COMP1100/1130 Assignment 1, Semester 1 2024
In this assignment, you will build a Haskell program that uses the CodeWorld API to draw colourful shapes on the screen.
This assignment is worth 10% of your final grade.
Deadlines:
Sunday April 14, 2024, at 11:00pm Canberra time sharp
Please note that Daylight Savings ends on Sunday 7 April.
Note: Late submissions will not be marked unless you have an
approved extension.
Extensions can only be applied for through
the Extension App.
Students with Education Access Plans still need to use this App.
Required Knowledge
If you have finished the Week 3 lab, you should be able to attempt Part A.
If you have finished the Week 4 lab, you should be able to attempt the majority of the assignment. Some parts require recursion over lists, which is covered in the Week 5 lab.
Overview of Tasks
| COMP1100 Marks | COMP1130 Marks | |
|---|---|---|
| Task 1: Helper Functions | 20 marks | 10 marks |
| Task 2: Rendering Shapes | 45 Marks | 40 Marks |
| Task 3: Handling Events | 35 Marks | 30 Marks |
| 1130 Extensions | - | 38 Marks |
| Report | 0 marks | 2 marks |
| Total | 100 marks | 120 marks |
Part A of the assignment requires you to complete Task 1.
Part B of the assignment requires you to complete all other assigned tasks.
As you complete each task (or even each function within a task),
once your code compiles without errors, you should commit and push your
work to git with a sensible commit message so your work is safely recorded.
Part A (Task 1) differs from the rest of the assignment in that you are able to ask for detailed help from tutors, peers, or other sources of assistance without this being considered plagiarism. This is to make sure that you have the help you need to get started on your first programming assignment. We recommend you attempt Part A on your own before asking for help, so that you have something to discuss. Help from tutors is best sought through drop-in consultations or the Ed Discussions forum because, during labs, tutors are usually busy helping with that week’s exercises. Usual academic misconduct standards apply to Part B of the assignment. You may also ask for help from tutors for this later parts, but the help you will receive will be focused on conceptual understanding rather than details of the tasks themselves.
Gitlab CI
You may notice a box in your repository on the Gitlab web view, looking something like this:

To help you ensure your submitted code is compiling, we’ve added a Continuous Integration (CI) script to this assignment. The CI will check that your code compiles, and run some tests on your code.
There’s three states your CI can be in:
- A red x, indicating your code is not compiling. This is something you should fix as soon as possible, as non-compiling code will not receive marks. You could fix this by either resolving the error, or by commenting out the erroring code to still submit it.
- An orange exclamation: this indicates that one of the tests in
tests/ShapesTest.hsisn’t passing. This is to be expected at the start of the assignment, but once you have finished Part A of the assignment, this might indicate an issue with your code. - A green tick: this indicates that your code is compiling, and all the tests are passing.
Getting Started
-
Fork the assignment repository and create a project for it in VSCodium, following the same steps as in Lab 2. The assignment repository is at https://gitlab.cecs.anu.edu.au/comp1100/2024s1/2024s1studentfiles/comp1100-2024s1-ass1.
-
Add our version of the repository as a remote called
upstream. This allows us to provide additional fixes in the case they are required. You do this by doing the following:- Go to the command palette in VSCode (or VSCodium) by pressing
Ctrl + Shift + p - Type
git remote - Click Git: Add Remote
- Enter
upstreaminto the box for the remote name - Put the following URL as the remote url:
https://gitlab.cecs.anu.edu.au/comp1100/2024s1/2024s1studentfiles/comp1100-2024s1-ass1.
- Go to the command palette in VSCode (or VSCodium) by pressing
Overview of the Repository
Most of your code will be written to Haskell files in the src/
directory. We are using the
Model-View-Controller
pattern to structure this assignment. Each file is called a module,
and we use modules to group related code together and separate
unrelated code.
Model.hs
The Model is a data type that describes the state of the running
program. The program will move to new states (new values of type
Model) in response to user actions, as defined by the
Controller.
View.hs
The View turns the Model into something that can be shown on the
screen; in this project, that is the CodeWorld Picture type.
Controller.hs
The Controller considers user input (and other events), along with the current Model, and uses that to decide what the new Model should be.
Other Files
-
tests/ShapesTest.hscontains some unit tests - simple checks that can help to verify that Part A of your program is working correctly. You are not required to write your own tests for this assignment, but you might find it useful to do so. COMP1130 students might need to modify these tests, as explained below. -
tests/Testing.hsis a small testing library used bytests/ShapesTest.hs. You are not required to understand it for this assignment. -
app/Main.hsties your functions together into the final program that runs. You are not required to understand it. -
comp1100-assignment1.cabaltells the cabal build tool how to build your assignment. You are not required to understand this file, and we will discuss how to use cabal below. -
Setup.hstells cabal that this is a normal package with no unusual build steps. Some complex packages (that we will not see in this course) need to put more complex code here. You are not required to understand it. -
.gitlab-ci.ymlandDockerfileare there to support the continuous integration. You are not required to understand them.
Overview of Cabal
cabal is the build tool for Haskell programs and libraries. It
provides several useful commands:
-
cabal v2-build: Compile your assignment. Note that because of some code provided for you by us you will see some warnings about unused variables; you will fix these warnings during Task B, so may ignore them for Task A. -
cabal v2-run shapes: Build your assignment (if necessary), and run theshapesprogram. Note that you will need to enterCtrl-Cin your terminal to exit the program. -
cabal v2-repl comp1100-assignment1: Run the GHCi interpreter over your project. This gives you the same ghci environment you use in labs, but with the assignment code loaded. (Aside: REPL is the name for interactive sessions like GHCi - it stands for read-eval-print loop. Many modern languages have REPLs.) -
cabal v2-test: Build and run the tests. Tests will abort on the first failure, or the first call to a function that is stillundefined.
You should execute these cabal commands in the top-level directory of your
project, e.g. ~/comp1100/assignments/Assignment1 (i.e., the directory you are in when you
launch the VSCodium Terminal for your project).
Interacting with the Program
You use a web browser to interact with the shapes program that you
launched with cabal v2-run shapes. Once you have completed the
assignment, it will respond to the following actions:
| Action | Effect |
|---|---|
Esc (key) |
Clear the canvas and all settings. |
1/2 (key) |
Display the sample images. |
C (key) |
Change colour (of shape to draw). |
T (key) |
Change tool (type of shape to draw). |
Backspace/Delete (key) |
Remove the last added shape. |
Spacebar (key) |
When drawing a polygon, finish drawing the polygon, adding it to the canvas. Otherwise, nothing. |
D (key) |
Print the current Model to the terminal (useful for testing). |
| Click-drag-release (mouse) | Used to draw various shapes. |
| Click (mouse) | Used to draw various shapes. |
Task 1: Helper Functions (COMP1100: 20 marks, COMP1130: 10 marks)
The easiest way to solve a large problem is often to break it apart
into smaller, easier problems. Programming is the same. In this task
you will write some helper functions that will make future tasks
easier. You can test your implementations by running cabal v2-test.
The functions you need to write for this task are:
switchColourinsrc/Controller.hs. This function should return the next colour in our set ofColourChoices:
| Argument | Result |
|---|---|
Red |
Green |
Green |
Blue |
Blue |
Cyan |
Cyan |
Magenta |
Magenta |
Yellow |
Yellow |
White |
White |
Black |
Black |
Red |
-
switchToolinsrc/Controller.hs. This function implements tool-switching, but should not changeToolif the user is halfway through an operation:-
If the tool is not holding a point (that is, a
PolyToolholding the empty list[], or aCuboidtool holding twoNothings, or any other tool holdingNothing), select the next tool in the following sequence:Line->Polygon->Rectangle->Circle->Triangle->Cuboid->Line. The resulting tool should not hold anyPoints -
If there is any
Pointstored in the given tool (because it is holding aJustvalue or the list inPolyToolis non-empty), return the argument unchanged.
-
-
toolToLabelinsrc/View.hs. This function should return instructions for the user on how to use eachTool, exactly according to the following table:
| Tool | Label |
|---|---|
LineTool |
"Line: click-drag-release" |
PolyTool |
"Polygon: click 3+ times, then spacebar" |
RectangleTool |
"Rectangle: click-drag-release for opposite corners" |
CircleTool |
"Circle: click-drag-release from centre to perimeter" |
TriangleTool |
"Triangle: click-drag-release from centre to corner" |
CuboidTool |
"Cuboid: click-drag-release for opposite corners, then click new top-left corner" |
Hint 1: At the time this assignment is released, the course will have only
briefly covered lists. You do not need to manipulate lists to write the Part A
functions. Use the blank pattern _ where you wish to ignore the input, and use
[] to match the empty list.
Hint 2: If anything is unclear, study the tests in test/ShapesTest.hs.
Part A ends here; Part B begins…
Task 2: Rendering Shapes (COMP1100: 45 marks, COMP1130: 40 marks)
In src/View.hs, modelToPicture converts your Model type into a
CodeWorld Picture, so that it can be displayed on the screen. It
currently does not work, because colourShapesToPicture is
undefined. In this task you will fill in that missing piece,
building up a function to convert the list of type [ShapeColour] from your
Model into a Picture. You can test these functions individually by
using cabal v2-repl comp1100-assignment1, using drawingOf to show
small pictures on the screen.
If you wanted to test functions from View.hs e.g. if your prompt shows *Controller>,
you can use ghci commands to load the specific module i.e. :l View
which should change the ghci prompt accordingly.
You can also test everything as a whole
by launching the program with cabal v2-run shapes and pressing the 1 and 2
keys to show the sample images. The functions you need to write for
this task are all in src/View.hs:
-
colourChoiceToColour: This function turns yourColourChoicetype from the Model into a CodeWorldColour. You should check the CodeWorld documentation for information on colours. Most of yourColourChoices should map toColours in the obvious way, e.g. fromBlacktoblack. HoweverCyanshould be an equal mix ofblueandgreen, andMagentashould be an equal mix ofblueandred. You will need to read the documentation to find out how to do this. -
shapeToPicture: This function turns yourShapetype into a CodeWorldPicture. You will need to consider the constructors forShapeindividually, and work out the best way to turn each one into aPicture. Here are some hints and instructions to help you along:-
CodeWorld has no function to draw a single line segment. It does have a function to draw a line made of multiple segments -
polyline. It also has no function for triangles and cuboids, but it does have functions that can draw these shapes. -
Polygons, Rectangles, Circles, and Triangles should be drawn as solid (filled)
Pictures. -
Many of CodeWorld’s functions draw individual shapes centred on the origin -
(0, 0). You will need to figure out how to slide (translate) the generatedPictureso it shows up where it is supposed to go. Drawing diagrams will help. Theabsfunction might also help - it computes the absolute value of its argument (i.e.,abs x == xifx >= 0, andabs x == - xotherwise). -
For
Rectangles, the twoPoints correspond to any opposite corners. -
For
Circles, the firstPointis the centre and the secondPointis on the perimeter. -
The
Triangleshould be equilateral (equal sides and angles). The firstPointshould be the centre (the point inside the Triangle equidistant from all three corners). The secondPointshould be one of the corners. -
A
Cuboidis a three dimensional rectangle (or in this case, a two dimensional representation of such a solid). The first twoPointscorrespond to opposite corners of one of the cuboid’s faces. This should be drawn as an unfilled (hollow) rectangle. The thirdPointis the top left corner of another rectangle which will have equal size and shape to the first one, which is also drawn unfilled. The illusion of three dimensions is created by a line connecting the top left corner of the first rectangle to the top left corner of the second, and so on for the other corners.
-
-
colourShapeToPicture: This function should render theShapeand colour it using theColourthat corresponds to the givenColourChoice. -
colourShapesToPicture: This function should turn everyShapeColourin a list into a singlePicture. You will need to recurse over the input list. If you have not yet completed Lab 5, you may want to work on other parts of the assignment and come back to this. In particular, we will treatShapeColoursto the left of the list as newer than those on the right of the list, and newer shapes should be drawn over the top of older ones. -
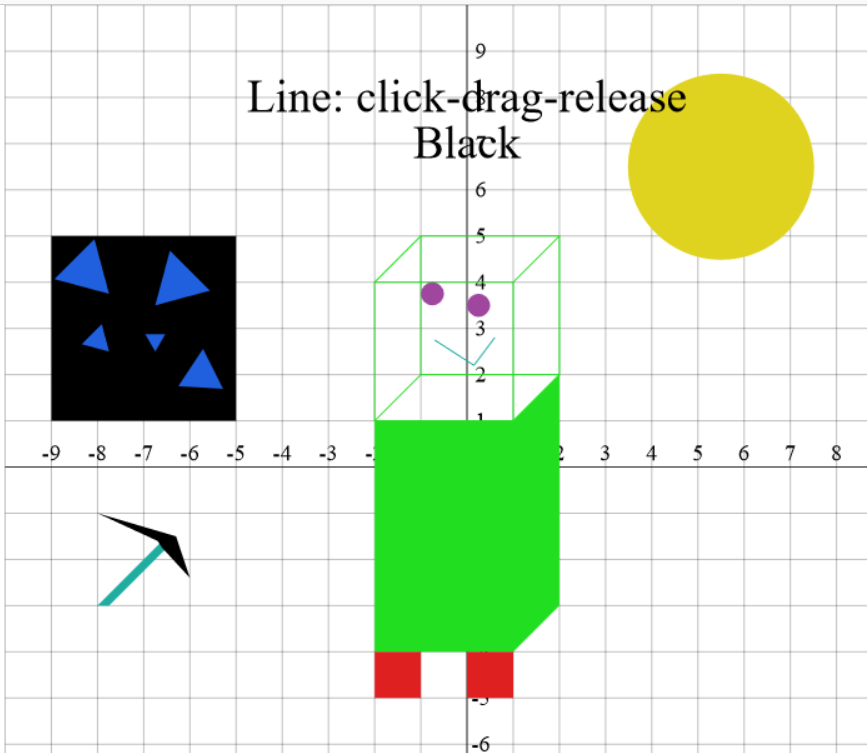
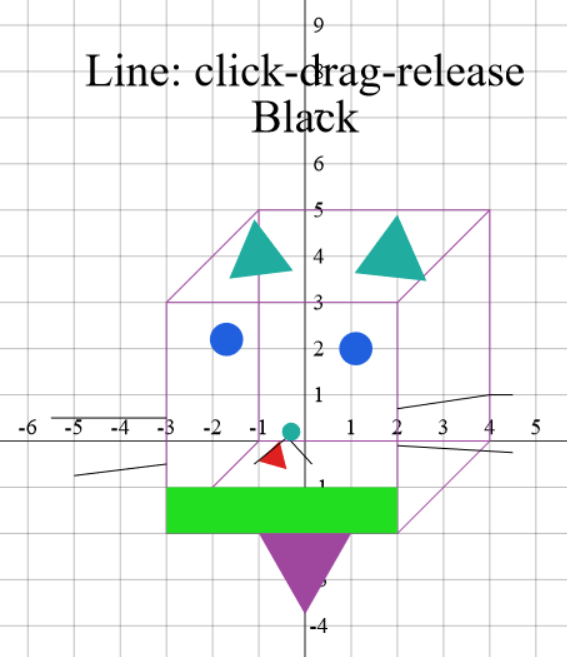
Here are the sample images (drawn by my children) for you to test your work against:
Task 3: Handling Events (COMP1100: 35 marks, COMP1130: 30 marks)
It is now time to tackle handleEvent in
src/Controller.hs. CodeWorld calls this function whenever something
interesting happens (like a key press, a pointer press, or a
pointer release). This function is called with two arguments:
- The
Eventthat just happened, and - The current
Modelat the time theEventhappened.
handleEvent then returns a new Model for the program to use moving
forward.
(Aside: Elm is a functional programming language that uses a similar pattern to build front-end web applications that are compiled to JavaScript.)
Let’s trace a simple interaction. The user, starting with a blank canvas, wants to draw a red line by clicking on the screen at coordinates \((1, 1)\) and releasing the mouse at coordinates \((2, 2)\). The Model will transition as follows, starting with the initial model:
Model [] Black (LineTool Nothing)
-
The user presses “C” to change the colour from black to red:
Model [] Red (LineTool Nothing) -
The user presses the mouse button at \((1, 1)\), changing the state to
Model [] (LineTool (Just (1.0,1.0))) Red -
The user releases the mouse button at \((2, 2)\), changing the state to
Model [(Line (1.0,1.0) (2.0,2.0),Red)] (LineTool Nothing) Red
Note that the Tool and the ColourChoice do not reset to the default values
after a shape has been drawn. However, the Maybe Point inside the tool
should revert to Nothing.
Task 3.1: Handling Mouse Input
CodeWorld provides a few different event constructors for mouse input,
but the ones we are interested in here are PointerPress for when the user
clicks, and PointerRelease for when the user releases the mouse
button.
When a PointerPress event arrives, you will need to store it in the
current Tool. For most shapes, you will store it
in a Maybe Point argument. For PolyTool, you will add it to
the list of vertices. For CuboidTool, you will need to consider whether it
is the first PointerPress, which starts defining the first rectangular face,
or the second PointerPress, which defines the top left of the opposite rectangular
face.
When a PointerRelease event arrives, for most shapes, this means the end of a
click-drag-release action, so you should construct the appropriate
shape and add it to the [Shape] in the Model. You should also
remove the starting point from the current Tool, so that future
shapes draw properly too. For PolyTool we can ignore PointerReleases,
as we will be finishing polygons using the spacebar in Task 3.2. For CuboidTool
we need to consider which part of the task of drawing the Cuboid we are performing.
Once you have finished this task for normal input, you may also want to consider
how your program will behave on unexpected input. For example, what should your program
do if it receives two consecutive PointerPress inputs without a PointerRelease between them?
Task 3.2: Handling Key Presses
To handle keyboard input, CodeWorld provides a KeyPress event. This
is already present in the assignment skeleton, because we have
implemented some keyboard functionality already. In the “Interacting with the Program” section, we listed the full set of keyboard commands that
your program will respond to. You need to implement the missing
functionality for these keys:
| Key | Effect |
|---|---|
C |
Change colour (of shape to draw) |
T |
Change tool (type of shape to draw) |
Backspace/Delete |
Remove the last added shape |
Spacebar |
Finish drawing a polygon, adding it to the canvas. |
If you have made it this far, you should not need to write a lot of code to implement these. A few hints:
- Think back to Task 1.
Backspace/Deleteshould delete the newest shape, which is on the left of the list.Backspace/Deletewith no shapes drawn should not crash the program…- … nor should any other unexpected input. Try to test some unexpected cases.
Task 4: 1130 Extensions (COMP1130 Only: 38 Marks)
COMP1130 students will need to complete two of the four extensions from the pool below. If you attempt more than two, you must indicate in your report which two you wish to be marked. Otherwise, we will mark the the first extensions you have completed in the order they appear in the code.
If you change the behaviour of colour or tool switching, or tool labelling, from Part A,
you must adjust the tests in tests/ShapesTest.hs so that they continue to pass.
Note: Extension functionality must be executed through the codeworld API just like
the rest of the assignment. Interactions should be received through the handleEvent
function, which you will need to modify. If you need to add arguments to any existing
type, please do so after the existing ones, e.g.: data Model = Model [ColourShape] ColourChoice Tool YourArgument1 YourArgument2 ...
Task 4.1: Redefining Colours
You have drawn your picture, but then decide that the green you are using is too bright!
Implement a new tool which allows users to change the definition of the current
ColourChoice by keyboard input, adjusting its
hue, saturation, and lightness. This
should effect all current shapes using this ColourChoice, and all future such uses
(until you press Esc to revert all changes, or shut the program).
Task 4.2: Redo
When you press Esc or Backspace / Delete to remove all or part of your picture, you
sometimes regret it! Implement a keypress redo function. You will need to keep a list of
undone shapes so that you can redo them one by one. Your whole picture should appear with
one press of the redo command in the Esc case. When you draw any shape on your canvas,
you should empty your redo list.
Task 4.3: Instant replay
You have finished your masterpiece and want to relive the process. Implement an animation that, starting with a blank canvas, adds your shapes one by one at a speed that allows you to see the steps of your creation. You should not be able to interact with the program while the animation plays, but should be able to do so again once it finishes. You may ignore any history of undoing and redoing for this task and simply regard an undone shape as never having been drawn.
Task 4.4: Preview
It is not satisfying to draw shapes by clicking around a blank screen, with no visual feedback until you are finished. Implement shape previewing for all shapes, so that you can see (for example) the line so far after your pointer press but before your pointer release.
Report (COMP1100: 0 marks, COMP1130 2 marks)
Your report, if you submit one (see below) must be in PDF format, located at the root of
your assignment repository on GitLab and named Report.pdf. Otherwise, it
may not be noticed by your marker, or might attract a mark penalty. You should
double-check on GitLab that the report has been added to your repository correctly.
No formal word limit is applied for reports but, given the instructions below,
it should be very short.
The report must begin with the following items:
- Your name
- Your university ID
- Your laboratory time and tutor
If you are a COMP1100 student, you need to add a short report only if you need to cite any sources that helped with the completion of your assignment. In particular, use these instructions if you need to acknowledge the use of generative AI.
If you are a COMP1130 student, you must add a short report.
This will explain how to use the functionality implemented in your extensions,
for example which keys to press.
The report will also explain any changes you made to the structure of the code that
was provided to you, for example if you changed the definition of Model.
Your comments should be brief and factual, and you do not need to justify your
coding decisions.
You should also cite sources where appropriate as per the instructions above
for COMP1100 students.
Communicating
Do not post your code publicly, even for Part A, on Ed Discussions or via any other means. Posts on Ed Discussions can trigger emails to students, depending on how they have configured their notifications, so if by mistake you post your code publicly, others will have access to your code and you may be held responsible for plagiarism.
Once again, and we cannot stress this enough: do not post your code publicly . If you need help with your code, post it privately to the instructors.
When brainstorming with your friends, do not view each others’ code for anything other than Part A. There might be pressure from your friends, but this is for both your and their benefit. Anything that hints at plagiarism will be investigated and there may be serious consequences.
Sharing concepts and sketches is perfectly fine, but sharing should stop before you risk handing in suspiciously similar solutions.
The use of generative AI tools (e.g. ChatGPT) is permitted in this course, with appropriate citation.
Course staff will not look at assignment code unless it is posted privately in Ed Discussions, or shared in a drop-in consultation.
Course staff will typically give assignment assistance by asking questions, directing you to relevant exercises from the labs, or definitions and examples from the lectures. They will not give direct instructions on how to edit your Part B code, but they will give you more generous help for questions related to Part A.
Submission Checklist
Once you have finished your assignment, and preferably 24 hours prior to the deadline, you should make sure that:
- You have fully read and understand the entire assignment specification.
- Your work has been pushed to GitLab. You should check this using your browser by viewing your repository at https://gitlab.cecs.anu.edu.au/uXXXXXXX/comp1100/2024s1/2024s1studentfiles/comp1100-2024s1-ass1 , where XXXXXXX is replaced by your university ID. It is your responsibility to confirm that your submission, including for your report, has been successful.
- Your program compiles and runs, including the
cabal v2-testtest suite. - Your program works on the lab machines - if the program does not work on the lab machines, it might fail tests used by the instructors.
- You have proof-read and spell-checked your report.
- The report, if submitted, is in PDF format, located at the root of your project on
GitLab and named
Report.pdf. That capitalRis important - Linux uses a case-sensitive file system. Otherwise, it may not be marked. Check this on Gitlab as in some situations operating systems may change the formatting of filenames.