Digital media festivals like Canberra’s Enlighten Festival and Vivid Sydney use huge projectors and LED arrays to create a city-sized light (and sound) show for people to enjoy. Your task in this assignment is to create a micro light show on your micro:bit!
You are going to write an ARM assembly program that uses the LED array on your microbit to create a changing light experience that engages a viewer. The application for your show is a demonstration of your microbit’s LED array and what you can achieve with it!
The assignment builds upon what you have learned in labs 6 - 10:
- Lab 7: Basic Machine Code
- Lab 8: Blinky
- Lab 9: Functions, Data Structures and Stack
- Lab 10 & 11: Interrupts and Wrapping Up
If you have not completed the tasks in the above labs or do not understand the content, we strongly recommend that you first complete the labs and then start the assignment.
Outline#
- Deadline: 26 May 2023, 11:59 pm
- Assignment template: link
- Specification: keep reading 🙂
- Weighting: 25%
- Marked out of: _ / 100
Rules and Policies#
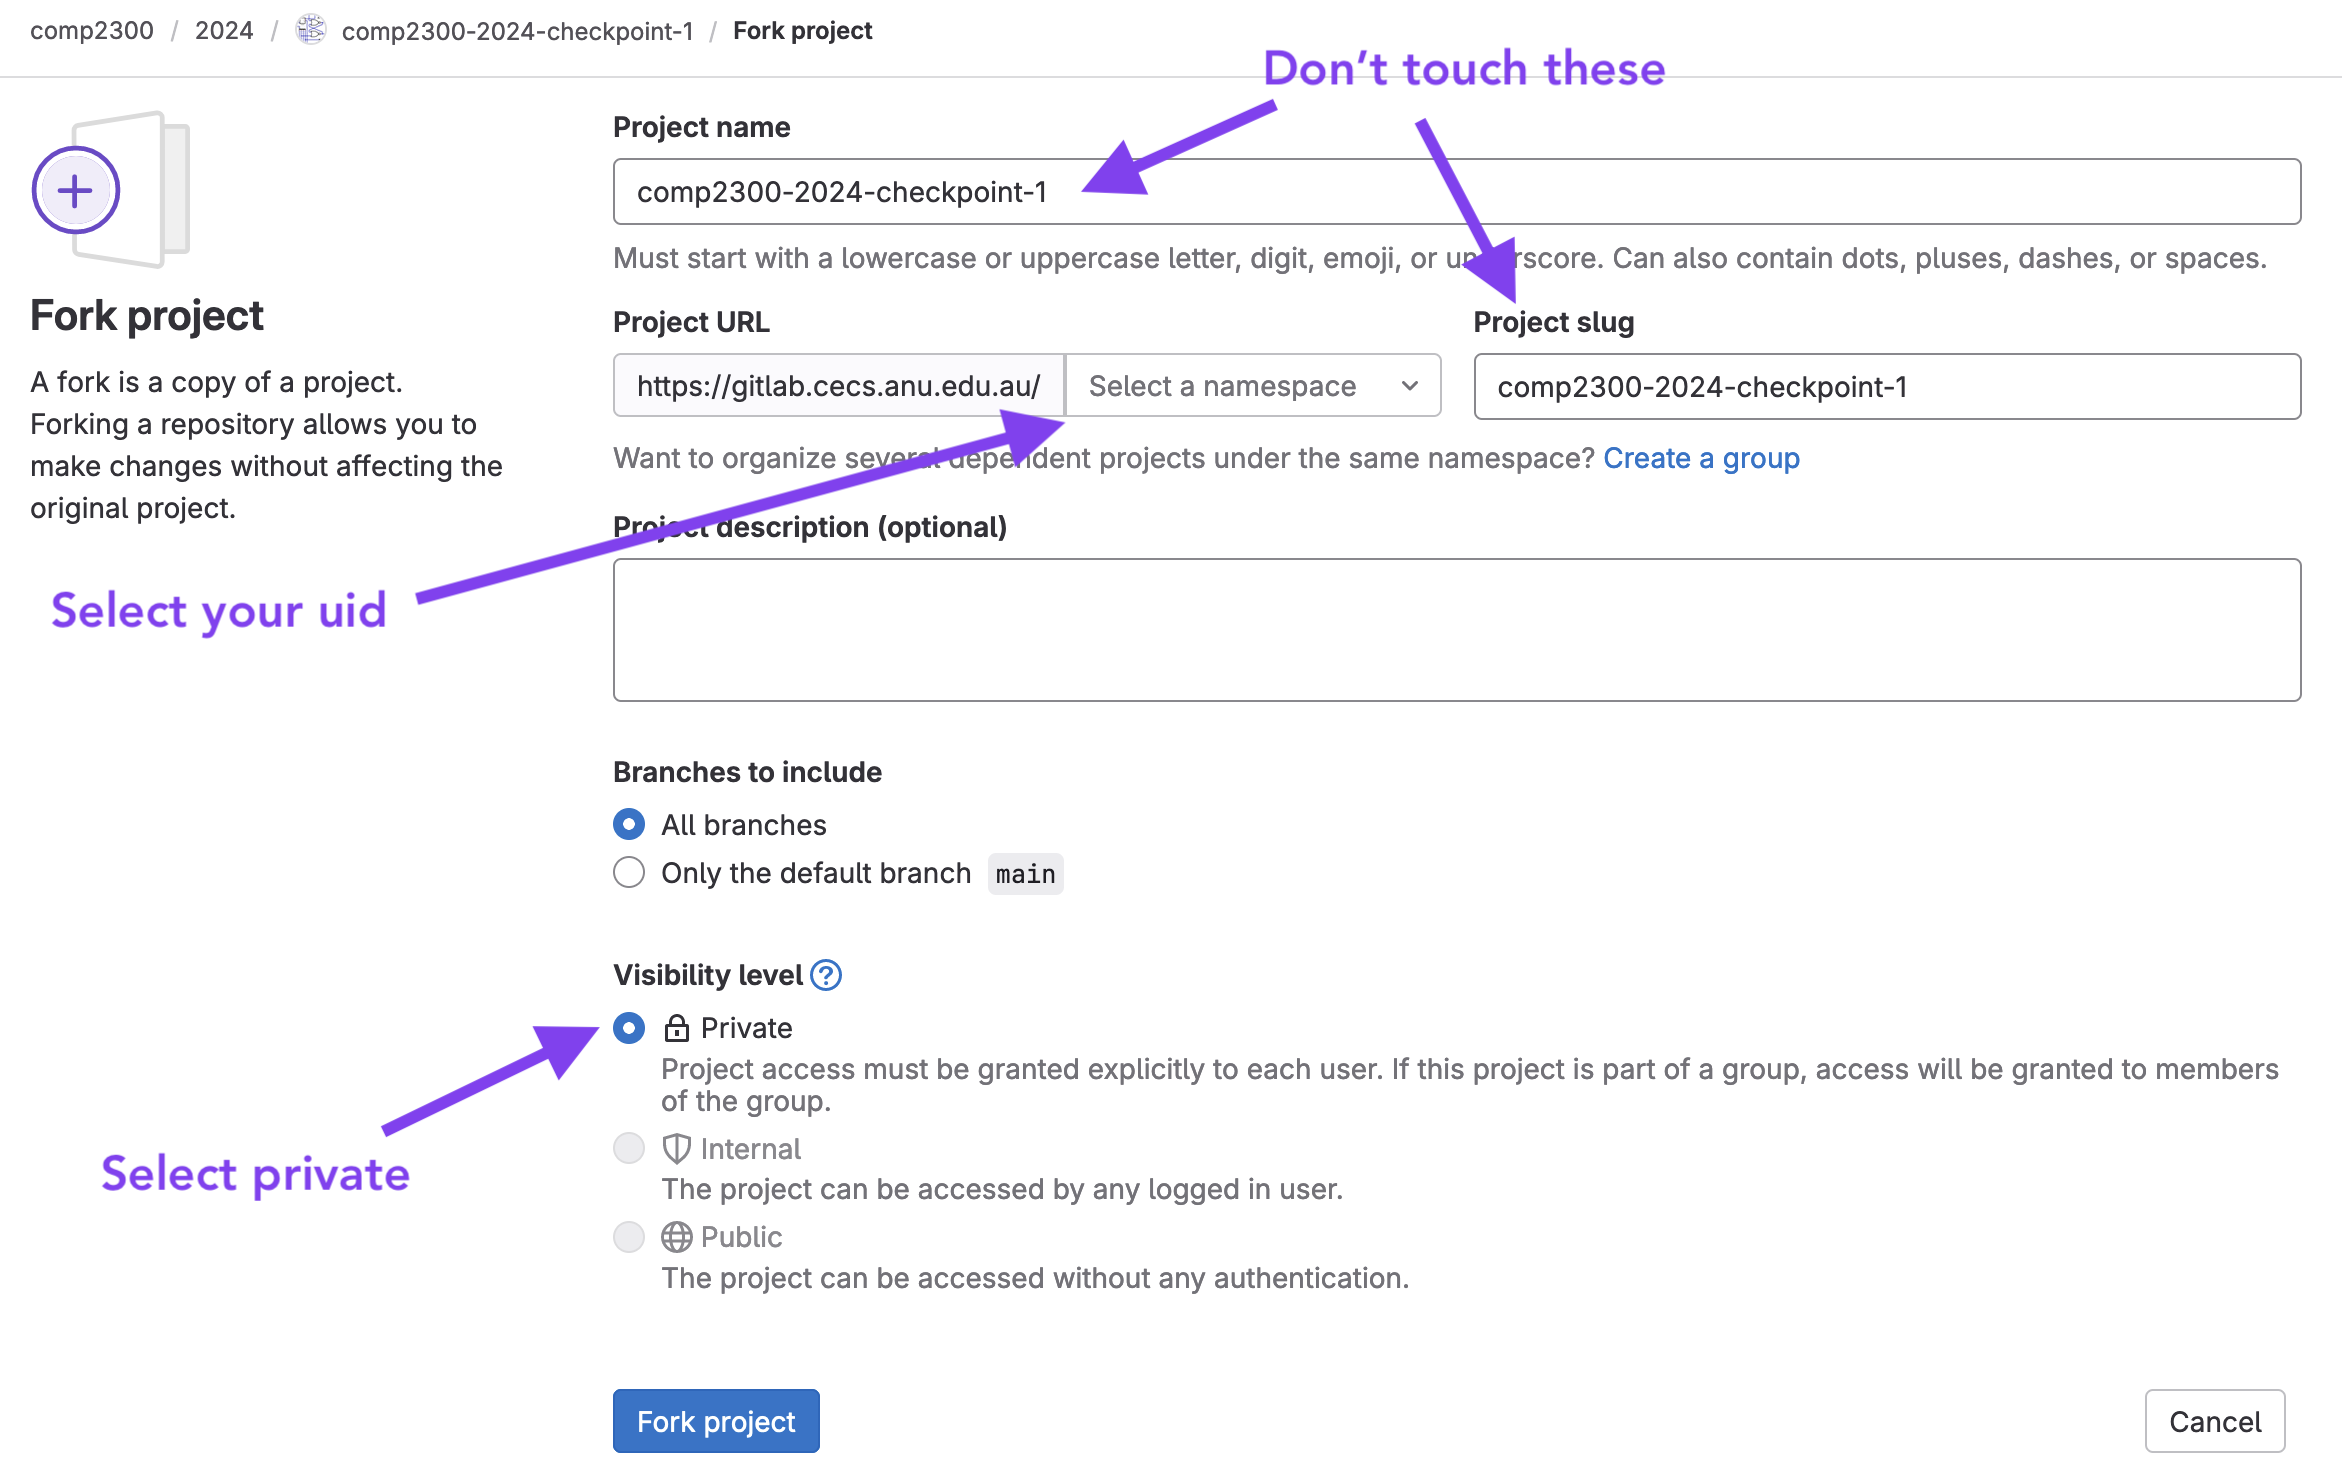
- this is an individual assessment task, ensure you fork your repo as private
- you may re-use designs / files from your labs
- it is your responsibility to ensure any additional files are included in the repo and pushed to gitlab correctly
- additional files should be left under the
src/directory - additional files should not contain spaces in their name
- eg:
src/example_file.Sis okay,src/example file.Sis not
- eg:
- you may use the included library files if you wish
- if you want to make changes to the library files, then we suggest you instead create
a new file under
src/and copy what you need there and modify it; this way we won’t miss extra work that you’re doing
- if you want to make changes to the library files, then we suggest you instead create
a new file under
- your submission must be in ARM assembly, no C or other language is permitted
- late submission is not permitted without an extension
Specification#
Here’s a technical specificiation for your assignment.
Your program:
- must be written in ARMv7 assembly using the assignment template (link)
- must use the LEDs to create a light show that changes over time
- should use scanning on the LEDs to enable displaying of any 5x5 image
- the light show must sufficiently demonstrate the techincal capabilities of your implementation
- must never stop (it can repeat or loop)
- must work when the microbit is powered over USB but not connected to a computer (that is, it works after you upload it and plug into a USB charger)
- should use memory (data structures) to create a changing and easily modifiable light show
- must include the submission of a <1000 words design document describing:
-
what your design is (and how it meets the assignment specification)
- this is the code design, not what light show you’re displaying
- how you accomplished it
- why your design choices were appropriate for the task
-
what your design is (and how it meets the assignment specification)
Note that we say < 1000 words. If you feel you have addressed all of what has been asked of you in less words, please don’t feel the need to hit 1000 words. You will end up writing a worse report by reducing the conciseness of it.
Deliverables#
To successfully complete this assignment, the following files must be submitted:
-
src/main.Scontaining your implementation -
src/____.Sany additional files you wish to include or split your implementation across (optional) -
src/____-lib.Sany files that contain alternative or modified versions of the functions found inlib/___.S(optional) -
statement-of-originality.mdcontaining your name, uid and a list of references for any work that is not your own -
report.mdcontaining your <1000 word design document-
optional
assets/*containing any images you want to add in your document
-
optional
Marking Criteria#
Your assignment will be evaluated on the following criteria:
- Sophistication of your implementation in ARM-v7 assembly language (50/100)
- Sophistication of your design and how it meets the assignment specification (25/100)
- Sophistication of analysis and evaluation of why your implementation is correct and appropriate for your design and what limitations it might have (25/100)
Item 1 will be evaluated primarily through your program code. Items 2 and 3 will be evaluated through your report.md and the quality of the writing within.
For more information on items 2 and 3, read the design document guide.
For item 1, you can consider the following to be a part of assessing the sophistication of your program:
- your use of memory for encoding your light show
- how easy it is to change what is displaying (a high quality submission should require little / no changes to the code to change what is being displayed)
- your level of extension beyond a basic scanning display
- your style and adherence to assembly programming standards
- includes things like following calling convention and good commenting
- for more information, check the assembly style guide
Ideas For Implementation#
This list is non-exhaustive and is only provided as a guide to give you an idea of what we’re expecting the difficulty of the grade ranges to look like.
Each point is an example of a submission, meaning that you only have to do one point from that grade range (unless otherwise specified). However, the more featured your submission is, the higher the mark. In saying that though, a single high quality feature is probably better than a few low-quality ones.
“Good use of memory”
This means that the program is easily changeable and controllable by modifying data structures in memory, without, or with very little, modification of the code and then uploading it to the board again to view those changes.
These are just provided as a guide and as mentioned, other aspects such as the quality of the report, quality of the programming, etc. also factor in to the grade. This means that just because you have successfully implemented something in grade range X, does not mean that you are guaranteed a grade in range X.
Pass (50 - 59%)#
- Moving Display, Non-scanned, Good use of memory
- Moving Display, Scanned, Poor use of memory
Credit (60 - 69%)#
- Moving Display, Scanned, Good use of memory
Distinction (70 - 79%)#
Everything from Credit level and at least one of:
- Basic PWM (Pulse Width Modulation)
- eg: screen level brightness (all LEDs)
- Generative or changing light display using the hardware Random Number Generator
- Using the timer interrupt(s) as an integral part of your display
High Distinction (80% - 100%)#
An HD is a mark of 80+, not 100. Just because you do something in this range, doesn’t mean that you can expect full marks.
Everything from Credit level and at least one of:
- Complex PWM (Pulse Width Modulation)
- eg: per-LED brightness control that can be programmed with memory and change with the display
- Using multiple hardware interrupts (buttons) to control and change what is being displayed
- External peripherals such as gyroscope, compass, etc, (warning: VERY DIFFICULT, consult with your tutor first)
Submission#
Submission is through GitLab, the most recently pushed commit of your fork of the assignment template before the deadline is taken to be your assignment submission.
Getting Started#
- read this assessment page completely
- fork and clone the assessment template
- ensure you fork your project as private
- do NOT change the name or path of the repo, or it may get missed by our software
- plan your assignment and what your are going to implement
- think of how the data structures are going to look and work
- think of how the program is going to fit together
- read the microbit tips and tricks page
- work on each part, debugging, testing, committing and pushing as you go
- make a mistake or get stuck, then ask your tutor in your lab or a good question on the course forum.
Completion Checklist#
- you have submitted the files listed above
- you have wrote all of your code using good practice
- you have saved, committed and pushed your assembly files to gitlab
- you have filled out, committed, and pushed your
statement-of-originality.md - you have filled out, committed, and pushed your
report.md - you have checked the report pdf artifact on gitlab to ensure it is correct
- you have checked the gitlab ci tests and they are passing
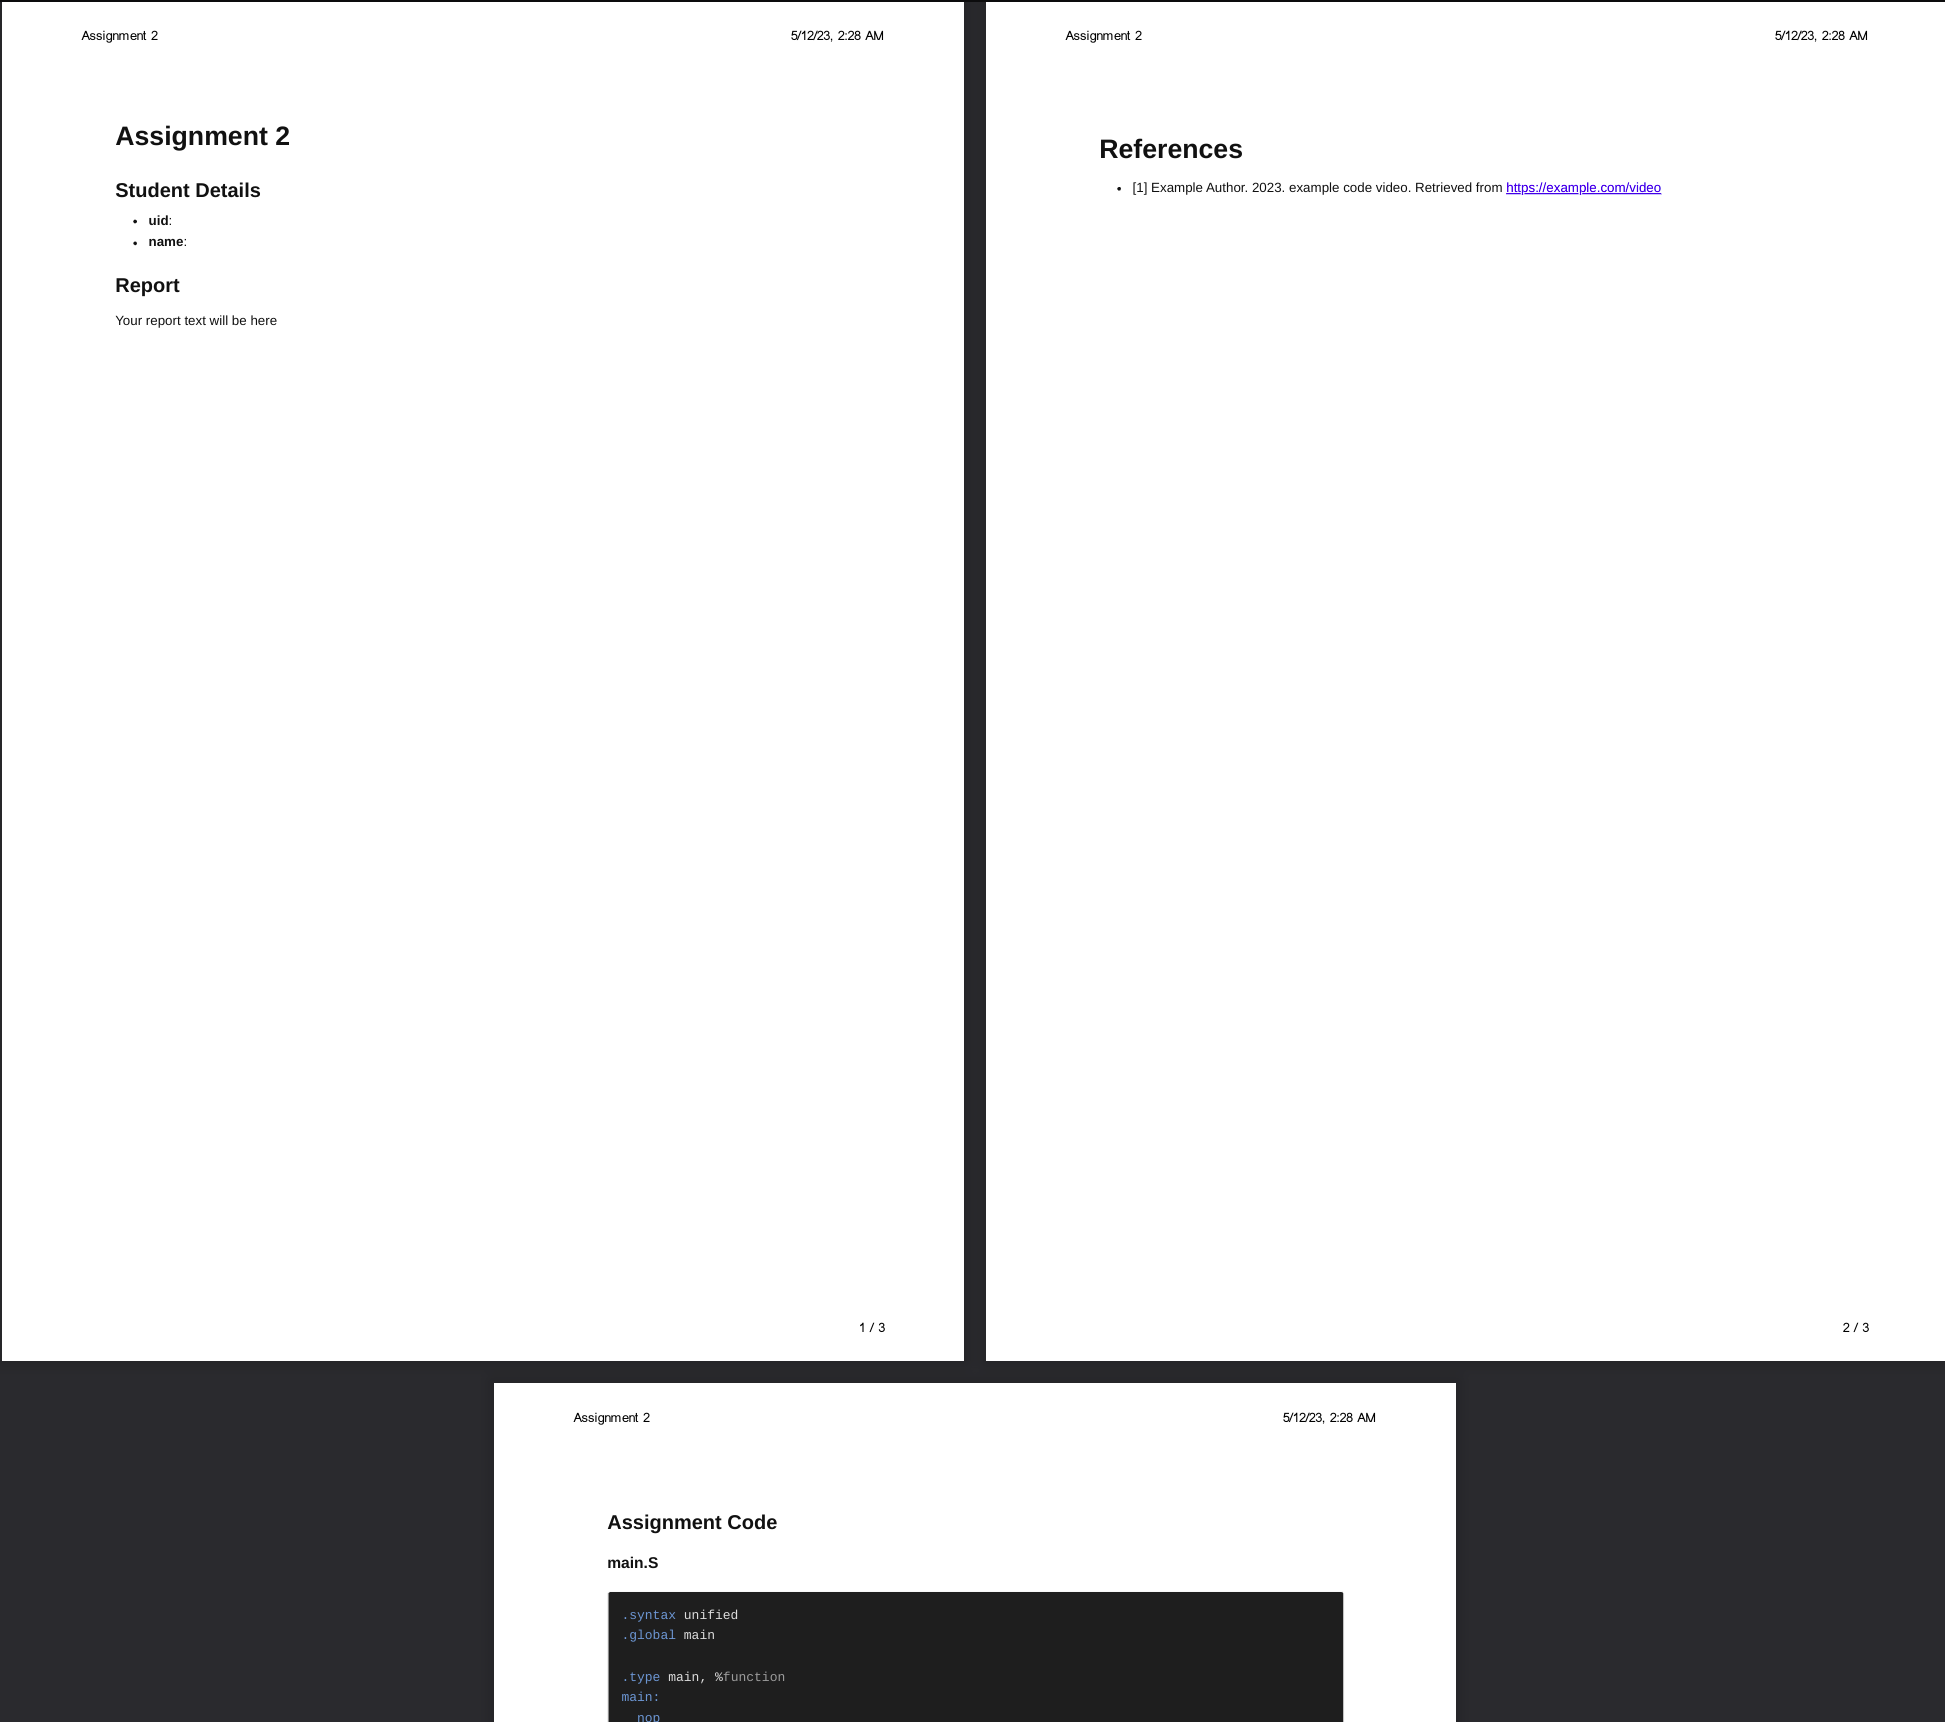
Report pdf Artifact#
Your repo will be packaged into a report pdf for marking purposes. As such it is important that you
see what the result of the pdf job is and make sure the output makes sense.
It will:
- take your name and uid from the
statement-of-originality.md - take your report from
report.md - take references from the
statement-of-originality.md - take the code from all of your
src/____.Sfiles - combine all of them into a single pdf
To view the pdf, first click the ci icon on your most recent commit (as above), then click on the
pdf job.
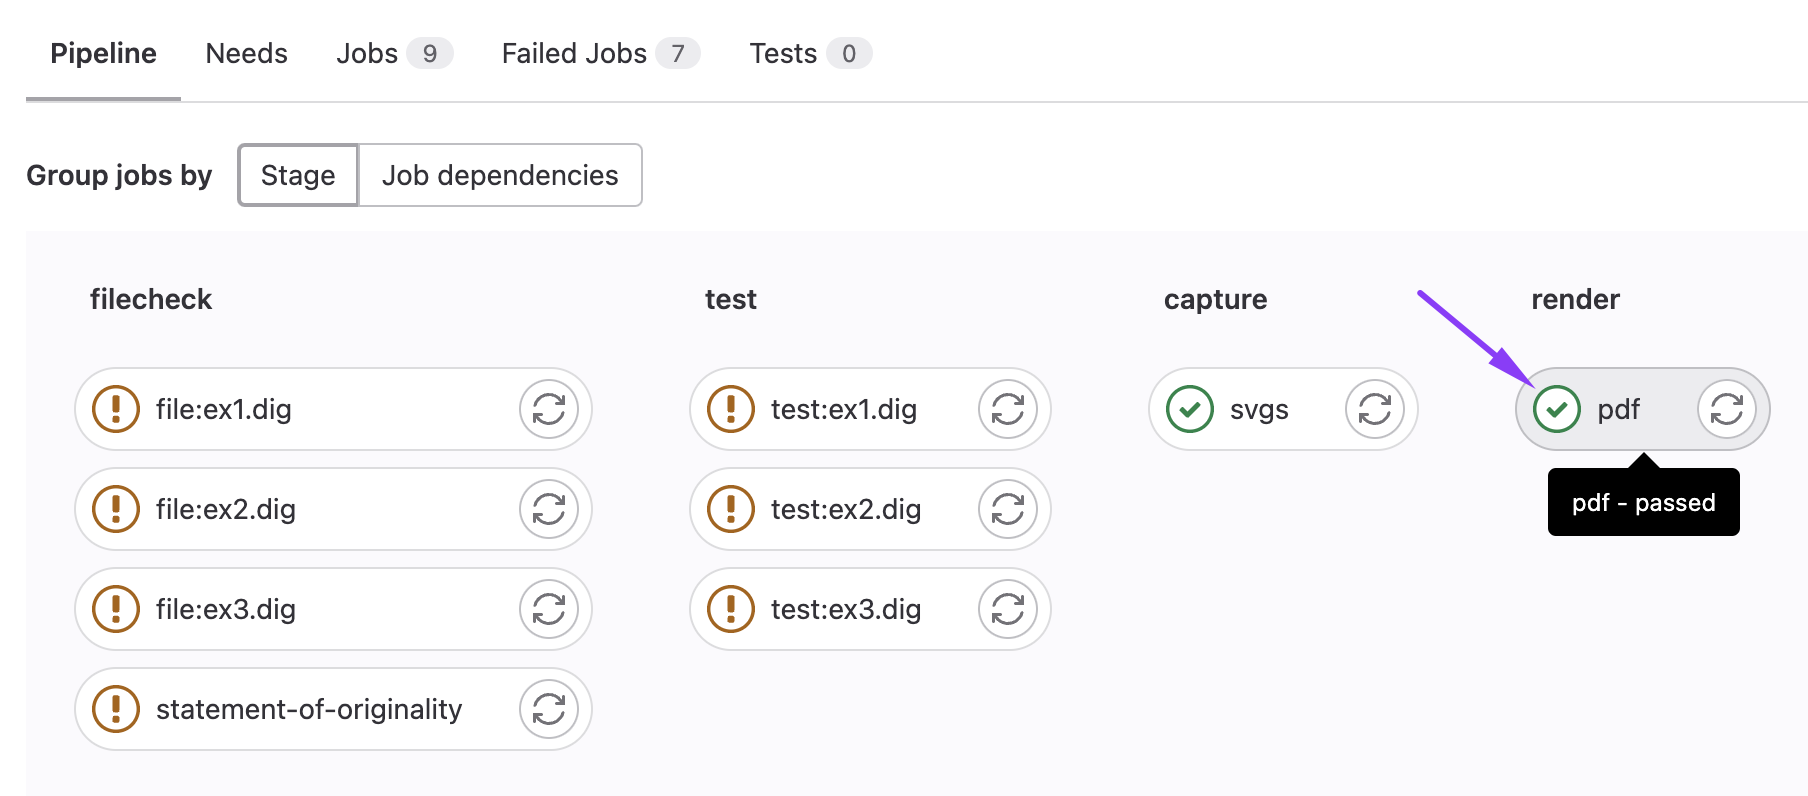
Then, you’ll be taken to the job page, where you should see a “Job Artifacts” section, click on the Download button.
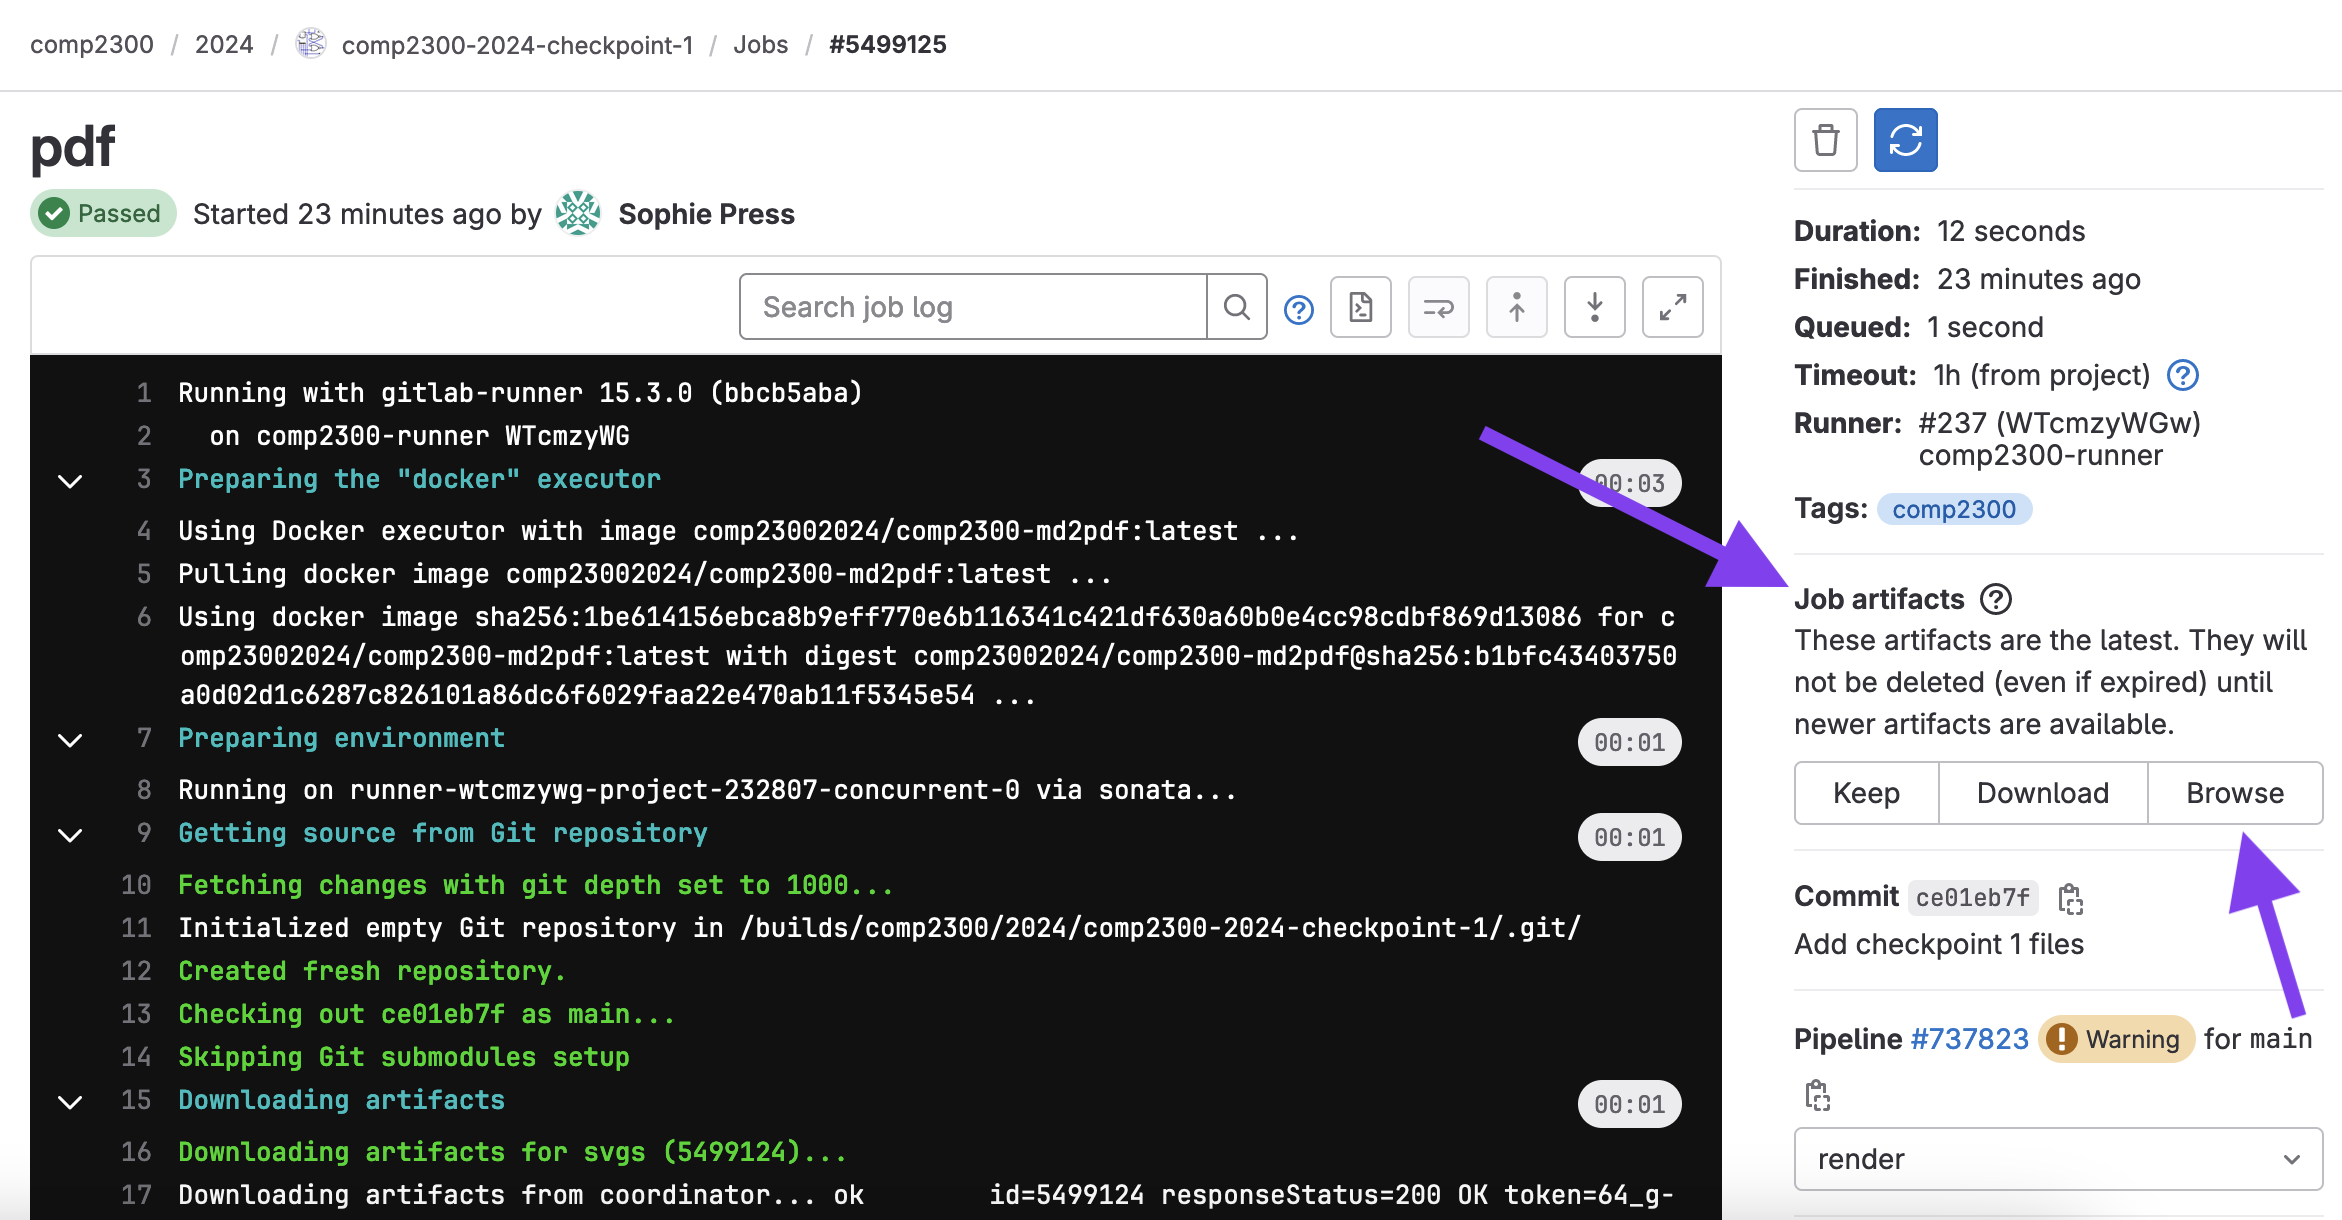
This will download a zip file containing your pdf. Which should look something like this.
There is more general info about gitlab ci here.
FAQ#
Can I make a game? Like snake?#
Yes! As long as the display is still based off the game state which is stored in memory. And you will still need to use scanning on the display. But otherwise this is a good example of what you can do by combining buttons and things like the Random Number Generator.
What does scanning mean?#
There is a lab exercise for this.
What does sufficiently demonstrate the techincal capabilities of your implementation mean?#
This means that your light show, what is actually being displayed on the LEDs, doesn’t need to be long or visually complex. But, it needs to be able to demonstrate what you have implemented.
However, if you’re aiming for a grade of Distinction or High Distinction then the extension will need to be paired with the show in some form of significant way. This means that if you were adding a button for example, then doing something with state where the buttons have some kind of impact would be required, eg: scrolling around a map, controlling a game, exploring a menu (think gameboy menu here).
Let’s use an example: a 7 second loop of a beating heart
Below are some examples of implementation quality and how this loop could be used to demonstrate the capability:
- Moving Display, Scanned, Good use of memory
- This would already be sufficient, assuming that you have encoded the display in memory
- Generative or changing light display using the hardware Random Number Generator
- You modify the beating heart loop to change the size and shape of the heart when it beats based on the result from the random number generator (> 5 variations)
- You make the heart transition through different states (beating, broken, stopped, irregular) based on the result from the random number generator
- Complex PWM (Pulse Width Modulation)
- You modify the beating heart loop to also include a change in brightness for the LEDs when the heart beats, so that the outer LEDs are dimmer, but grow in brightness with the beat
If you’re unsure then post privately on the forum and ask!
Do I have to write a design document?#
Yes! 50% of the marks for this assignment are evaluated through the design document. If you don’t write one you will get zero for that half of the assignment.
How do I write a design document?#
Have a look at the design document page for advice.
Make sure you are answering the questions in the specification and stay within the word limit.
Writing a clear and concise document is a challenge, but we believe in you.
My program doesn’t work, can I email you for help?#
Sorry, you won’t get help over email or Teams. We provide a course forum which is the only way we are able to help.
Forum posts related to your assignment submission must be “private to instructors” (as for any individual assessment task).
It’s [5 minutes, 60 minutes, 12 hours] before the deadline and my CI Jobs aren’t finishing!#
Unfortunately on the day that an assignment is due, when many students are pushing updates at once, the CI servers can’t keep up. You may not see your CI jobs finish before the deadline. You will just have to manually check that your files have been submitted correctly.
The best way to avoid this issue is to start early and finish early 😇
If there’s any issues with your git repository after the deadline. Please let us know (after the deadline) through a private forum post and there may be something we can do.
How do I know my assessment has been submitted?#
If:
- the files in your fork of the assessment are correct (i.e., the files you intend to submit) when checking on the gitlab website
- the time is before the deadline
then your assessment has been submitted (well done!).
Please don’t ask us to “check”, we would be just doing exactly the same thing as the above steps which you can do yourself.