In this assessment you are going to complete a number of assembly files to a required spec, much like what you have already been doing in the labs (from week 7).
To complete this assessment you should have completed the week 7, week 8 and week 9 labs as well as watched the week 6, week 7 and week 8 lectures.
Outline#
- Deadline: 10 May 2023, 10:00 am
- Assessment template: link
- Specification: keep reading 🙂
- Weighting: 5%
- Marked out of: _ / 5
Rules and Policies#
- this is an individual assessment task, ensure you fork your repo as private
- you may re-use designs / files from your labs
- it is your responsibility to ensure any additional files are included in the repo and pushed to gitlab correctly
- additional files should be left under the
src/directory, not undertasks/
- additional files should be left under the
- your main solution still needs to be in the provided files (
tasks/)- you should develop your code in
src/main.Sand then copy theentirefile to the correspondingtasks/task-X.Sfile when completed
- you should develop your code in
- all submitted files should abide by the style guidelines
- it is your responsibility to ensure any additional files are included in the repo and pushed to gitlab correctly
- late submission is not permitted without an extension
- your submission must be in ARM assembly, no C or other language is permitted
- you may not modify the existing functions and code, only enter code in the areas indicated by comments
- your solutions must perform the calculations using assembly programming, simply putting answers in will not result in any marks, even if the CI is passing
The CI uses the emulator for testing your solutions, unfortunately the runners don’t have microbits attached to them. What this means for you is that you should test your code on the emulator as well as the microbit. You can do this with the emulator option under the debug list.
The emulator is very close to the microbit but doesn’t support all instructions. You can view the supported instructions by issuing the following through the VSCode command pallette:
COMP2300: View Emulator Supported Instructions
If your code uses an unsupported instruction then the CI will fail. As such it’s easier for everyone involved if you stick to the supported instructions. If you really feel like you need to use an unsupported instruction then make a private post on the forum and we can discuss it.
Specification#
The following are the tasks for the checkpoint. They often involve interacting with memory, where you may want to verify your
answers using the command pallette: COMP2300: View Memory (New Tab).
Here is the conversion widget if you need it:
| Decimal | |
| Hex | |
| Binary |
Task 1 - Arrays and Loops (1 Mark)#
In this exercise, you will use a loop to calculate some statistics about an array of numbers and store that result back in memory.
Copy the code below into your src/main.S file.
.syntax unified
.global main

.type main, %function
main:
  bl start_check @ Don't remove this line!

  @ ----------------------------------------
  @ --- Insert exercise code between the ---

  @ Your code goes here!

  @ ----------------------------------------

  bl end_check @ Don't remove this line!

@ infinite catch loop
inf_loop:
  nop
  b inf_loop
.size main, .-main

@ -------------------------------------------
@ Insert any functions you wish to write here

@ -------------------------------------------

.data
elements:
  .word 25, 17, 22, 11, 13, 24, 5, 0, -3, 9, 8, 20, 3, 1, 22, 19, 16, 4
elements_end:
  .word 0 @ The address of the end of the elements list
elements_data:
  @ length, sum, average
  .word 0, 0, 0

.text
.global start_check
.type start_check, %function
start_check:
  ldr r0, =elements
  ldr r1, =elements_end
  ldr r2, =elements_data
  mov r0, 0
  mov r1, 0
  mov r2, 0
  bx lr
.size start_check, .-start_check


.global end_check
.type end_check, %function
end_check:
  nop
  nop
  bx lr
.size end_check, .-end_check
You have been presented with an array of numbers (elements), your task is to write
a loop to calculate the following, and store them back at elements_data upon finishing.
| Value to Calculate | Storage Location |
|---|---|
Length of elements
|
elements_data + 0 |
Sum of elements
|
elements_data + 4 |
Mean (average) of elements
|
elements_data + 8 |
Complete the code in src/main.S according to the above specification and then copy the
entire file to tasks/task-1.S, save, add, commit and push.
Task 2 - 7-Segment Displays (1.5 Marks)#
In this exercise, you will use the load-twiddle-store pattern to interact with a mock memory mapped IO data structure, similar to how the LED grid works on the microbit.
Copy the code below into your src/main.S file.
.syntax unified
.global main

.type main, %function
main:
  bl start_check @ Don't remove this line!

  @ -----------------------------------------
  @ --- Insert code for transition 1 here ---

  @ Your code goes here!

  @ -----------------------------------------

  bl check_transition @ This will overwrite scratch registers!

  @ -----------------------------------------
  @ --- Insert code for transition 2 here ---

  @ Your code goes here!

  @ -----------------------------------------

  bl end_check @ Don't remove this line!

@ infinite catch loop
inf_loop:
  nop
  b inf_loop
.size main, .-main

@ -------------------------------------------
@ Insert any functions you wish to write here

@ -------------------------------------------

.data
direction:
  .word 0xEF3F4F7F
  .word 0xFF006057
output:
  .word 0xFD3F5FFF
  .word 0x0000C08F

.text
.global start_check
.type start_check, %function
start_check:
  ldr r0, =direction
  ldr r2, =output
  ldr r1, [r0]
  ldr r0, [r0, 4]
  ldr r3, [r2]
  ldr r2, [r2, 4]
  and r0, r2
  and r1, r3
start_check_p1:
  nop
  mov r0, 0
  mov r1, 0
  mov r2, 0
  mov r3, 0
  bx lr
.size start_check, .-start_check

.global check_transition
.type check_transition, %function
check_transition:
  ldr r0, =direction
  ldr r2, =output
  ldr r1, [r0]
  ldr r0, [r0, 4]
  ldr r3, [r2]
  ldr r2, [r2, 4]
  and r0, r2
  and r1, r3
check_transition_p1:
  nop
  mov r0, 0
  mov r1, 0
  mov r2, 0
  mov r3, 0
  bx lr
.size check_transition, .-check_transition

.global end_check
.type end_check, %function
end_check:
  ldr r0, =direction
  ldr r2, =output
  ldr r1, [r0]
  ldr r0, [r0, 4]
  ldr r3, [r2]
  ldr r2, [r2, 4]
  and r0, r2
  and r1, r3
end_check_p1:
  nop
  mov r0, 0
  mov r1, 0
  mov r2, 0
  mov r3, 0
  bx lr
.size end_check, .-end_check
Here, instead of the LED grid, we have 8 Seven-segment displays. Each of these displays contain 8 LEDs (denoted by the letters in the below image) which are connected to pins which are mapped to an 8-bit block of a memory address.


If the images are too small for you, click them to open larger versions.
Each pin has 2 points of control:
-
Direction: configures the pin to be an output (
1) or an input (0)- Direction = output: the pin will respond to the Output control (ie. the LED can be turned on and off)
- Direction = input: the pin will not respond to Output control (ie. the LED will always be off)
- You can get the base address of Direction with the following instruction:
ldr rX, =direction(whererXis any register you wish to use)
-
Output: controls the pin to be high (
1) or low (0) if the Direction is set to output- Output = high: the LED will illuminate
- Output = low: the LED will be off
- You can get the base address of Output with the following instruction:
ldr rX, =output(whererXis any register you wish to use)
Your task is to transition the display 2 times from the starting display (this is the default configuration already implemented for you),
to the following images, calling bl check_transition after the first transition has been completed.
Starting Display#

Display Transition 1#

Display Transition 2#

To get marks for this question, you must use the load-twiddle-store pattern in some form to modify the LED state registers. Simply calculating the expected value of the registers for each transition manually and then setting the memory regions to those values will not be awarded marks.
example of manual external calculation of output value:
@ this format won't be awarded marks
ldr r0, =output
ldr r1, =0x00FFAB10
ldr r2, =0xFFAF12D4
str r1, [r0]
str r1, [r0, 4]
example of load twiddle store:
@ this format will be awarded marks
ldr r0, =output
ldr r1, [r0]
mov r2, 0b10010011
lsl r2, 8
bic r1, r2
mov r2, 0b00100100
lsl r2, 8
orr r1, r2
str r1, [r0]
An exception to this is if you are setting everything to 1 or 0, eg:
ldr r0, =direction
ldr r1, =0xFFFFFFFF
str r1, [r0]
While you may use the manual calculation in future when working with the LEDs on the microbit, the point of this task is to show your bit manipulation using the load-twiddle-store pattern.
Complete the code in src/main.S according to the above specification and then copy the
entire file to tasks/task-2.S, save, add, commit and push.
Task 3 - Bill Customers (1.5 Marks)#
In this exercise, you will use functions, loops and memory to create customer bills.
Copy the code below into your src/main.S file.
.syntax unified
.global main

.type main, %function
main:
  bl start_check @ Don't remove this line!

  @ ----------------------------------------
  @ --- Insert exercise code between the ---

  @ Your code goes here!

  @ ----------------------------------------

  bl end_check @ Don't remove this line!

@ infinite catch loop
inf_loop:
  nop
  b inf_loop
.size main, .-main

@ args:
@   r0: product code
@   r1: quantity of product
@ result:
@   r0: cost of product * quantity
.global get_part_order_cost
.type get_part_order_cost, %function
get_part_order_cost:
  @ Complete the following function to get the cost for one part of an order
  nop
  bx lr
.size get_part_order_cost, .-get_part_order_cost

@ args:
@   r0: order base address
@ result:
@   r0: cost of order with no discounts applied
.global get_raw_order_cost
.type get_raw_order_cost, %function
get_raw_order_cost:
  @ Complete the following function to get the cost for a given customers order
  nop
  bx lr
.size get_raw_order_cost, .-get_raw_order_cost

@ -------------------------------------------
@ Insert any functions you wish to write here

@ -------------------------------------------

@ args:
@   r0: order base address
@ result:
@   r0: cost of order with discounts applied
.global get_order_cost
.type get_order_cost, %function
get_order_cost:
  @ ------ DO NOT MODIFY THIS FUNCTION! ------
  str lr, [sp, -4]! @ Store the link register on the stack
  ldr r1, [r0]      @ Load the customer id
  ldr r2, [r0, 4]   @ Load the items in the order
  str r1, [sp, -4]! @ Store the customer id on the stack
  str r2, [sp, -4]! @ Store the number of items in the order on the stack

  bl get_raw_order_cost @ Get the raw cost of the order

  ldr r2, [sp], 4   @ Load the number of items in the order off the stack
  ldr r1, [sp], 4   @ Load the customer id off the stack

  @ Apply a 50% discount for customer number 0x1F000003
  ldr r3, =0x1F000003
  cmp r1, r3
  bne no_discount
  lsr r0, 1
no_discount:
  ldr lr, [sp], 4   @ Restore the link register from the stack
  bx lr
.size get_order_cost, .-get_order_cost

.data
num_products:
  .word 6 @ The number of products available
product_costs:
  @ Item id, cost per item
  .word 0x000000AA, 10
  .word 0x000000AB, 6
  .word 0x000000AC, 22
  .word 0x000000AD, 30
  .word 0x000000AE, 2
  .word 0x000000AF, 18

num_orders:
  .word 6 @ The number of orders to process
customer_orders:
  @ Customer code, Items in order, (product code, quantity)
  .word 0x1F000001, 3, 0x000000AA, 2, 0x000000AC, 1, 0x000000AE, 10
  .word 0x1F000002, 1, 0x000000AF, 10
  .word 0x1F000003, 5, 0x000000AA, 1, 0x000000AB, 5, 0x000000AD, 2, 0x000000AE, 1, 0x000000AF, 1
  .word 0x1F000004, 2, 0x000000AC, 6, 0x000000AF, 8
  .word 0x1F000005, 4, 0x000000AA, 12, 0x000000AC, 1, 0x000000AD, 2, 0x000000AF, 4
  .word 0x1F000002, 2, 0x000000AF, 10, 0x000000AE, 2

num_customers:
  .word 5 @ The number of customers who make orders
customer_bills:
  @ Customer code, bill value
  .word 0x1F000001, 0
  .word 0x1F000002, 0
  .word 0x1F000003, 0
  .word 0x1F000004, 0
  .word 0x1F000005, 0

.text
.global start_check
.type start_check, %function
start_check:
  ldr r0, =product_costs
  ldr r1, =customer_orders
  ldr r2, =customer_bills
  ldr r3, =num_customers
  ldr r4, =num_orders
  ldr r5, =num_products
  mov r0, 0
  mov r1, 0
  mov r2, 0
  mov r3, 0
  mov r4, 0
  mov r5, 0
  bx lr
.size start_check, .-start_check


.global end_check
.type end_check, %function
end_check:
  str lr, [sp, -4]!
  nop
  ldr r0, =customer_orders
  add r0, 120
  str r0, [sp, -4]!
  bl get_order_cost
  ldr r1, [sp], 4
  str r0, [sp, -4]!
  mov r0, r1
  ldr r1, [r0]      @ Load the customer id
  ldr r2, [r0, 4]   @ Load the items in the order
  str r1, [sp, -4]! @ Store the customer id on the stack
  str r2, [sp, -4]! @ Store the number of items in the order on the stack
  bl get_raw_order_cost
  add sp, 8         @ delete useless items from stack
  ldr r1, [sp], 4
check_order_cost:
  nop
  ldr lr, [sp], 4
  bx lr
.size end_check, .-end_check
You have been tasked with completing a customer order billing system. A skeleton code has been
provided to you with some data structures and functions already completed (get_order_cost)
that cannot be edited (doing so will result in 0 for this question).
The main process logic and other functions are up to you to complete.
Program Specification#
The desired behaviour is broken down into labels for the corresponding section of the program.
main#
- The main process will loop through all of the customer orders (
num_ordersandcustomer_orders)- It will calculate and load the base address of the next order into
r0 - It will call the
get_order_costfunction which will get the cost of an order, with any discounts applied - The main process will load the current bill value for the corresponding customer and add this order cost to the value and store it back in memory at the same location (
customer_bills)
- It will calculate and load the base address of the next order into
get_raw_order_cost (function)#
- Takes in the base address of an order (
r0) - Initializes a sum of the order at 0
- Loops through the items in the order
- Loads the item code into
r0and quantity intor1 - Calls
get_part_order_cost - Adds this to the sum of the order cost
- Loads the item code into
- Puts the sum of the order cost into
r0 - Returns
get_part_order_cost (function)#
- Takes in the product code (
r0) and quantity of the product (r1) - Loads the cost of the product
- Multiplies the individual product cost by the quantity required to get the total cost for this part of the order
- Puts the result of the part order cost into
r0 - Returns
Secret Discount#
The already implemented function, get_order_cost, applies a discount to customer 0x1F000003. This customer
has a special arrangement with the company and receives 50% off every order they make. A different customer (0x1F000005)
has heard about this deal and is upset that they don’t receive the same discount. They have heard that you are
creating the new billing software and have bribed you to implement the same discount for them.
You will need to figure out a way to provide them with the same discount as 0x1F000003, however you know that
the company will check the result of your get_raw_order_cost and get_part_order_cost functions to make sure there
is no mistakes being made. This means that you will have to trick the get_order_cost function to apply the discount to
customer 0x1F000005 as well as 0x1F000003.
If you are unsure how to go about doing this, review Task 8 of Lab 9.
Do not modify the get_order_cost function or existing data structures, (doing so will result in 0 for this question).
Complete the code in src/main.S according to the above specification and then copy the
entire file to tasks/task-3.S, save, add, commit and push.
Marking Criteria#
Your assessment will be evaluated on the following criteria:
- Correctness of your implementations (4/5)
- Good practice with assembly programming (1/5)
Item 1 will be evaluated primarily through the results of the assembly CI tests.
Item 2 will be evaluated by visually inspecting your submissions for:
- clean, commented and readable code
- following calling convention when using functions
For more information on how to have good quality assembly code, check the style guide.
Submission#
Submission is through GitLab, the most recently pushed commit of your fork of the assessment template before the deadline is taken to be your assessment submission.
Getting Started#
- read this assessment page completely
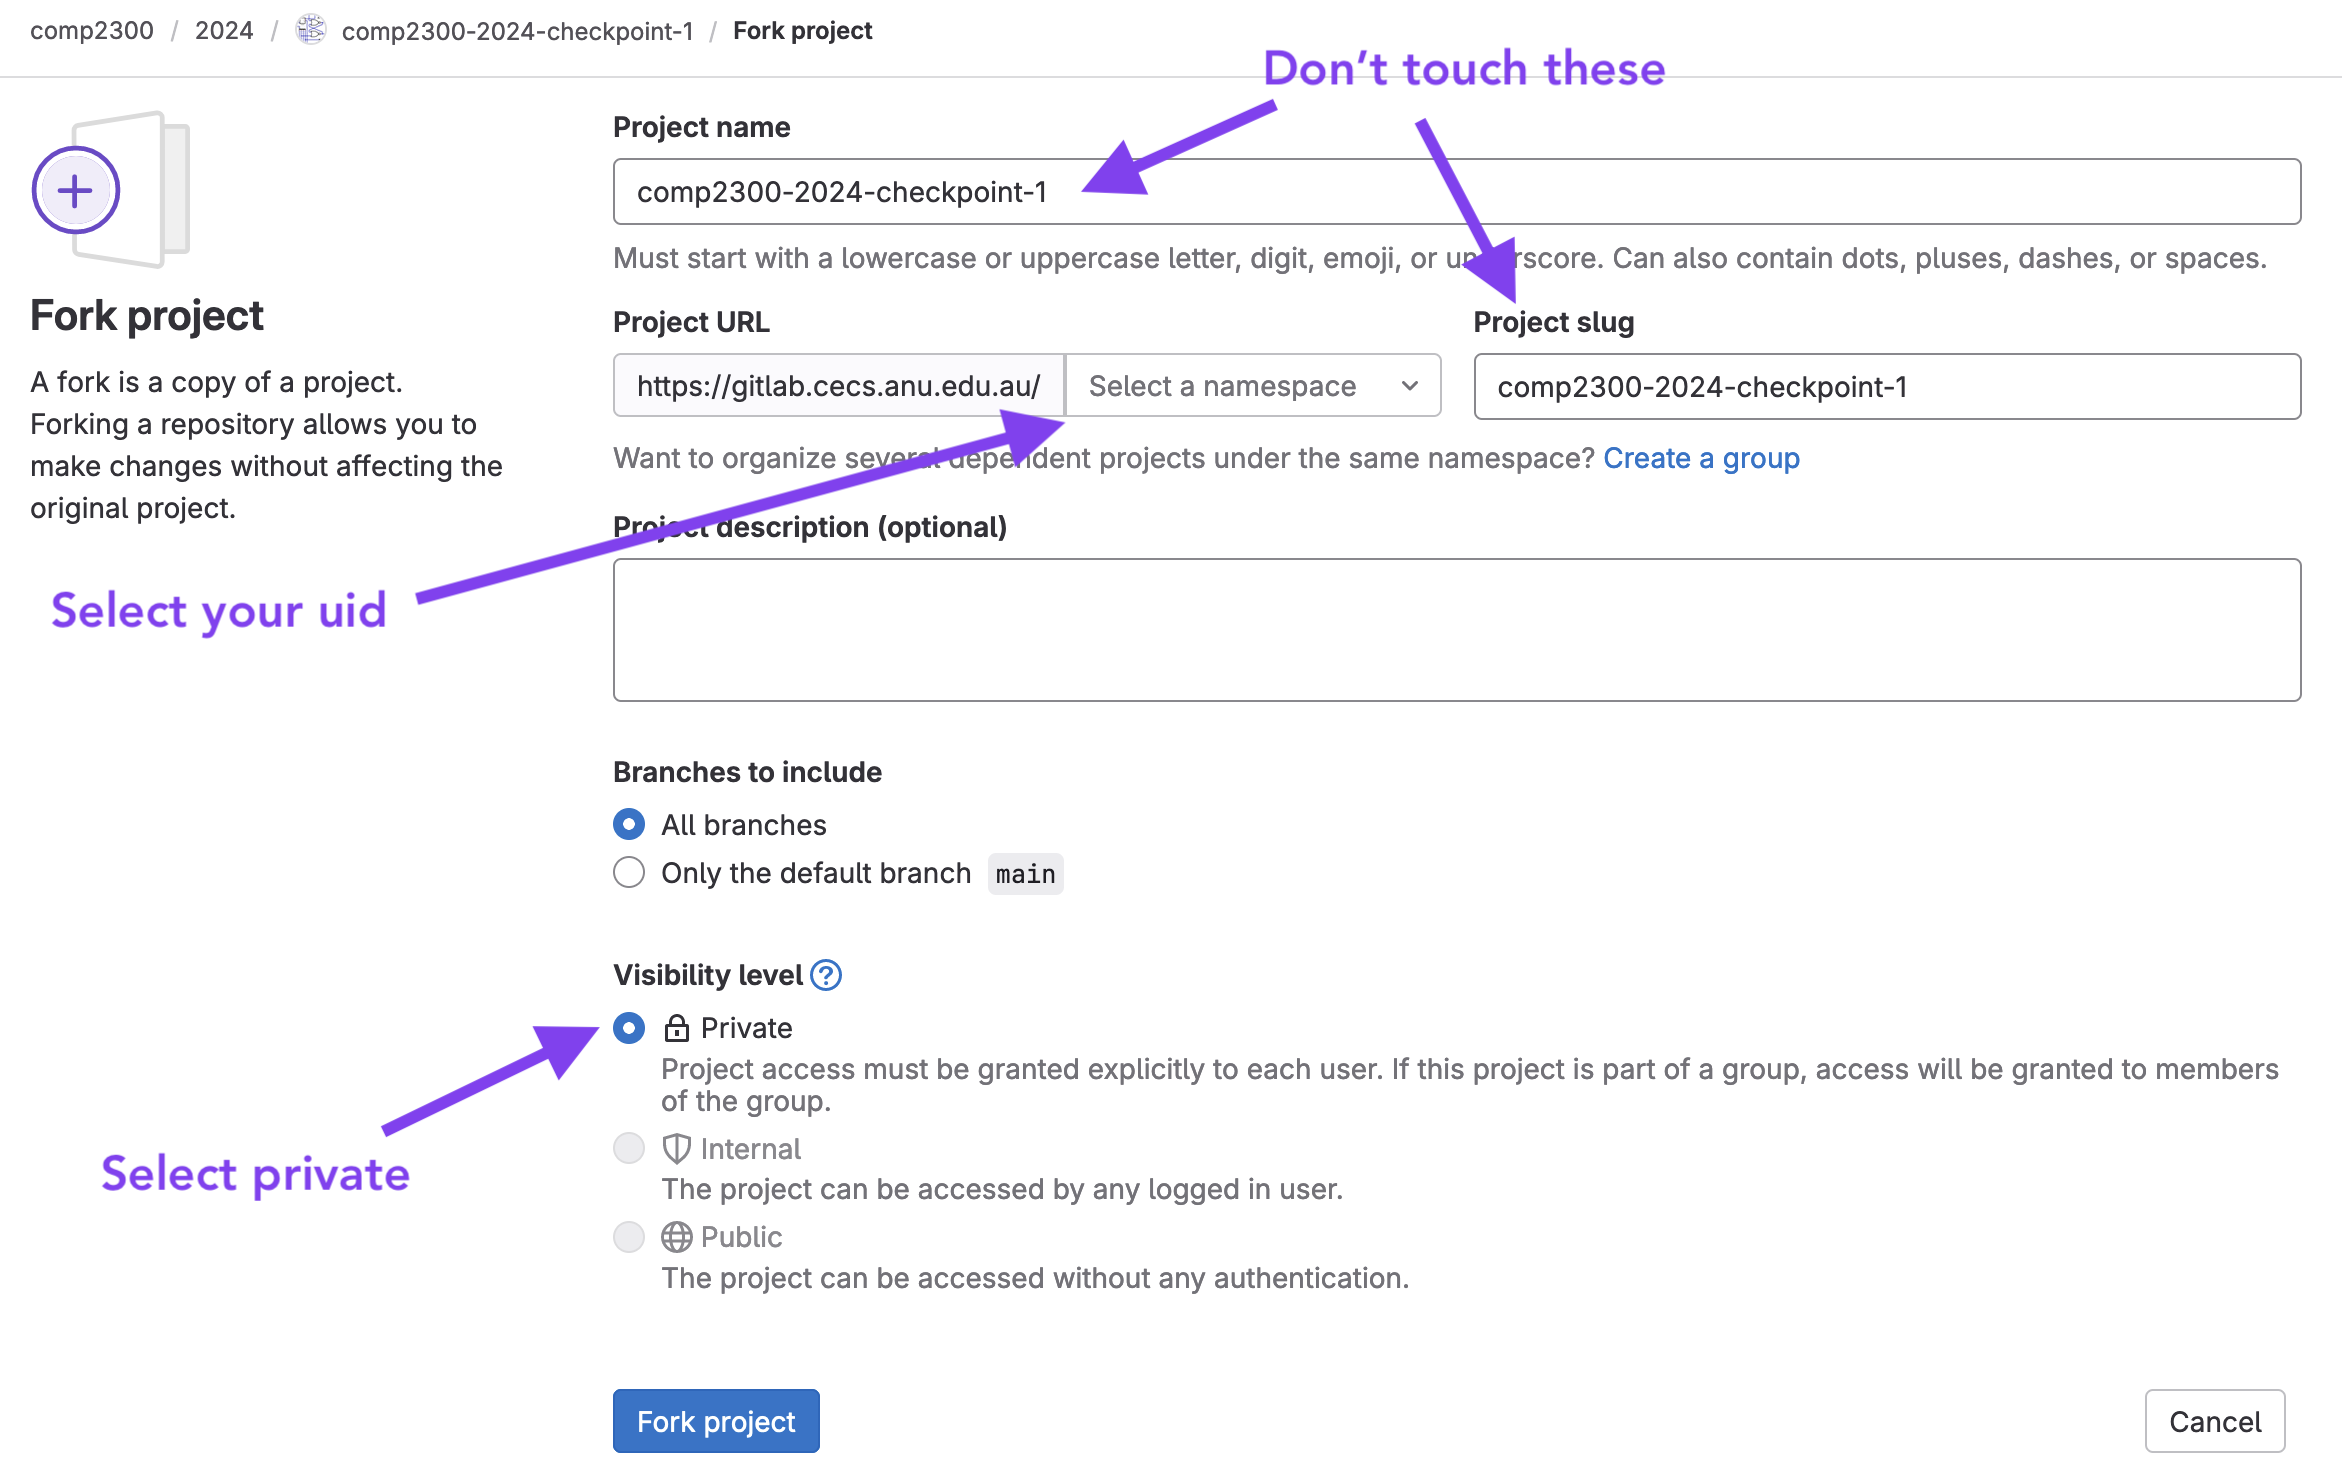
- fork and clone the assessment template
- ensure you fork your project as private
- do NOT change the name or path of the repo, or it may get missed by our software
- work on each task, testing, committing and pushing as you go
- make a mistake or get stuck, then ask a good question on the course forum.
Completion Checklist#
- you have completed the tasks using
main.Sand then copied the contents to the correspondingtasks/task-X.Sfiles provided and have not renamed or moved them - you have debugged your files locally and they complete the task based on the stated criteria
- you have wrote your code using good practice
- you have saved, committed and pushed your assembly files to gitlab
- you have filled out, committed, and pushed your statement of originality
- you have checked the gitlab ci tests and they are passing
- you have checked the pdf artifact on gitlab to ensure it is correct
Gitlab CI and Artifacts#
For this assignment, your repo will be partially marked automatically (a tutor will still sight it) based on the tests on gitlab. This is the CI that you may have already been seeing in the labs, however now it isn’t just for your benefit, so it’s important that you understand and check it.
The correctness of your implementations will be marked based on passing the tests for each one of the
tasks/task-X.S files. These tests will be based on the outline provided in the task, and will have default
check points in the code. To test these files you will need to debug them locally, and step through the code
to ensure that it is behaving as it should be, if they are then they should also be passing in the CI. However, it is best
to make sure that this is the case by going to the gitlab website to make sure the CI is passing as you’d expect.
To view the CI pipeline for your repo, click on the little icon to the right of your most recent commit.
![]()
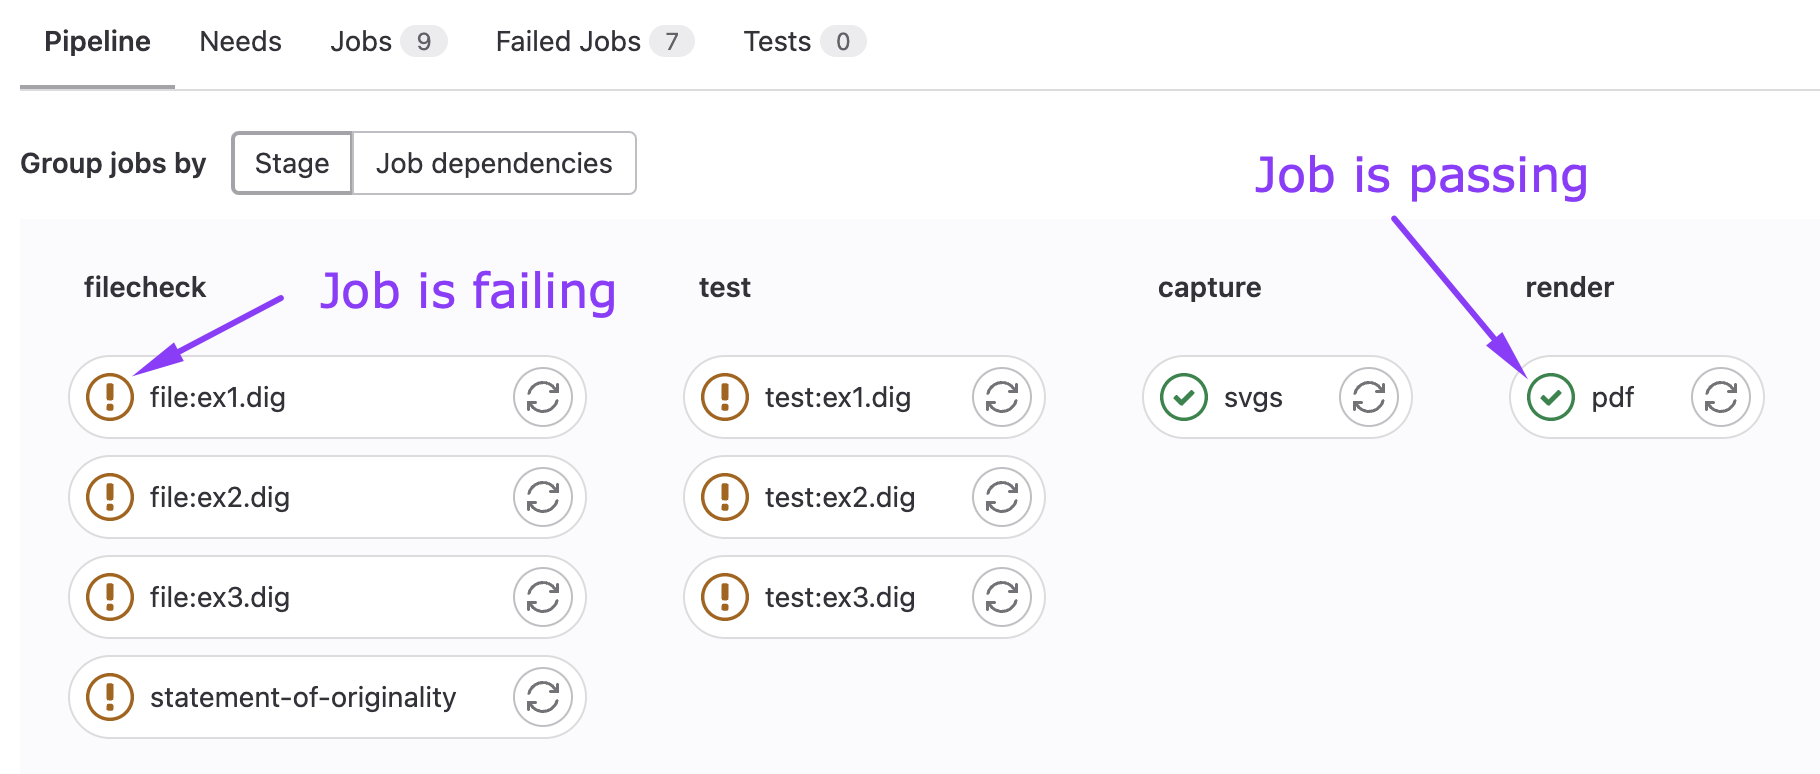
Then you’ll be presented with a list of the jobs, you’ll want to make sure that the jobs are passing once you’ve completed the corresponding task.
Filecheck stages ensure that the file exists and has been updated from the default. Test stages run the submitted files against our tests to measure correctness.
PDF Artifact#
Your repo will be packaged into a pdf for marking purposes. As such it is important that you see what the result
of the pdf job is and make sure the output makes sense.
It will:
- take your name and uid from the
statement-of-originality.md - take code from your
tasks/task-X.Sfiles - take test results of your
tasks/task-X.Sfiles - take references from the
statement-of-originality.md
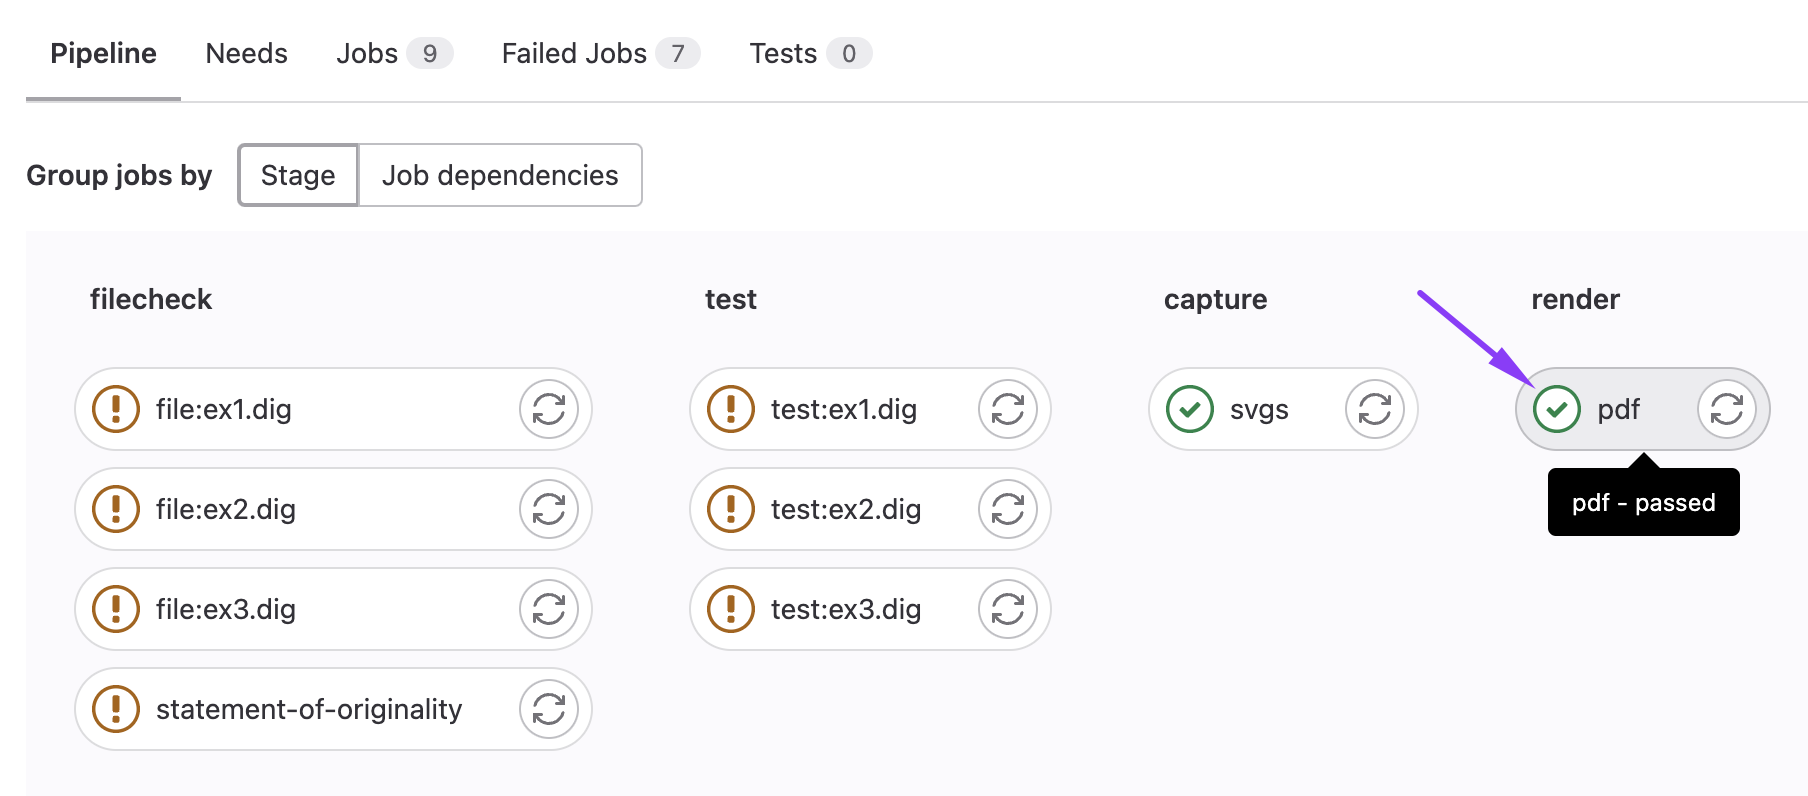
To view the pdf, first click the ci icon on your most recent commit (as above), then click on the
pdf job.
Then, you’ll be taken to the job page, where you should see a “Job Artifacts” section, click on the Download button.
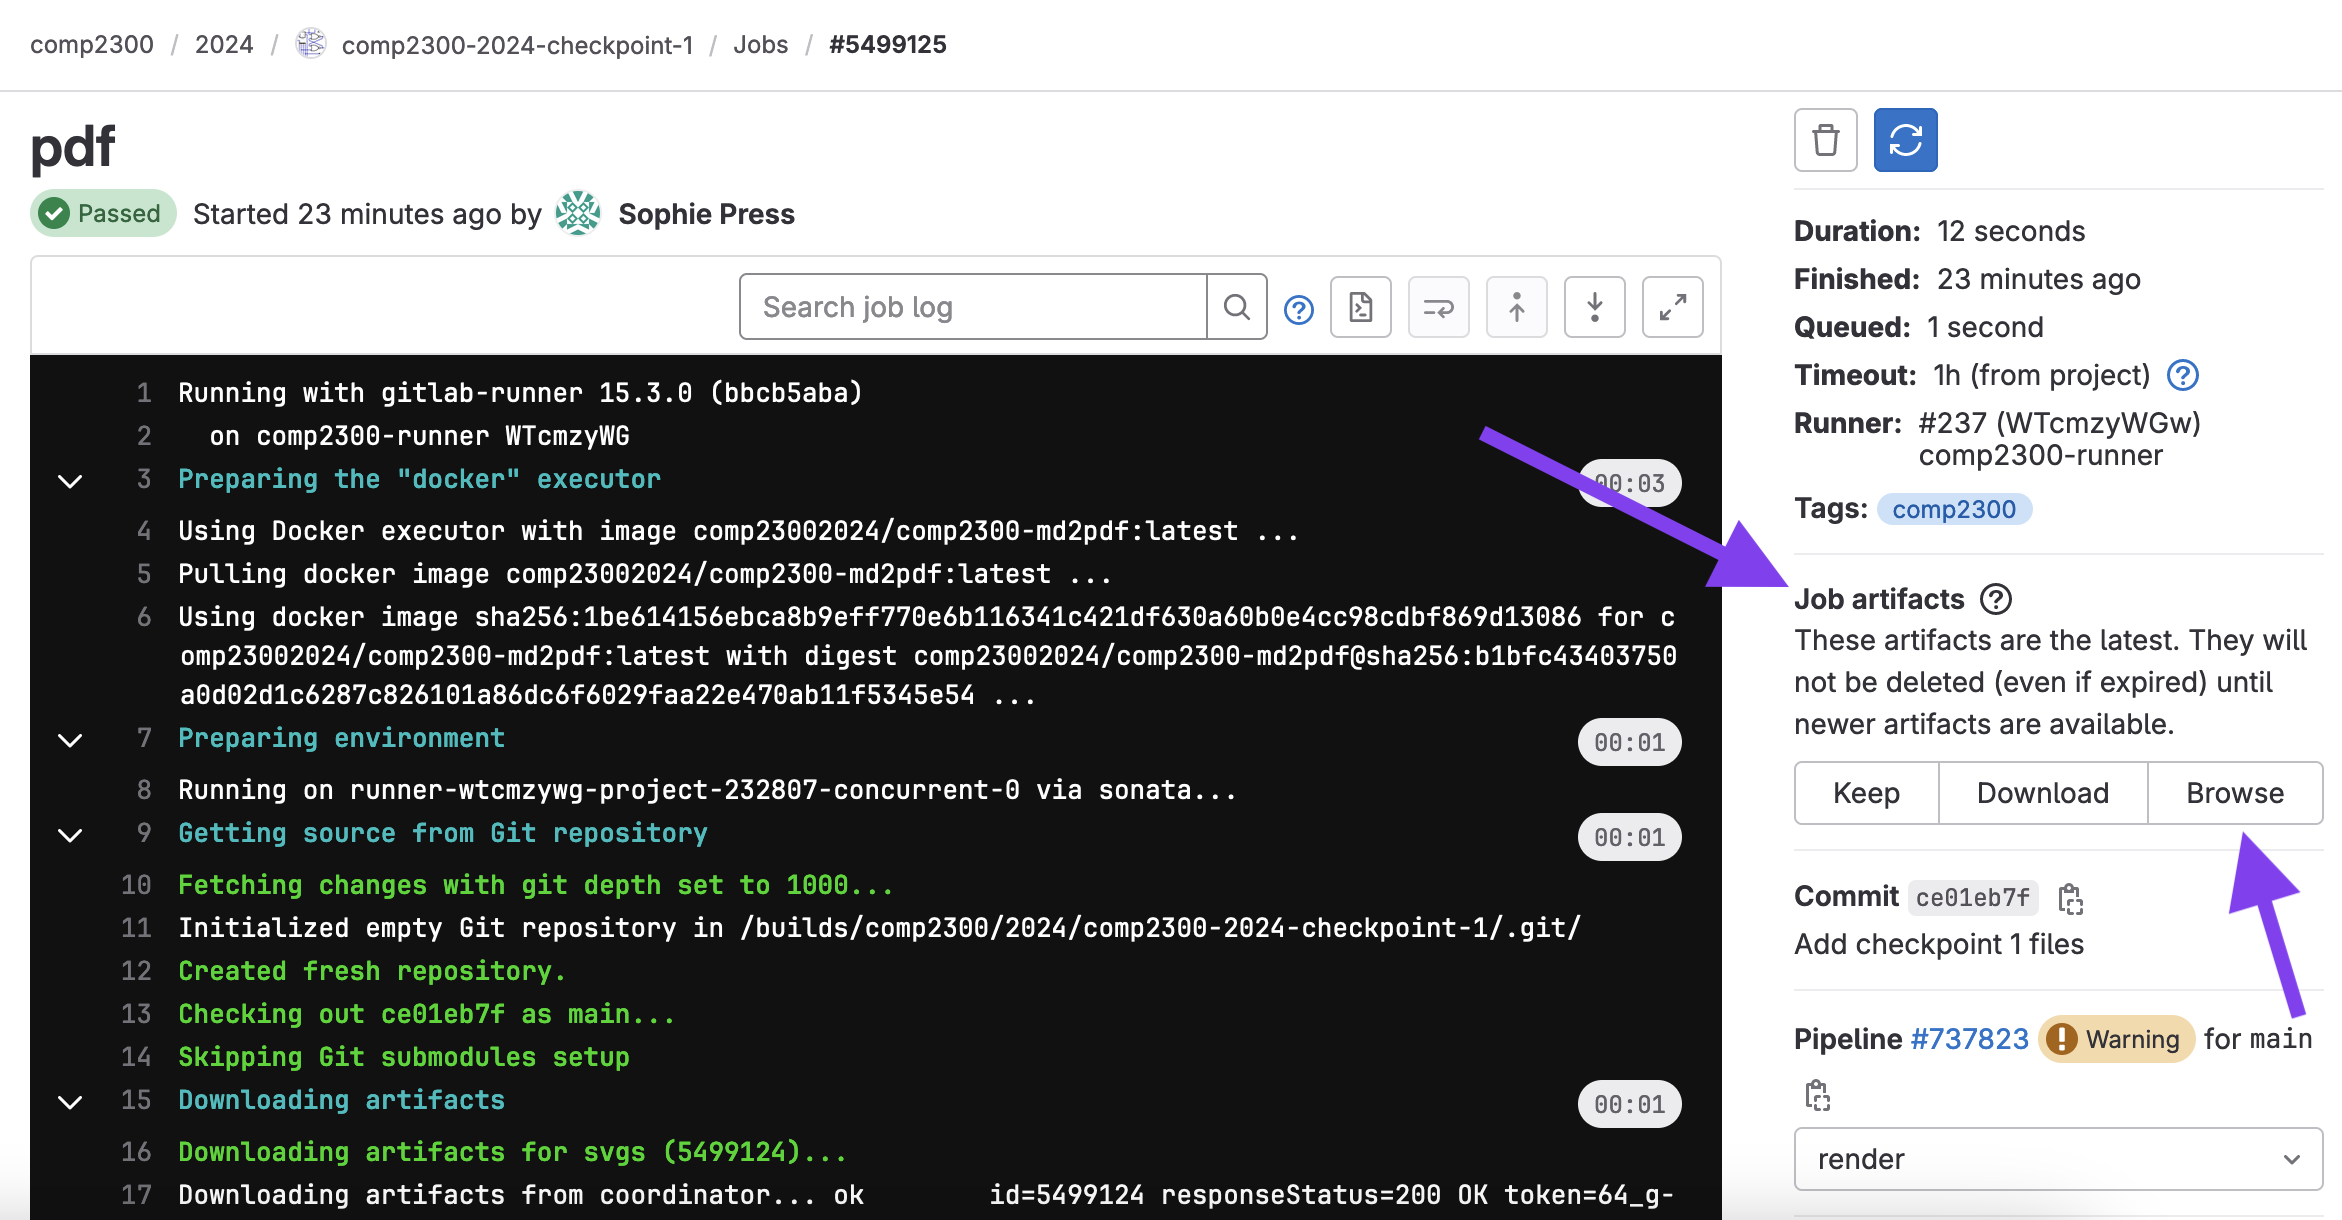
This will download a zip file containing your pdf. Which should look something like this.
There is more general info about gitlab ci here.
FAQ#
My code doesn’t work, can I email you for help?#
Sorry, you won’t get help over email or Teams. We provide a course forum which is the only way we are able to help.
Forum posts related to your assessment submission must be “private” (as for any individual assessment task).
It’s [5 minutes, 60 minutes, 12 hours] before the deadline and my CI Jobs aren’t finishing!#
Unfortunately on the day that an assessment is due, when many students are pushing updates at once, the CI servers can’t keep up. You may not see your CI jobs finish before the deadline. You will just have to manually check that your files have been submitted correctly and that you are passing tests locally.
The best way to avoid this issue is to start early and finish early 😇
If there’s any issues with your git repository after the deadline. Please let us know (after the deadline) through a private forum post and there may be something we can do.
How do I know my assessment has been submitted?#
If:
- the files in your fork of the assessment are correct (i.e., the files you intend to submit) when checking on the gitlab website
- the time is before the deadline
then your assessment has been submitted (well done!).
Please don’t ask us to “check”, we would be just doing exactly the same thing as the above steps which you can do yourself.