Outline
In this lab you will:
- meet the tools you’ll need in this course:
- the VSCode (or VSCodium if you’re on one of the ANU lab machines) text editor you’ll use to write the code
- Microsoft Teams, the chat and video meeting platform we will be using for labs and lectures.
-
go through the steps you’ll need to submit all assignments in this course (so it’s really important you can do them now—don’t leave this stuff till the last minute)
- put a circle on the internet (yew)
Hello and Welcome!
Hello and welcome to ANU Extension Creative Computing! We are all very excited to have you in our class and we hope you are too. You might have a few questions and unsure of what to expect. That is okay! We shall explain in this class and throughout the course.
We are going to start with a short activity (15 minutes).
Turn to the person next to you. Introduce yourself. Discuss the following questions:
- what artist have you been into recently? (Artist is not limited to visual artist, any musical, dance, video maker, etc counts too!)
- what is unique about their art?
Wait—isn’t this a coding course? Why are we asking about artist? Well, this is a coding course but its also an art course so its good to think of different artists for inspiration. Also you might hear about a cool new artist.
We (the tutors) will come round and have brief chat.
Introduce your partner. Briefly explain what artist your partner has been interested in and why.
Introduction: a pre-lab
Lab 1 is a bit of a weird lab—it’s more like a pre-lab before the normal lab material starts in week 2. You can work through it at any time, either on campus or at home (or wherever). If you get through it ok (and can show a circle in your browser) then you’re ready to start the course. If you get stuck that’s ok: you can ask questions on the EXTN1019 teams channel, which you can join with this link.
If you’re really familiar with this stuff, there’s a tl;dr version at the end. Again, though, I want to emphasise that it’s ok if this is all new—you’ll get plenty of support in this course to get the hang of it. All we ask is that you put in the effort.
Part 1: software setup
In this course you’ll write code using the VSCode text editor, run the code in the Firefox web browser, and download/view/submit your lab & assignment code with git. You’ll also use Microsoft Teams to post questions, have discussions and hang out with other students.
There’s a separate page dedicated to software setup, so if you’re on your own laptop you should head to the software setup page and follow the instructions.
Even if you’re familiar with the software setup, you’ll still need to have logged in to all the various ANU systems as described in the course start checklist in the FAQ, so make sure you get that done ASAP.
If want to work on the lab content outside of the workshop hours, we advise you to install the software on your laptop. Otherwise, all of the software is already installed on the lab machines at the ANU.
Part 2: forking the lab 1 template
From here, we’ll use a few git-specific terms, and in general we’ll explain everything along the way. If you’re confused, though, there’s a section on git help on the software setup page.
Once you’ve got the software you need, you have to log in to the GitLab server at using your normal ANU credentials (uni ID and password) and bring up the lab 1 repository. A repository (often abbreviated to “repo”) is basically just a box which stores a bunch of files and their history (the changes they’ve been through over time). Whenever you hear the word repo/repository, think “a directory of files which Git is keeping track of”.
If you like, you can add SSH keys to your account so that you don’t have to type in your uni ID and password every time, but it’s not essential and you can also add that stuff later. If you’re new to all this git stuff, it’s probably ok to just stick with the ID & password for now.
This template is a starting point for everyone who wants to complete this lab, so before you can start working on it you need to create your own “copy”. This is called forking, and creates a new repo (your “fork”).
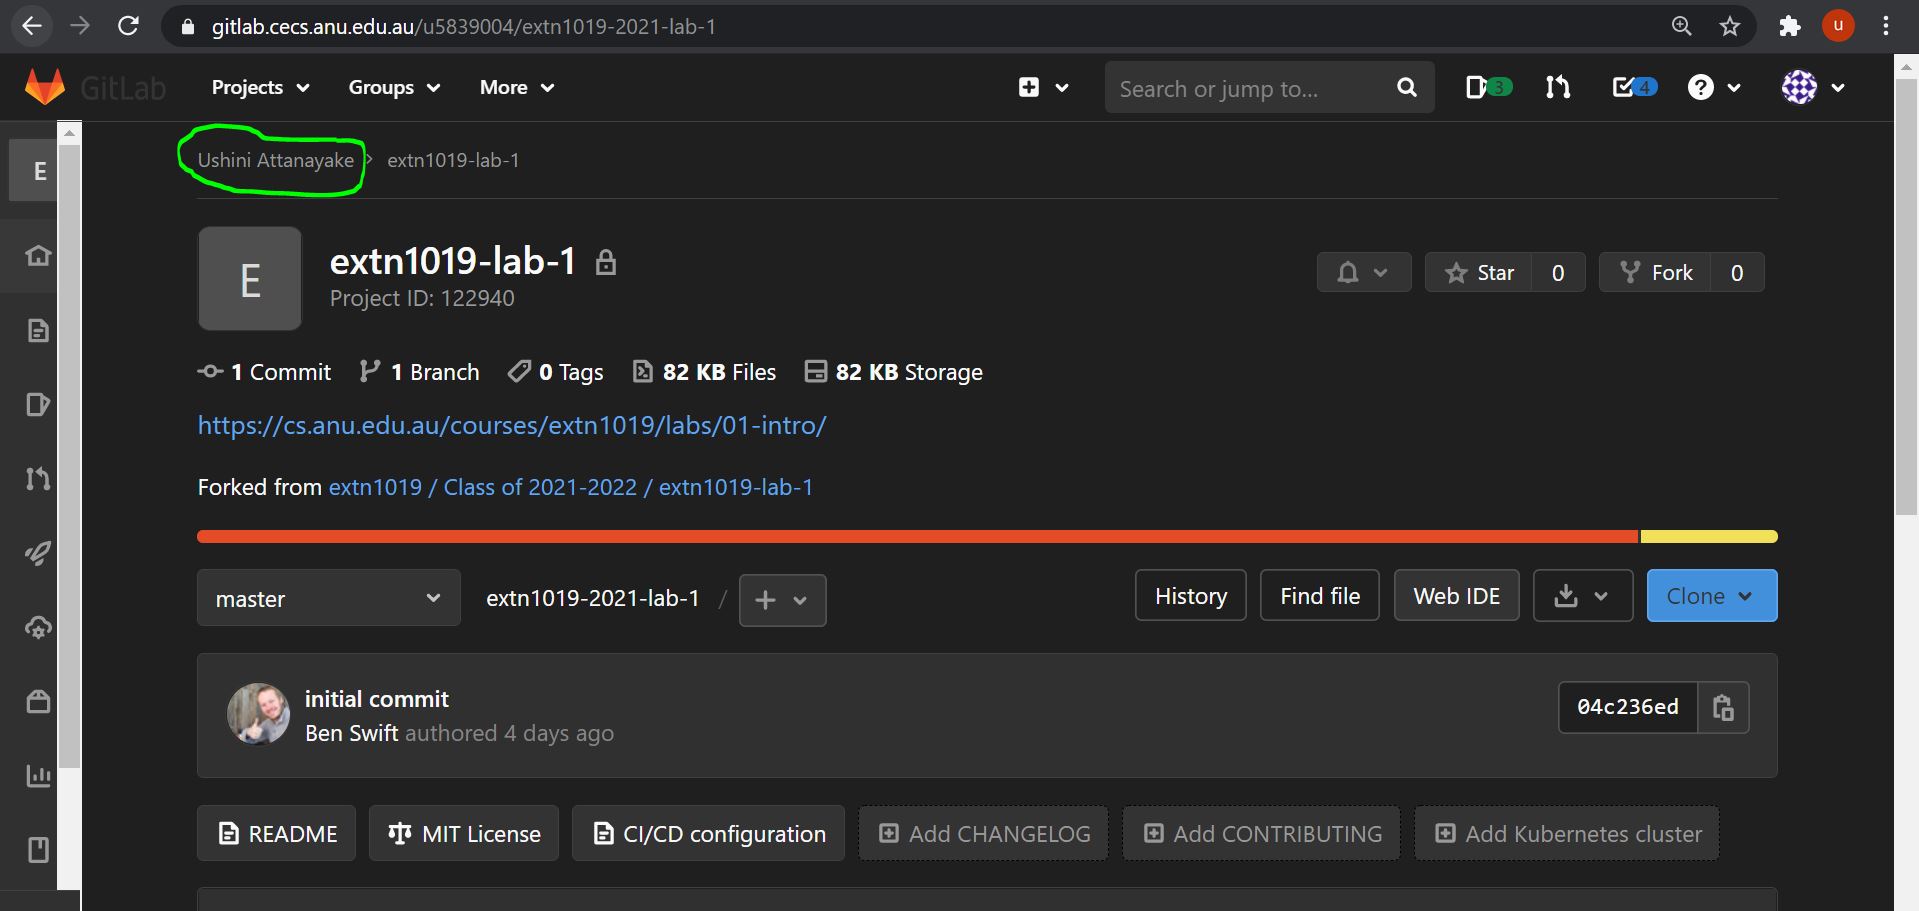
To fork the lab 1 template, click the fork button on the GitLab page in your web browser (I’ve circled it in red).
Once you’ve done that, you should see a page like the one below—you now have
your own fork (copy) of these files on the server, as indicated that it
shows your name in the top-left-hand corner (circled in green). The files are
exactly the same, but the repo is now attached to your GitLab account, rather
than the extn1019/2023-2024 GitLab account, so you can change the files and push
things up to the GitLab server without messing up anyone else’s starting point.
Part 3: cloning the lab 1 template
Your fork of the template repo is still on the GitLab server, though. To actually work on these files, you need to clone (download) this repo to the computer you’re working on.
-
In VSCode, open the command palette (View > Command Palette, or ctrl+shift+P) and a prompt will appear in the top.
-
Type
git cloneand hit enter. A box will appear asking for the repo url. -
Back on gitlab, open your fork of the lab code. Directly under the page title there’s a box that looks like this (if it doesn’t say
HTTPSon the left hand side, click that box and select it. Now click on the right hand side box to copy the URL to your clipboard.)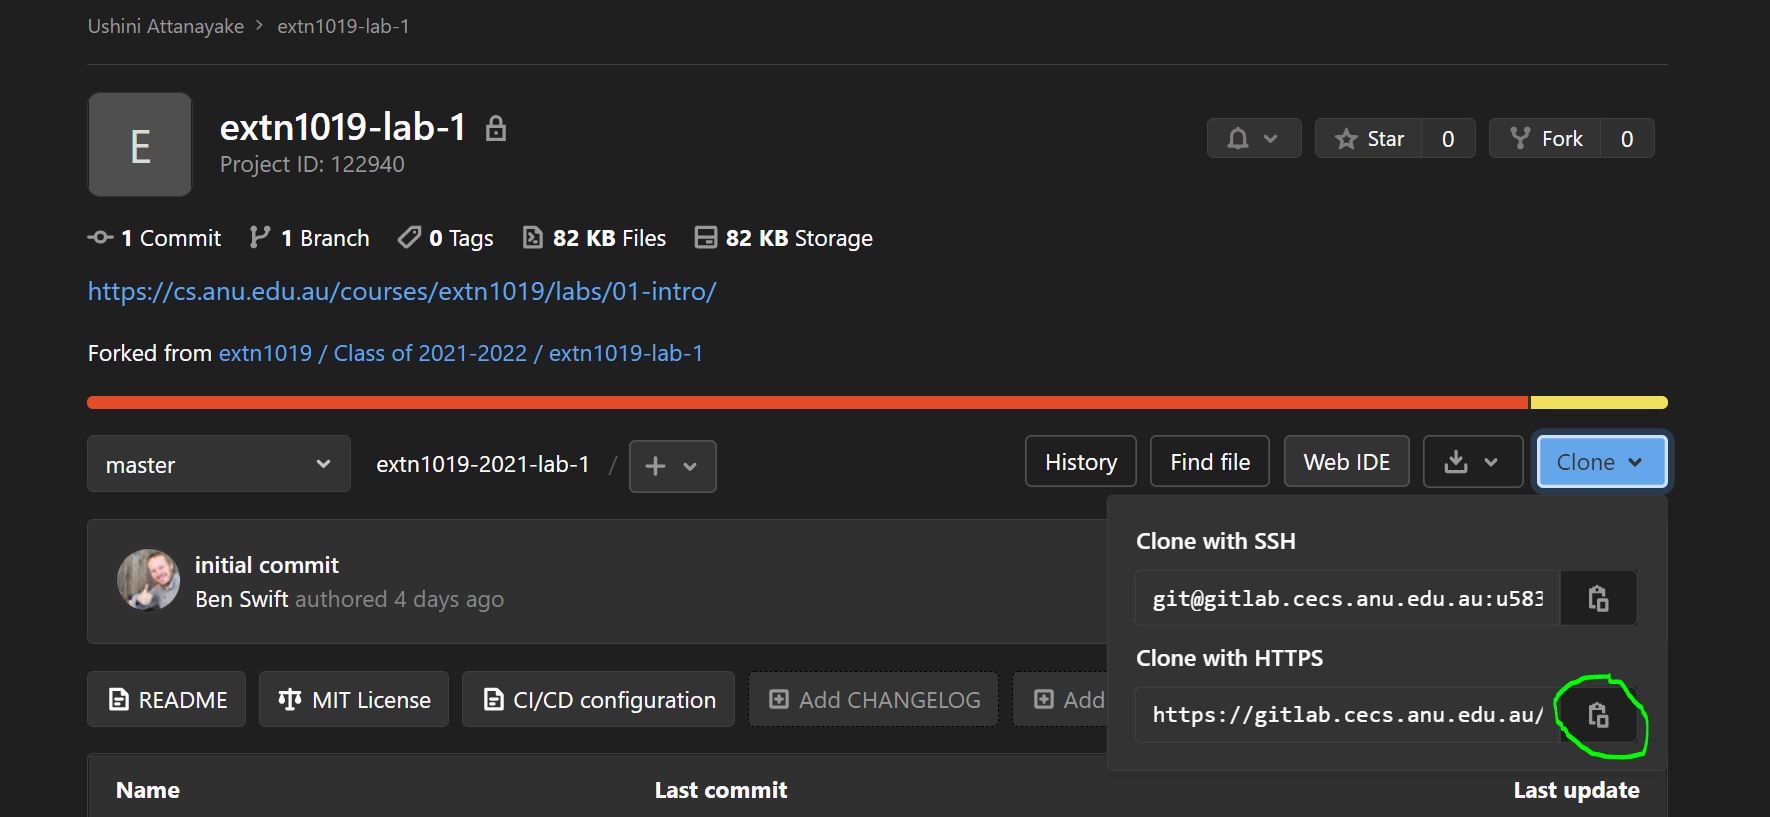
-
Back in VSCode, paste the url into the prompt box and hit enter — making sure that the “Clone from URL” option is highlighted.

-
A window will open asking you where to save the files. If this is your own computer it might be a good idea to create a
extn1019folder and clone all your repositories there. If this is a lab computer, make sure you save this to your university homedrive (it’ll be calledu1234567). When you’ve found a good spot for you files hit Enter or click “Select Repository Location”. -
Now you’ll be asked to enter your username and password. This will be the same uid and password you used to log into GitLab.
-
If you entered your uid and password correctly, a popup will appear in the bottom right of VSCode asking you to
Open RepositoryorAdd to Workspace. Today we’re going to chooseOpen Repository, but they have a similar effect.
Great job! Now lets make that circle.
Part 4: making a circle
Now you’ve got the template files in VSCode you can get to work.
In the sidebar on the left you can see all the files in the template folder.
Throughout the course we’ll explain what each of these files is for but for now
the one we care about is sketch.js. Click on that one and VSCode will open it
up and look something like this
You’re getting close to creating the circle you’ve been thinking about all
along. In the draw function (immediately below // your "draw loop" code goes
here) add the following lines:
background(30);
ellipse(200,200,200,200);
Now save the file.
The final piece of the puzzle is to run/view the sketch. To do this, you need to start the live server:
We are working to get the live server ready for use by the first workshop. So if you’re accessing this content before the workshop, it might not be ready for you.
- Open the command palette (View > Command Palette)
- Type “Open with live server”
- Hit Enter
Your default browser will open up and should show a white circle on a charcoal background.
As stated on the software setup page you should use Firefox as your web browser for the course, and (for convenience) you could set it to be your default browser (since that’s what the live server extension will open the sketch in).
It might not look like much, but you’ve made your first p5 sketch, and you should take a moment to enjoy your success.

Part 5: committing & pushing the changes
Now that you’ve successfully completed today’s task of putting a circle on the internet it’s important that you save your work and push it up to GitLab. This process is important to learn because it’s the way you’ll submit all your assignments for this course!
The first thing to do is save your sketch.js the usual way (i.e. File > Save
or Ctrl-S/Cmd-S depending on your OS).
Now you want to upload your changes to the sketch.js file back to gitlab so
it’s safe and sound. This involves some more VSCode commands so open up the
command palette using View > Command Palette.
Type in git commit all and press enter. You’ll get a popup which says “There
are no staged changes to commit. Would you like to automatically stage all your
changes and commit them directly?”. Click yes.
Now you’ll see a popup asking for a “Commit Message”. Write a note about the changes you made (e.g. “I added a circle to the sketch”). This message is just so you can remember what this change was so write whatever makes sense to you.
In Git’s terminology, a commit is a snapshot of your code at a particular time that you can always return to. This means that if you break your code somehow you can always feel safe knowing you can just return to your last commit where everything was working. When working on assignments you’ll want to commit your code regularly just to be safe.
Now all you have to do is push (upload) these committed changes to GitLab with
the push command. Open up the command palette using View > Command
Palette, type git push and hit Enter. You might need to put your UID &
password in again at the push step. If you get an unauthorised message, try once
more and if it still doesn’t work seek help from a tutor or friend.
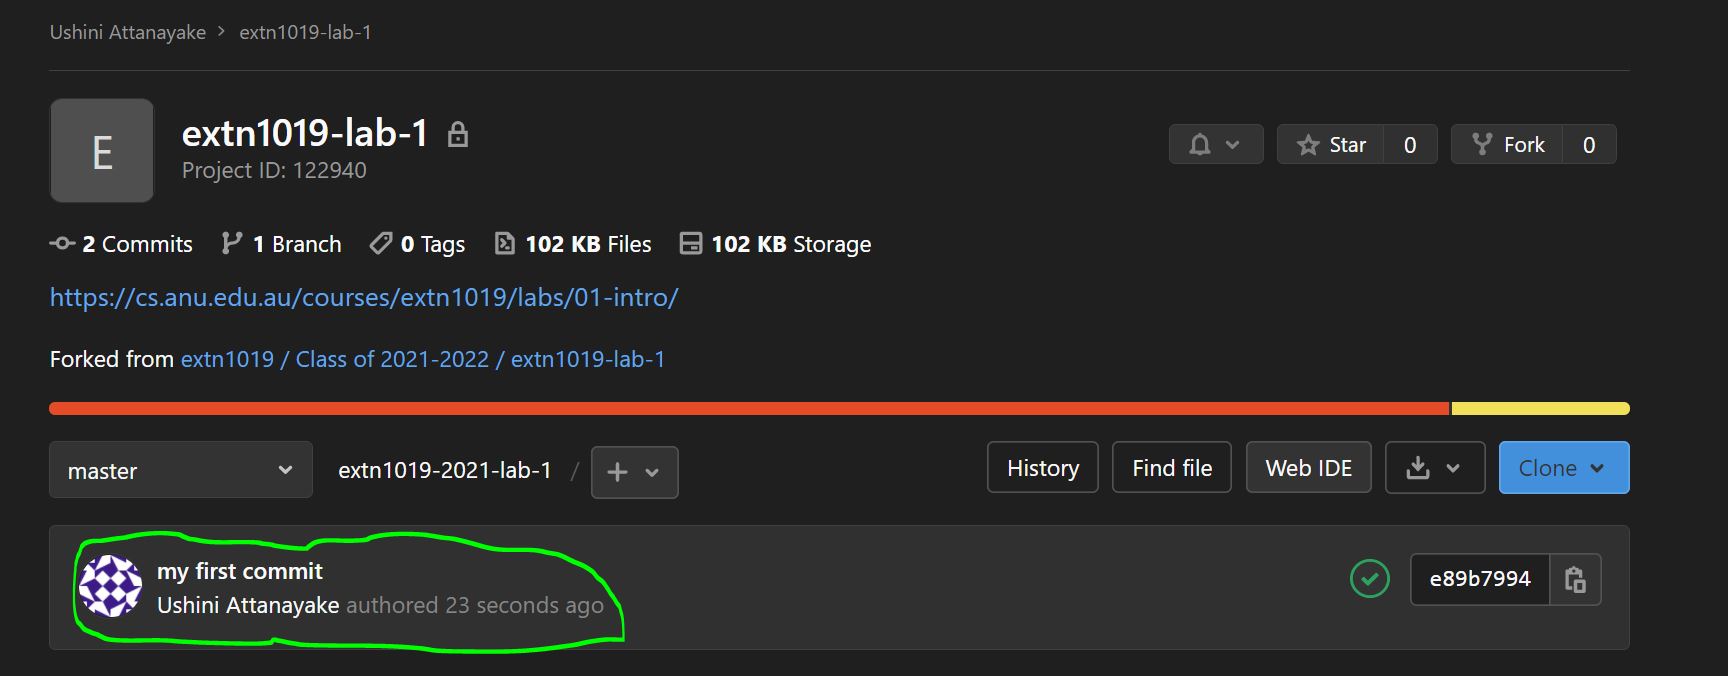
If everything worked successfully, then when you refresh the GitLab project page
for your fork (i.e.
https://gitlab.cecs.anu.edu.au/uXXXXXXX/extn1019-2023-year-11-lab-1.git, where uXXXXXXX should be replaced with your UID) you should see
the first line of that commit message as shown:
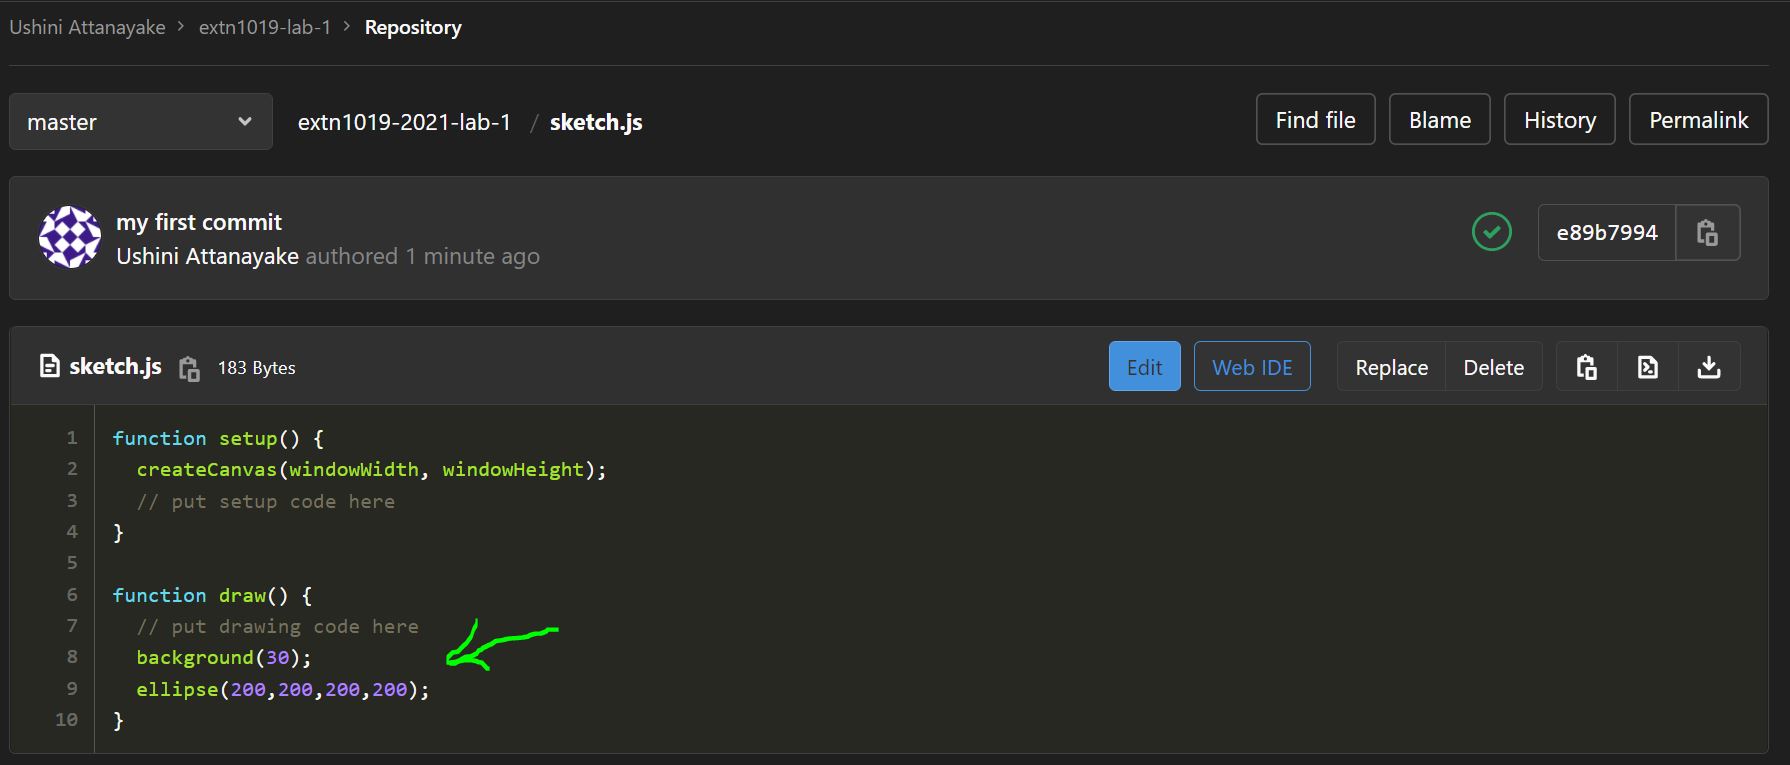
And if you click on the sketch.js filename further down you should see the new
version with your ellipse line in there. Hooray!
Part 6: putting your circle on the internet
It might have felt like your sketch was already on the internet when you were building it before because it was in your browser, but really it was only visible to you. By pushing your code to gitlab, your page was automatically published online within the ANU network.
If you’re on ANU campus wifi or ethernet right now you can check this worked by
copying and pasting this link into your browser and replace uXXXXXXX with your
university ID.
This link might not be accessible before the first workshop.
https://extn1019.cecs.anu.edu.au/uXXXXXXX/extn1019-2023-year-11-lab-1/
If you can see your circle, great job, you’re done!
If you happen to be away from campus right now, you’ll need to use the ANU’s
reverse proxy login. This allows you to
access ANU resources (like the library) from outside campus. Use your anu id and
password to log in. Then paste the URL above (with your university id swapped
in) and click go.
If you can see your circle, great job, you’re done!
It’s good to get in the habit of checking the published version of your sketch every week because this is what your tutor will see when they mark your assignments.
Part 7: the short version
Here’s the tl;dr version (if you’ve done this version control thing before, or if you’re just after a refresher):
-
the lab 1 template starts in a
extn1019-2023-year-11-lab-1Git repo on the CECS GitLab server -
to work on the sketch, fork the template repo to your own GitLab account
-
clone your fork1 to the computer you want to work on
-
open the folder in VSCode and start the p5 live server (
File > Command PalettetypeOpen with live serverand hit Enter) -
to submit your work, commit and push the changes to your fork (you can do this as many times as you like)
Summary
Congratulations! In this pre-lab you learned how to use the tools you’ll need to participate in the course. If you feel like you just typed in a bunch of things and didn’t really understand what went on, then that’s ok—we’ll explain everything during the course. But it’s important that you at least check that everything works for you, because if it doesn’t then you’ll have problems later on.
See you in the next workshop :)
-
make sure you clone your own fork (i.e. the one with your uni ID in the url) to your local machine, not the template (because obviously you aren’t able to change the template for everyone—GitLab won’t let you) ↩