In this course, we will use some additional software that will need to be installed on your personal device.
- Digital, a logic simulator.
- VS Code, an IDE for coding and debugging later in the course.
- Git, for downloading, and submitting, exercises and assessment items.
- Various other packages as required.
Installation
Virtual Machine
The following steps can be followed on any machine, but provide a worse experience than developing natively on your computer. Try the machine specific instructions first, and follow these as a backup if you encounter issues.
- Install Virtual box
- Download the Ubuntu 20.04.4 ISO image (Desktop image)
- Make a new Virtual Image
- Any machine name is fine.
- Pick ‘Linux’ and ‘Ubuntu’ as the machine type.
- It is recommend to use at least 2048 MB of RAM and 20 GB hard drive size.
- When prompted, select the ISO file you downloaded
- When Ubuntu loads click ‘Install Ubuntu’
- Continue with default options until it installs (it will only erase the virtual image data, not your host operating system data).
- You can safely select the ‘minimal installation’
- Configure the settings
- Any location is fine
- Use
studentas the name. Leave the autofilled entries after inserting this name. - Pick a password and don’t forget it.
- Other defaults are fine.
- Accept and wait for configuration to finish
- Accept the restart and press Enter when prompted
- In Ubuntu, open the ‘Terminal’ application
- In Terminal run
sudo apt update && sudo apt install -y gcc git makeEnter your password when prompted. It will not display the text as you type.
- In Terminal run
sudo snap install --classic codeEnter your password when prompted.
- You may want to adjust the screen resolution. Open Settings > Screen Display and set the Resolution as you like.
- Set up VS Code
From here you can follow the Git steps in labs 1 and 2. Note you will need to redo the ‘first time only’ parts, as this is effectively a new computer.
Verify the setup works by following the lab 8 instructions.
Lab Machine
Lab machines already have the main environment set up, all you need to do is set up VS Code.
Windows 64-bit
Steps 7–10 are newly added in week 8. You can continue from step 7 if you have already done steps 1–6.
- Download Digital. Unzip the file and run Digital.exe. If you have not got a working install of Java on your computer, Digital most likely will not run. You can install Java from here.
- Download & install Git. Git Bash will behave like a terminal on the lab machines and should let you do all the usual Git commands.
- Download VS Code from here. If you need a version other than the 64 bit windows installer, you can find it on their alternate downloads page.
- Set up VS Code
- Open a terminal from the terminal menu at the top of VS Code. A terminal window will open at the bottom of your screen. In this terminal window, there will be a drop-down menu at the top-right. Choose “Select Default Profile”, and choose “Git Bash”.
- Download the GCC 9.4.0 + MinGW-w64 9.0.0 (MSVCRT) - release 2 ZIP from https://winlibs.com/#download-release.
- Unzip the file to a location of your choice.
- Inside of the
mingw64/binfolder, renamemingw32-make.exetomake.exe. - Add the
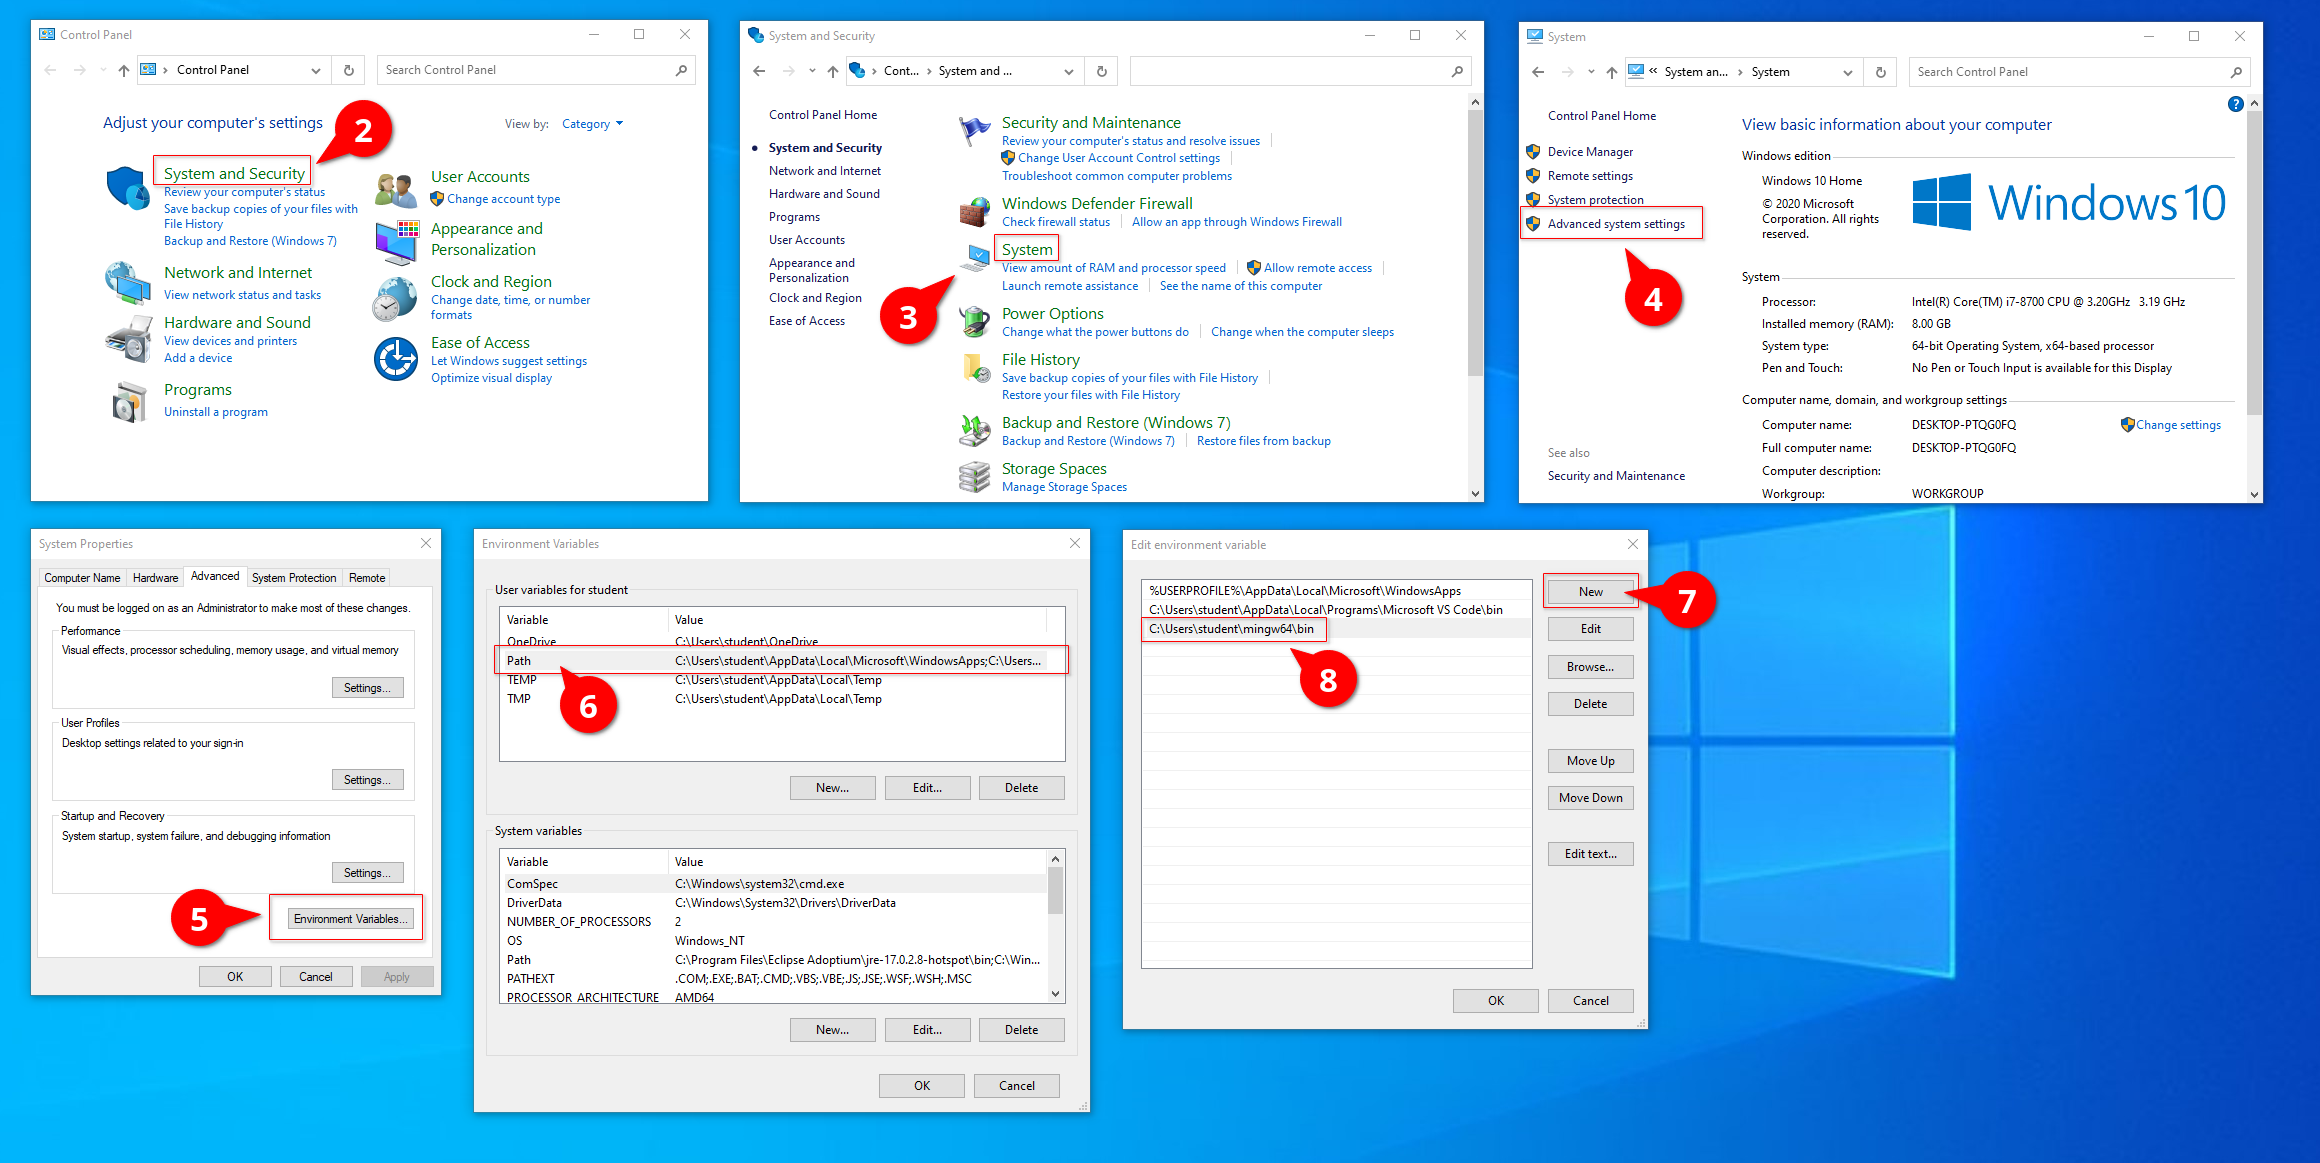
mingw64/binfolder to your PATH- Open the ‘Control Panel’ application.
- Click ‘System and Security’.
- Click ‘System’.
- Click ‘Advanced System Settings’.
- Click ‘Environment Variables…’.
- Double click the ‘Path’ entry (letter case may vary).
- Click ‘New’ and insert the absolute path to the
mingw64/binfolder. - Click ‘OK’ on each of the popup windows.
- Close and reopen VS Code.
 (You can open the image in a new tab if it is too small)
macOS
-
Install XCode from the App store.
-
Download Digital. Unzip the file and run Digital.jar.
-
Download & install VS Code. You may need to hold the control key and click to install in order to bypass a software security check.
If things go wrong, check the Troubleshooting section further down this page.
Linux (Not a Lab Machine)
These instructions are aimed at Ubuntu, but should work for any sensible Linux distro that’s up to date. If you’re using something other than Ubuntu, I trust that you know what you’re doing. If you need help, you can try asking on Piazza, but we may not be able to assist with all flavours of Linux. For Arch users: VS Code has an AUR package, so you don’t need to download a tarball.
- Ensure Git, Java, and other dependencies, are installed by running this command in the terminal:
sudo apt install openjdk-17-jdk git Build-Essential -
Download Digital. Unzip the file and run the appropriate script.
-
Download & install VS Code. You’ll want to download the
.debfile. Install the package once downloaded. Using another IDE is difficult — our assembler is a VS Code extension. VS Codium is an option as well, as used on the lab machines. - Set up VS Code
The rest of this page is information to help you if you get stuck with software issues. If you’ve just finished your initial software install, head back to lab 1 now.
VS Code
Setup
- Have VS Code installed by following the relevant platform specific instructions
- Open VS Code, then open the Extensions view, on the left side of your screen — it’s the button with this icon:

- Search for and install the ENGN2219 2022-S1 extension
(
engn2219-anu.engn2219-2022-s1-vscode).
Using
VS Code has good documentation. The lab material will link to specific parts of it where appropriate. Many settings can be changed to customize the appearance and behaviour of VS Code — feel free to set things up to your liking. In particular you may want to enable autosave.
Troubleshooting
Here’s a list of issues you might come across, depending on the specific details of your machine. As always, be careful with copy-pasting random code you found on the internet (even in a university course!), and try to understand the problem first before you try the solutions listed.
If new problems come up on Piazza, they will be added to this page once a solution is found.
VS Code Developer Tools Console
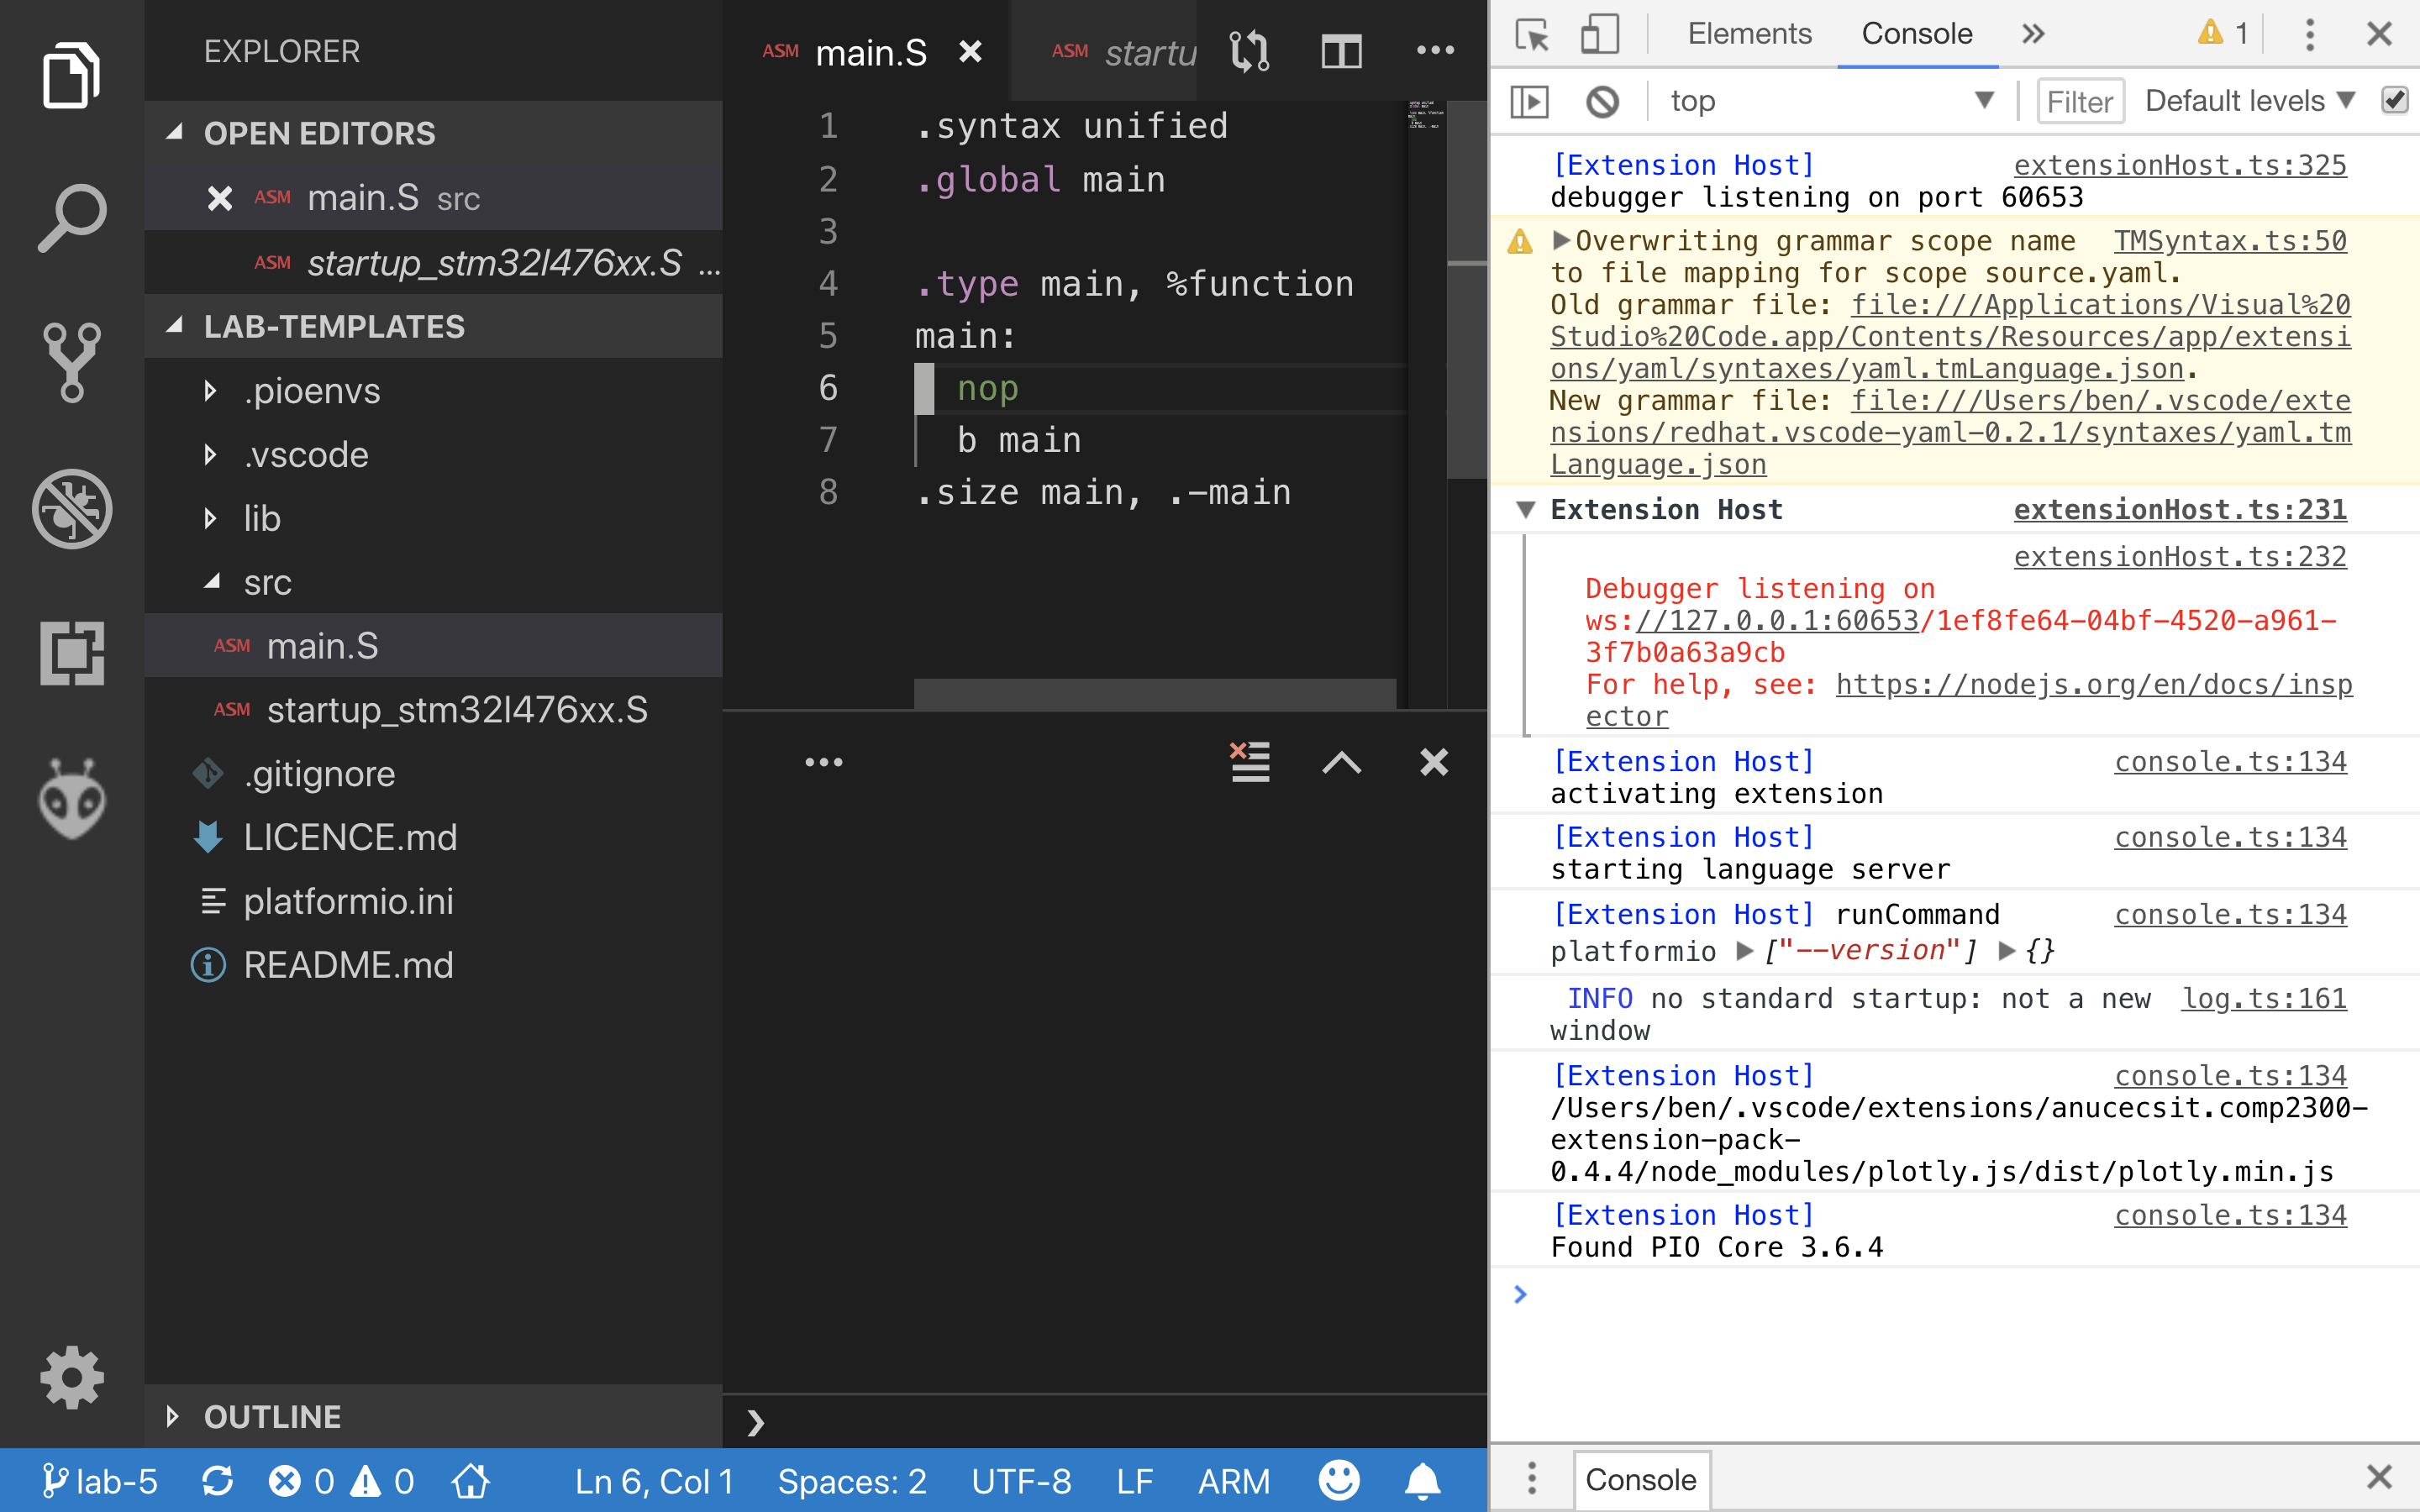
Before you look at the specific problems, here’s a tip for getting the most useful error messages out of VS Code when things are going wrong. In command pallete, run the Developer: Toggle Developer Tools command and you’ll see a new pane pop up in VS Code. Switch to the Console tab (top-right of the screenshot) and you’ll see something like this:

Keep this view open while you do the command which isn’t working for you, and it might output some error messages here (watch for red lines of text) which give you more detailed information about what’s going wrong. If the issue is not immediately obvious, now would be a good time to consult with a tutor or post on Piazza.
OS Specific Problems
[Windows] Integrated Terminal Freezes
On some Windows machine VS Code terminal tab freezes at start up. This happens irrespective of the shell selected. Because of this the debugger will not run.
The cause of the problem is still unclear. There is no fix at the moment.
[Windows] Git HTTP Basic Authentication Failed
Open the start menu, and search for Credential Manager. Select Windows Credentials, then search for git in the list of generic credentials. Either update your password or delete the entry to resolve the issue.


