This week’s lab will introduce you to more important parts of the computing environment of this course, particularly Gitlab, which will be used every time you submit work. We will then further introduce you to programming with Haskell.
Table of Contents
- Table of Contents
- Pre-lab Checklist
- CECC Gitlab
- Crash Course on using Git with VSCode
- Angle conversion with Haskell
- Area of a Triangle
- GHCi commands
- Merge Conflicts [Optional]
Pre-lab Checklist
- Have completed Week 1 tasks.
- Have read lecture material material prior to this lab.
- Be able to locate VSCode and the Terminal on lab computers.
- Be able to execute basic bash commands e.g.
cd,pwd, etc. - Be able to execute basic commands in GHCi.
CECC Gitlab
CECC operates a teaching focused GitLab service https://gitlab.cecs.anu.edu.au/, which we use throughout the semester and is also used in other courses (COMP1110 etc.). In your own time, feel free to check out the School of Computing’s Gitlab Guide.
GitLab is an online Git repository manager with a wiki, issue tracking, continuous integration, and continuous deployment.
Git is a free and open source version control system (VCS), originally developed by Linus Torvalds in 2005, the famous creator of the Linux operating system kernel. Git is an example of a distributed version control system (DVCS). Instead of having only one single place for the full version history of the software, as is common in once-popular version control systems like CVS or SVN, with Git every developer’s working copy of the code is also a repository that can contain the full history of all changes (https://www.atlassian.com/git/tutorials/what-is-git).
If you wish to use your personal device(s) to work on this course, you will need to install Git to submit labs and assignments. You can download Git here: https://git-scm.com/download/
Configuring Git
If this is your first time using Git on the lab machine (or your personal device), you must configure Git by running two commands in the Terminal, replacing your name and your email in the respective lines.
git config --global user.name "Your Name"
git config --global user.email your_uid@anu.edu.au
Crash Course on using Git with VSCode
In this section we will learn to do the following:
- Create our own copy of a Gitlab repository (a collection of commits, and branches and tags to identify commits)
- Create a copy of the repository on our local machine
- Sync a local repository with a remote repository
- Commit and push changes to a remote repository
Disclaimer: We are only going to go through the essentials of setting up and using Git with VSCode. If you wish to explore more options with using Git with VSCode, check out https://code.visualstudio.com/docs/editor/versioncontrol. We will not be demonstrating using command line for Git. If you wish to learn this yourself then https://docs.gitlab.com/ee/gitlab-basics/start-using-git.html be a great starting point.
Forking a project
This creates your own fork (copy) of a repository. Forking a repository allows us to commit our own changes without modifying the original project.
- Using a browser, go to the repository that you will wish to make a copy of. The URL for this lab is https://gitlab.cecs.anu.edu.au/comp1100/2024s2/2024s2studentfiles/comp1100-2024s2-lab02.
- Go to the project’s dashboard under the Project tab and click
on the Fork button.

- You will be asked where to fork the repository. Click on the user or group to where you’d like to add the forked project. You should see your own name here. Do not rename the project.
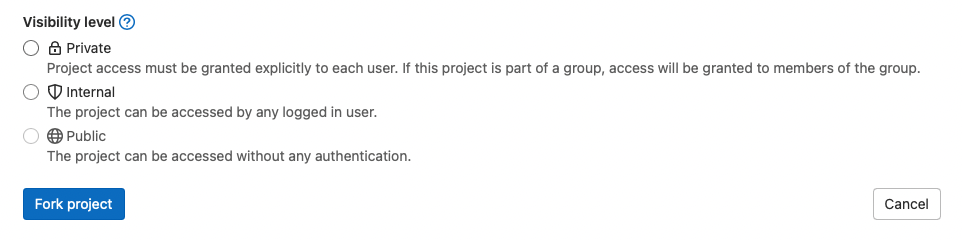
- The last choice to make is to pick the visibility level for your repository.
You must make this Private.
In other words, pick the first button in the list below.
Then you can press the blue “Fork project” button.
Once you have successfully forked a project, you will be redirected to
a new webpage where you will notice your name before
> project-name. This means you are now the owner of this
repository. The URL in your browser should reflect the change:
https://gitlab.cecs.anu.edu.au/uXXXXXXX/comp1100-2024s2-lab02
If you don’t fork the project, you’ll be trying to push your work to the same public repo everyone is forking from, which Gitlab will prevent you from doing. Pause for a minute, and consider why this might be — ask your peers or tutor if you have questions.
So far we have only been working with remote repositories:
A remote repository stores versions of project files in the “cloud” at some server site. The CECC GitLab Web site (i.e., https://gitlab.cecs.anu.edu.au) is the server we are using.
Cloning a project into a workspace
We can only work on projects in a local repository.
Cloning creates a local repository, storing the file on your local machine (i.e., the lab machine you are currently working on or your personal computer).
- Navigate to the Gitlab webpage containing the project you wish to clone—the remote repository that you own. Click the Code button, which is a little below the Fork button inside a large blue box, copy the HTTPS link by choosing Copy to Clipboard. This copies the URL of the remote repository.
- On your lab machine, launch VSCode.
-
Next, we are going to open the Command Palette by pressing
Ctrl + Shift + Por selecting “View > Command Palette…” from the VSCode menu.The Command Palette will be how you interact with many of VSCode’s features, including Git.
- In the Command Palette, type
git cloneand press Enter.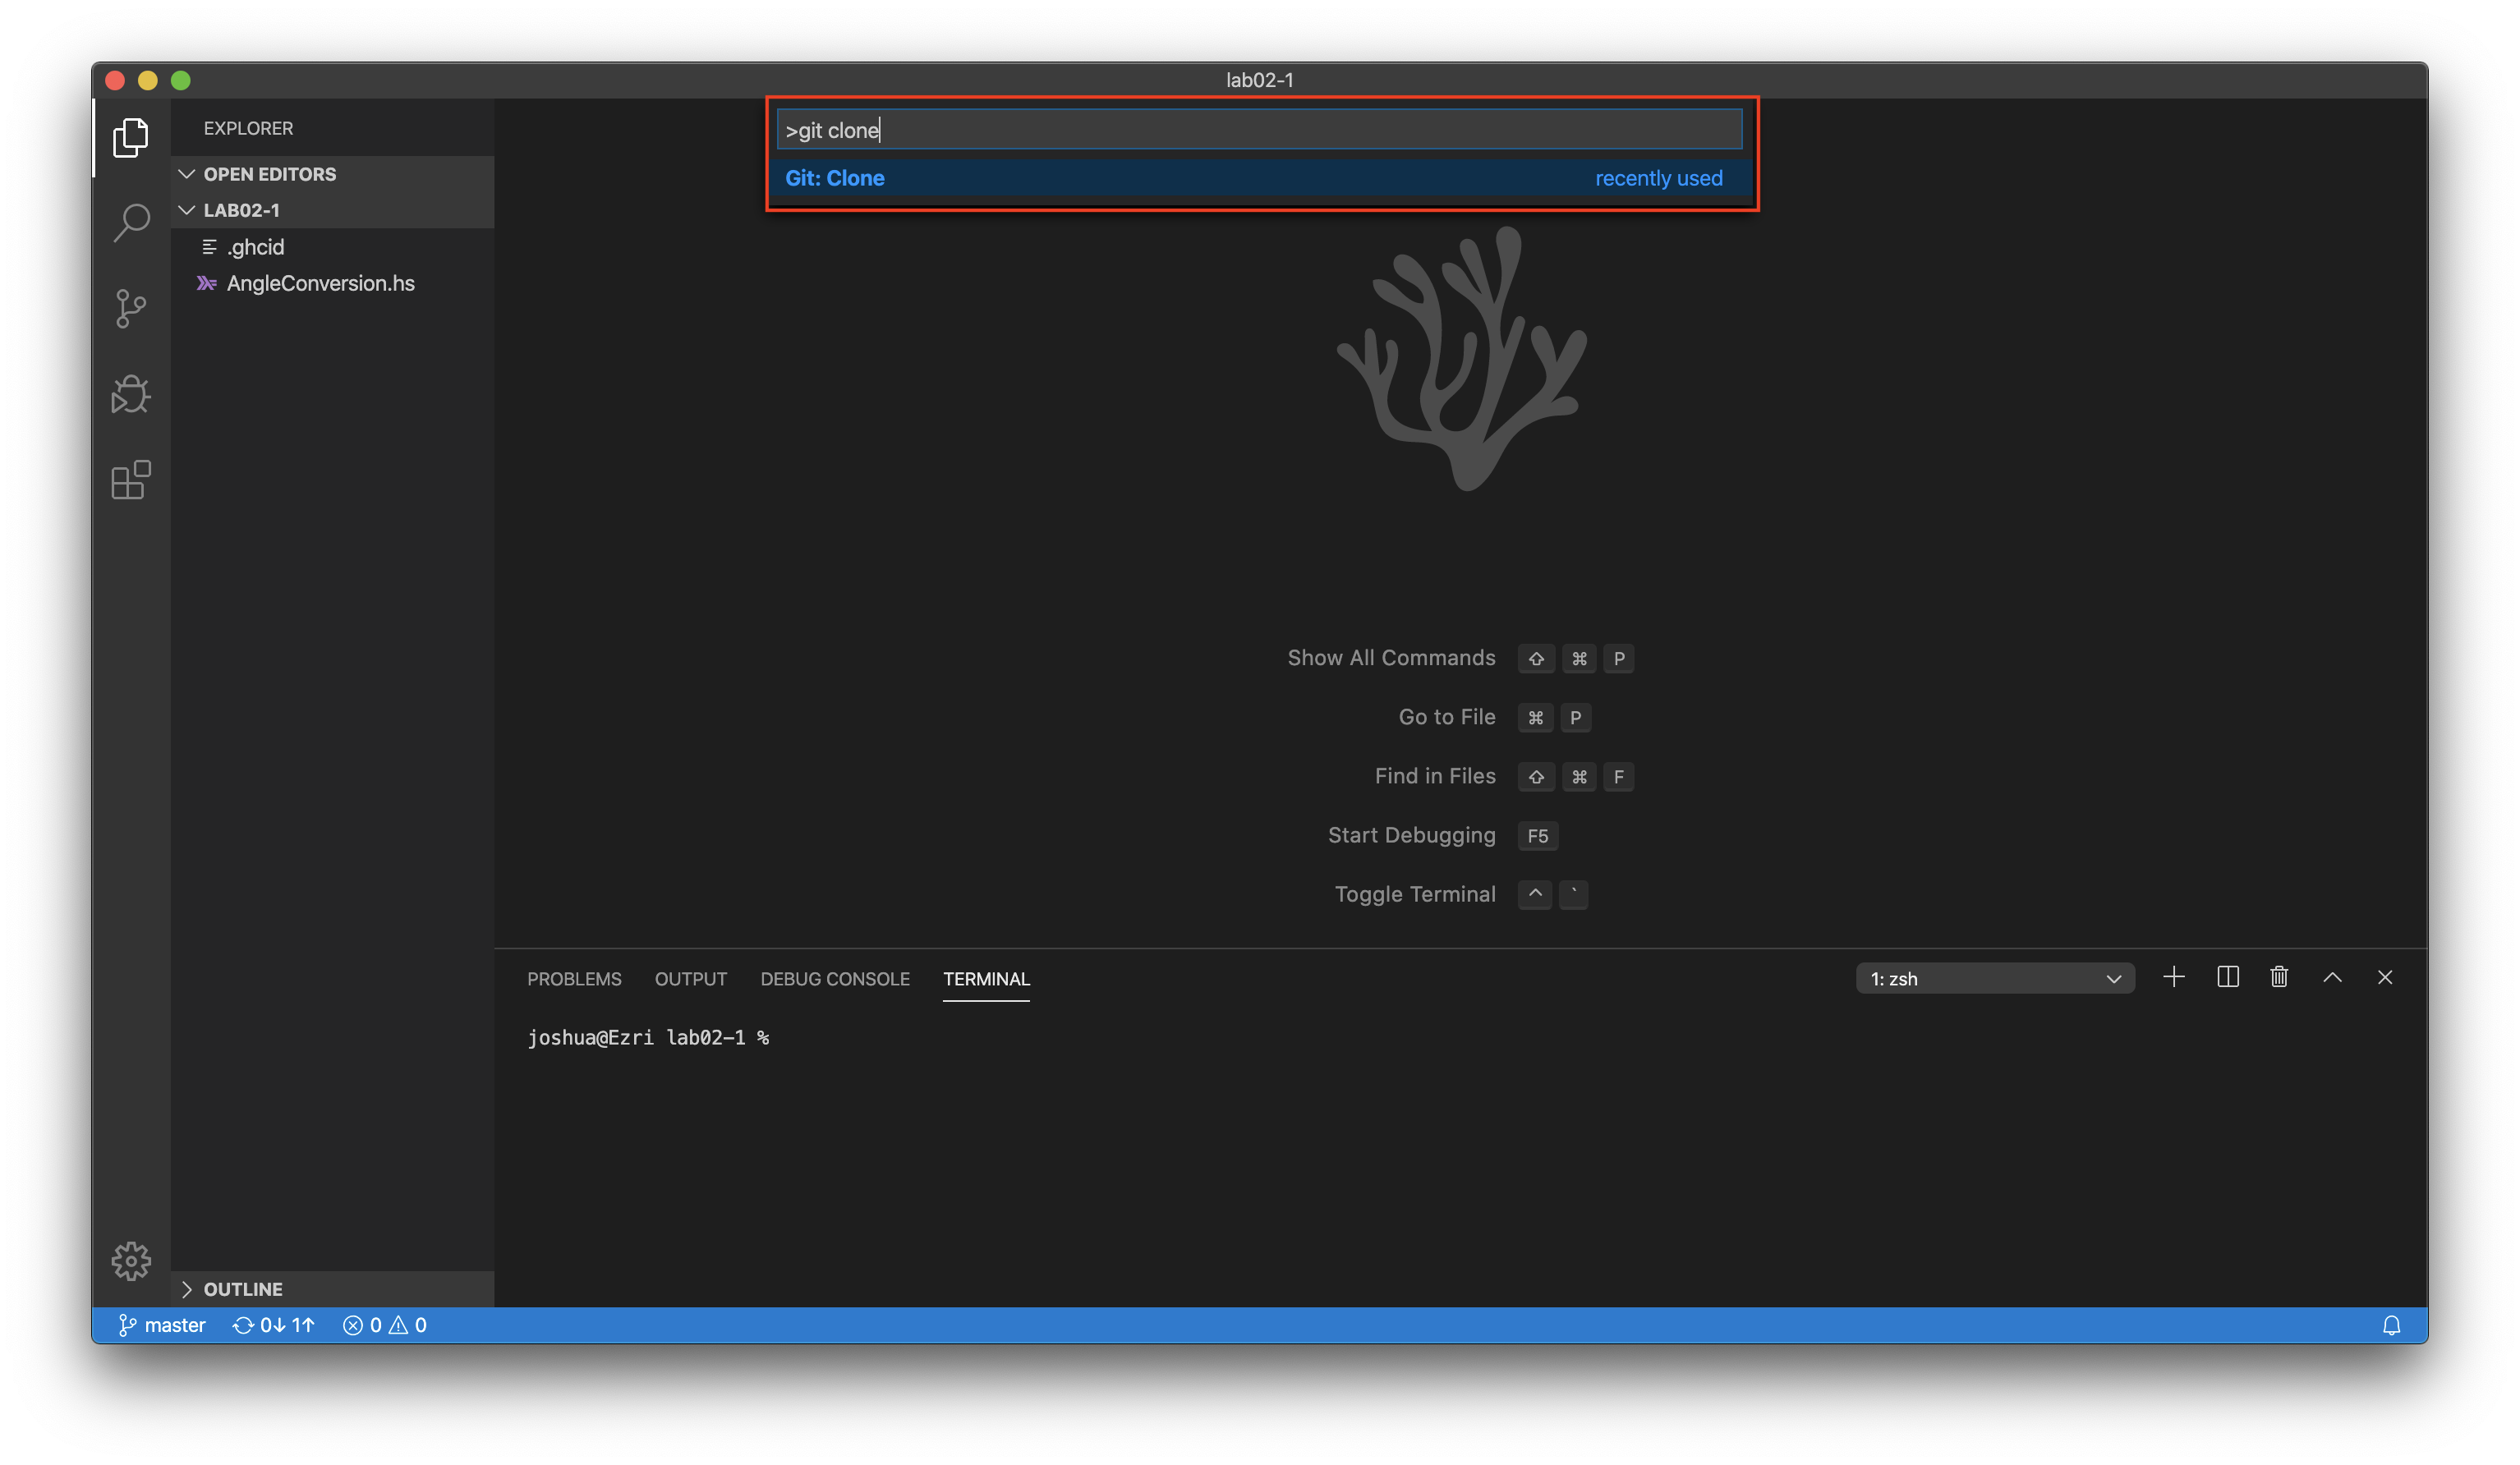
- Paste the remote repository URL that you copied in step 1 into the
Command Palette (by pressing
Ctrl + v) and then press Enter.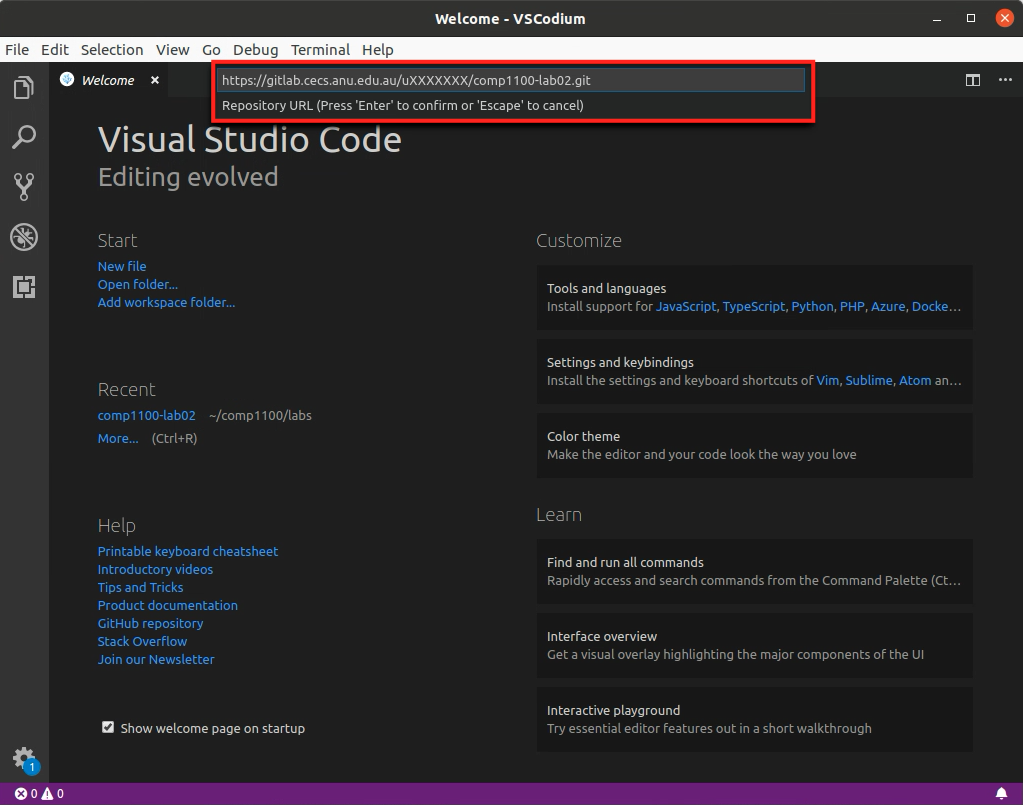
- Navigate to the comp1100/labs folder that you created in Lab1 and then press the Select Repository Location button in the top right.
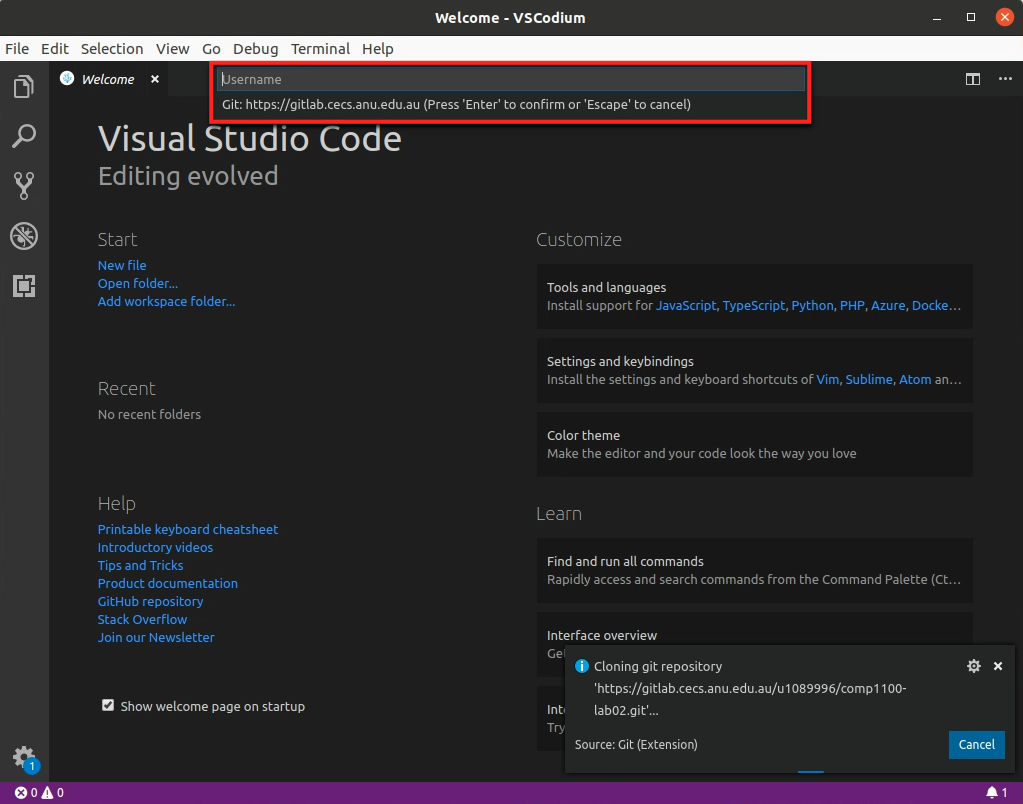
- In the prompt window at the top of the screen enter your username
(uXXXXXXX) and the password. Git operations that will come next
in this and later labs will require you entering your username and
password.

- A popup will appear in the bottom right. Click
Open.
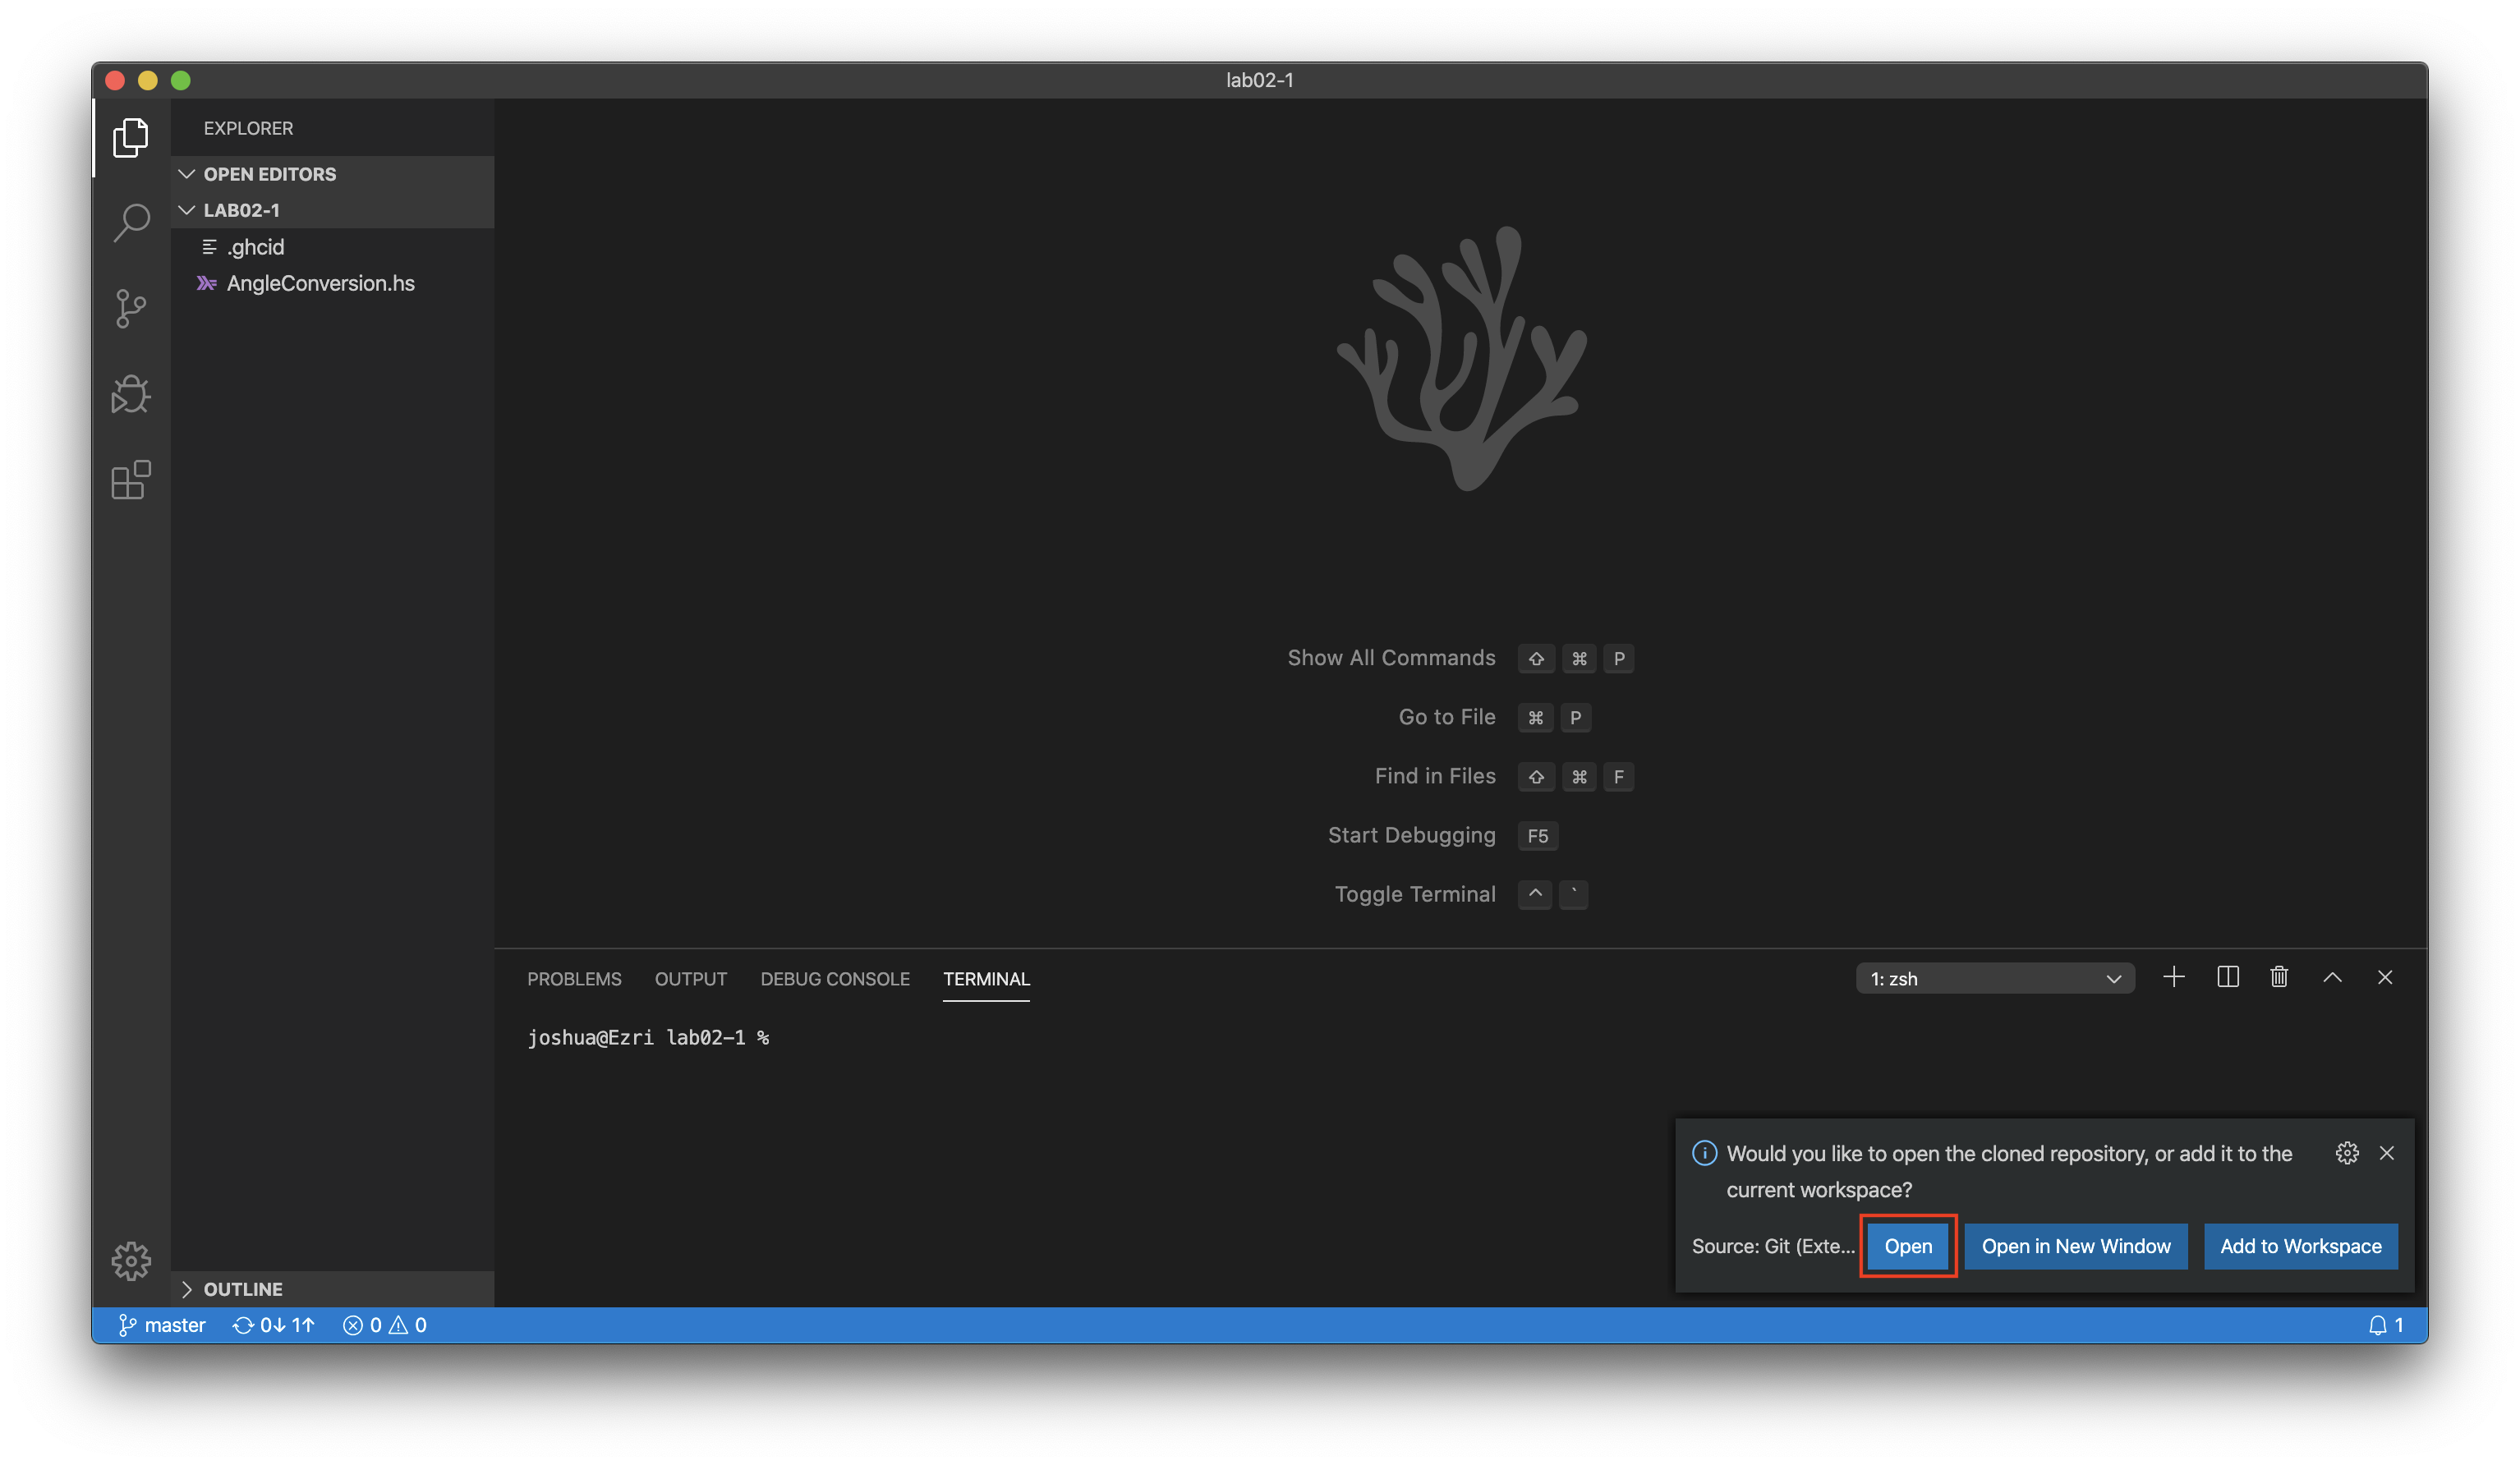
Congratulations! If you see a new window with the project files, you have successfully cloned the project. Now you are ready to edit the files in the project.
Pull changes from remote repository
It is very important that you perform this step before making any changes to your local files every time. Otherwise your local and remote repositories may get out of sync in ways that are tricky to fix.
Pulling changes from the remote repository ensures that our local files are in sync with our previous work, if any. Although there are multiple ways of achieving this, we will focus on only pulling in this guide.
- Open the Command Palette again by pressing
Ctrl + Shift + P. - Type
git pulland select the option Git: Pull to fetch and apply changes (if any) from the selected remote repository.
- [Optional] If you have made changes to your local repository before pulling, you may have the unpleasant job of dealing with Merge Conflicts, which we will get into later.
Since there are no new changes to the remote repository (you just cloned an identical copy a few minutes ago!) nothing should happen after following steps 1 and 2.
Now, let’s get some actual work done.
Angle conversion with Haskell
Exercise 1
In order to complete this activity, open the file AngleConversion.hs in the VSCode text editor (double click it on the left hand side of the window).
In this file, you will find that we have already defined a function
for you: degreesToRadians which, as the name suggests, converts
values of angles from degrees to radians.
The equation used for the defined function is: \(radians = degrees \times \frac{\pi}{180^\circ}\)
Your task is to complete the function radiansToDegrees, with
appropriate:
- short comment useful to describe its funtionality,
- type signature declaration,
- definition of the function itself.
Here is the mathematical equation required: \(degrees = radians \times \frac{180^\circ}{\pi}\)
This is not a test. If you are confused, please ask for assistance from your tutor or your classmates.
More details regarding radians can be found at http://mathworld.wolfram.com/Radian.html.
Floating point numbers
A word of caution
Floating point numbers are imprecise: a/b*b==a does not hold in
general (see
https://wiki.haskell.org/Generic_number_type). Irrational
numbers. which are real numbers that cannot be written as a simple
fraction, can lead to this imprecision, e.g., pi, sqrt 2, etc.
Let us look at a simple yet universal example. In the following
example, (==) is used to check equality, and returns true if the
values of the arguments are equal, and false otherwise. e.g. 3 == 3
returns True.
We all know \(0.1 + 0.2 = 0.3\) based on simple arithmetic, so let us
test this in Haskell. Enter GHCi by typing ghci in Terminal.
ghci> 0.1 + 0.2 == 0.3
...
What do you see? Is it the answer you expected? Now try
ghci> 0.1 + 0.2
...
Let us also look at the functions in AngleConversion.hs. In terms of
the mathematics involved, we can all agree that
which means that
\[30^\circ - \text{radiansToDegrees} (\text{degreesToRadians} (30^\circ)) = 0\]Let us try that in ghci (Don’t forget to load the AngleConversion module):
ghci> 30 - radiansToDegrees (degreesToRadians 30)
What did you get?
How about the following?
ghci> radiansToDegrees (degreesToRadians 30)
As mentioned above, floating point representations for irrational
numbers such as pi can be imprecise.
Long story short: Internally, computers use a format (binary floating-point) that cannot accurately represent decimals such as 0.1, 0.2 or 0.3 at all. When the expression is interpreted, “0.1” is already rounded to the nearest number in that format, which results in a small rounding error before the calculation happens.
Check out https://floating-point-gui.de/ for more details. There are also numerous websites that go into further details regarding floating point rounding errors, these are only a Google search away.
As an analogy, imagine writing down the decimal expansion of \(1/3\) to only a few decimal places as \(0.333\) and then multiplying this by three. You end up with \(0.999\), not \(1\), which is essentially what causes the computer to make the error above.
Git commit local changes back to the remote repository
- Open the Command Palette again by pressing
Ctrl + Shift + P. - Type
git commit alland select the option Git: Commit All.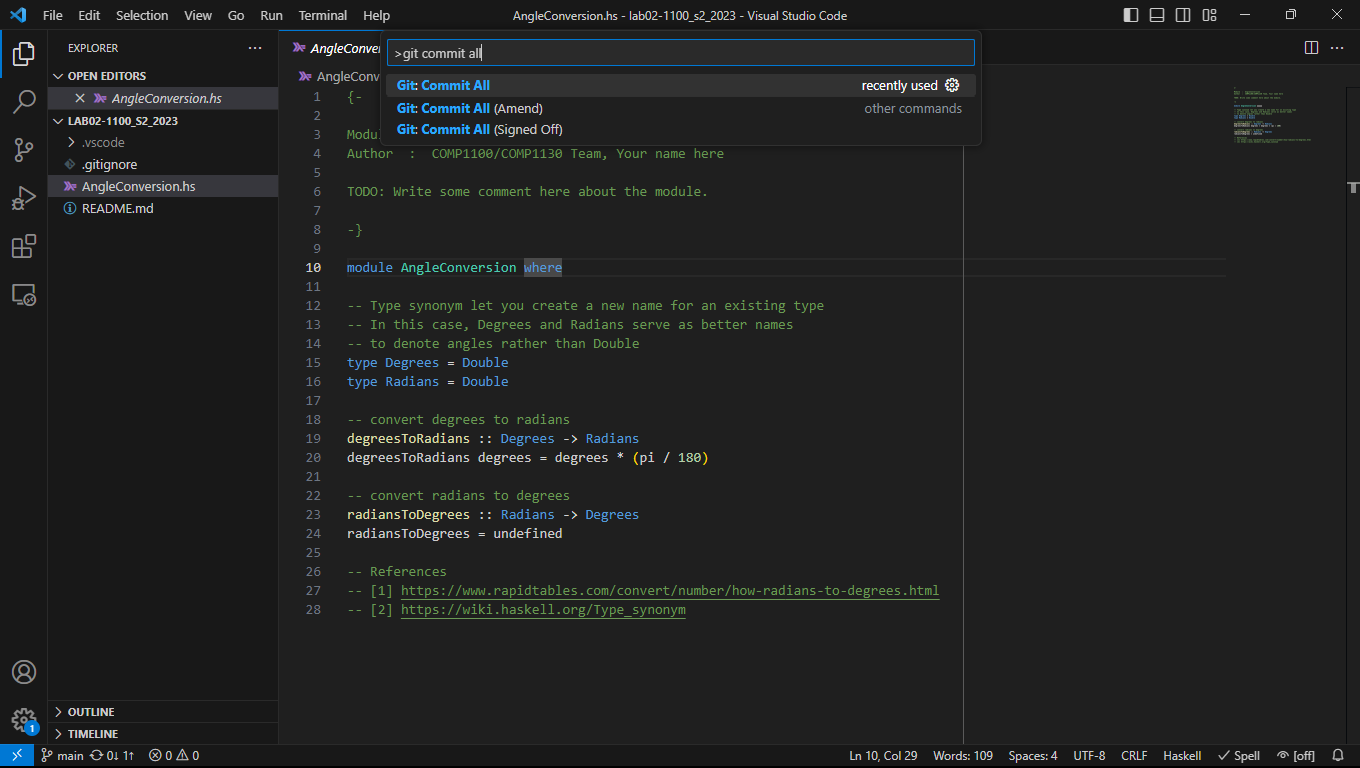
- Write a useful description within the file that appears. Then press the tick on the top right hand side.
A useful message in this case could be
“Added definition of
radiansToDegreesfunction” or “definedradiansToDegreesfunction”. It is important to make the message: https://chris.beams.io/posts/git-commit/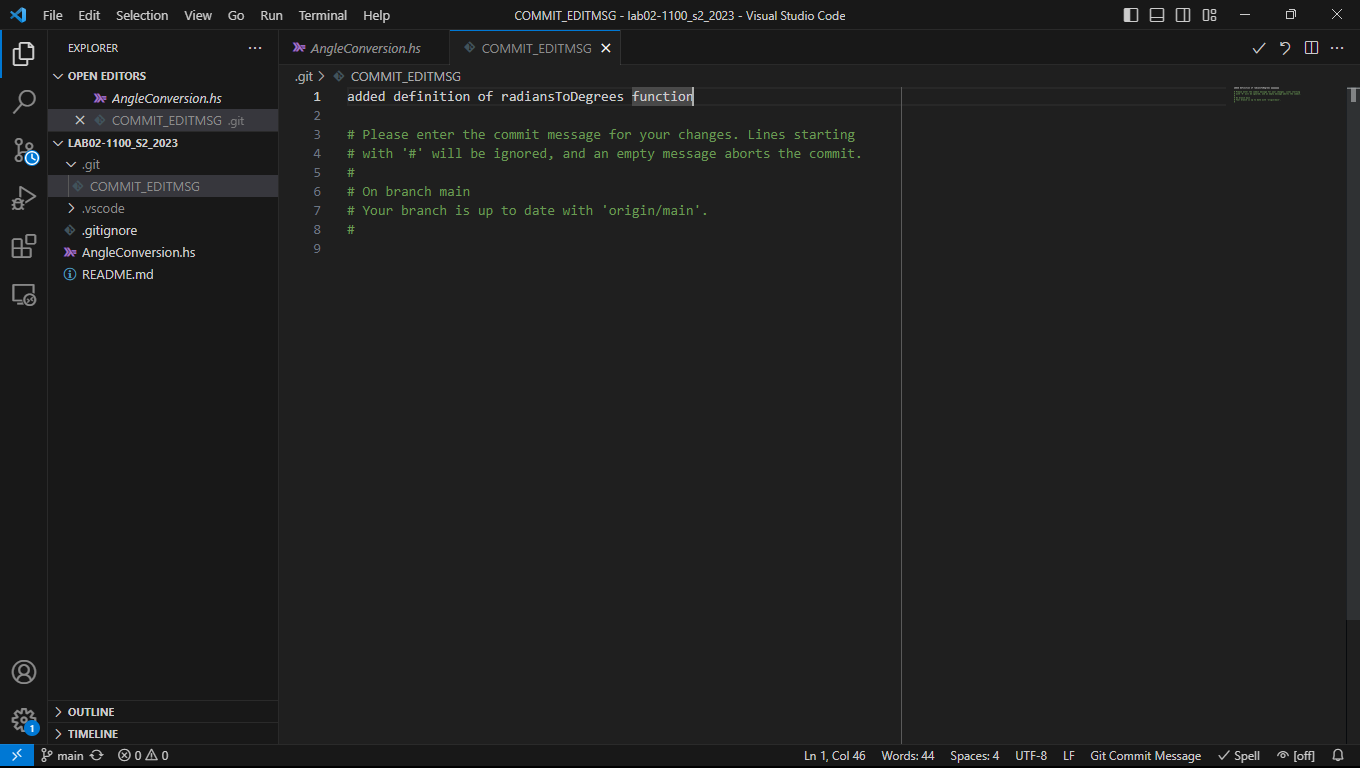

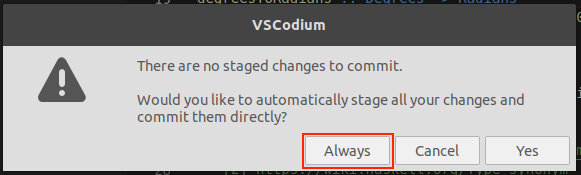
If this is your first time committing in VSCode, it may ask you
whether you want to automatically stage commits. Click Always if
this appears.
If an error appears like the following, ensure you have followed the
instructions for configuring git.

Git push changes to the remote repository
- Open the Command Palette again by pressing
Ctrl + Shift + P. - Type
git pushand select the option Git: Push.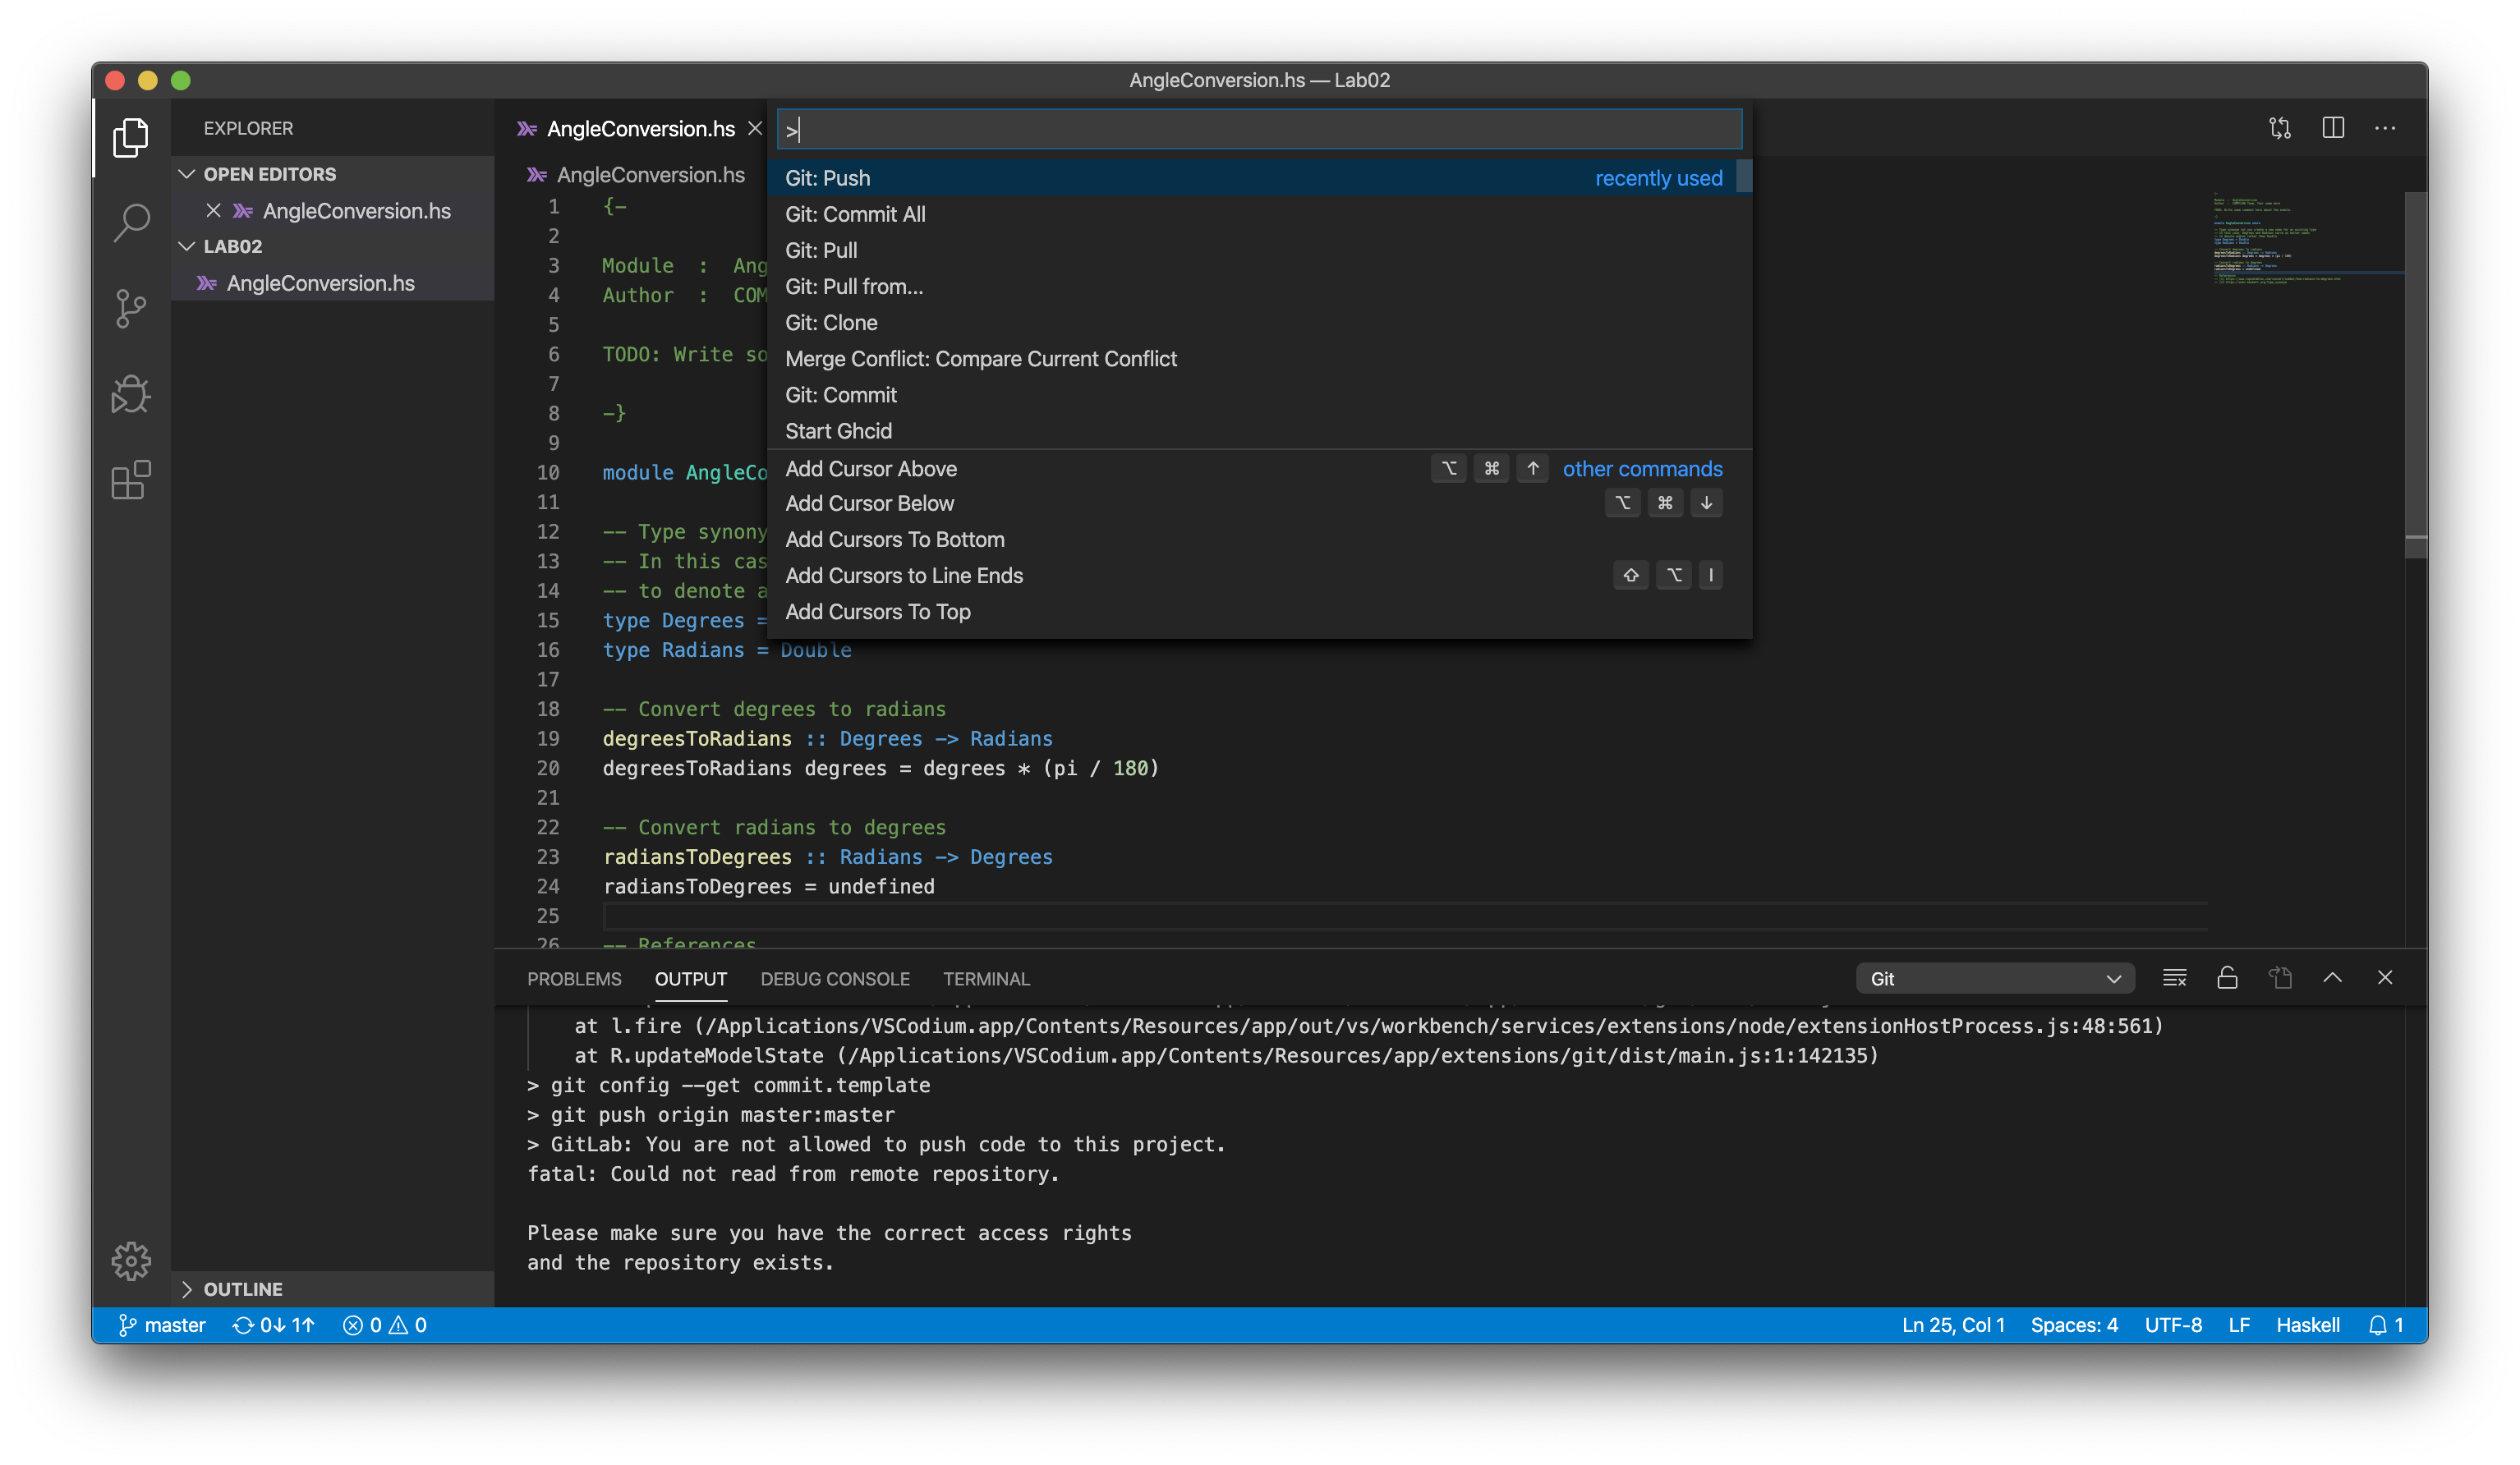 In the prompt window enter your
username and password as before.
In the prompt window enter your
username and password as before. - Check that your work has actually been pushed to the remote repository by visiting your copy of the Lab2 repository on the Gitlab website. Hint: it will probably be at the URL: https://gitlab.cecs.anu.edu.au/uXXXXXXX/2024s2/2024s2studentfiles/comp1100-2024s2-lab02 but with your UID instead of “uXXXXXXX”.
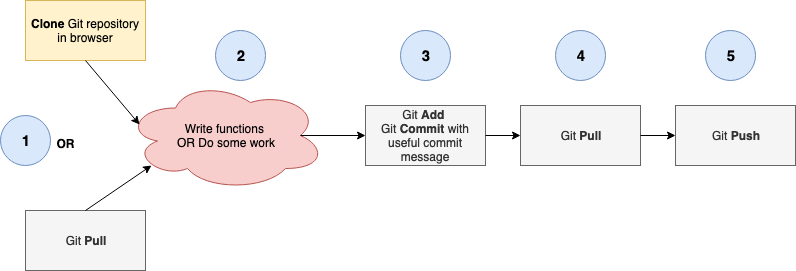
Git workflow
The following diagram provides a pictorial representation of the workflow that we followed in the previous section. Please refer to this workflow throughout the semester and follow the steps numerically from 1 through to 5 on the lab computer as well as your personal computer every time you start work. Please ask your tutor if you are unsure about any of the following steps.
Area of a Triangle
Exercise 2
In the same directory as AngleConversion.hs
- Copy the file
Area.hsfrom last week’s lab. - Add the module information at the top of the file similar to
AngleConversion.hs - And then …
Write a function that takes in 3 floating numbers, representing the three sides of a triangle, and outputs a floating number as the answer, representing the area of such triangle. The area of a triangle with sides \(a\), \(b\) and \(c\) can be defined as
\[\textrm{area}_\triangle = \sqrt{s(s-a)(s-b)(s-c)}\]where,
\[s = \frac{a+b+c}{2}\]Again, again …
- What do you think is a useful function name in this case?
- What do you think should be the type signature of this function?
- What do you think should be on the second line of this function?
- What could you include as a comment for the function that is useful to the reader?
You may find a where clause useful in this case:
-- add the cubes of two numbers
sumCubes :: Double -> Double -> Double
sumCubes m n = cube m + cube n
    where
        cube x = x * x * x
In this example, cube is a helper function (function that performs
part of the computation of another function) that cubes a given number
and its functionality can be hidden away in a where clause. This
avoids code repetition, which contributes towards code style, which
helps with debugging the functions more easily when required. More
details on this in a later lab.
Some test cases that you could compare your function with:
ghci> areaTriangle 3 4 5
6.0
ghci> areaTriangle 10 5 7
16.24807680927192
ghci> areaTriangle 3 3 3
3.897114317029974
Write or run some more tests to help give you confidence that your function is correct.
You are required to submit your attempts at the exercises above in order to receive full participation marks for this lab. You have until the start of your next lab to do this. You should submit by committing and pushing all your changes to your Gitlab repository. You should have the exercises from the previous lab in this submission as well, so that you can receive full participation marks for that lab.
GHCi commands
GHCi commands all begin with : and consist of a single command name
followed by zero or more parameters. The command name may be
abbreviated, with ambiguities being resolved in favour of the more
commonly used commands. A more comprehensive list of commands can be
found at
https://downloads.haskell.org/ghc/latest/docs/html/users_guide/ghci.html#ghci-commands
| Command | Abbreviations | Action |
|---|---|---|
:load <modulename> |
:l <modulename> |
Load the Haskell module |
:reload |
:r |
Reload the module loaded by the last :load command |
:browse <modulename> |
:bro <modulename> |
List the functions defined in the module you just loaded. |
:cd <directory> |
Changes directory just like in Bash. | |
:type <expression> |
:t <expression> |
Show the type of the expression e.g. :t True shows True :: Bool |
:info <name> |
:i <name> |
Shows information about the specified “name”, it could be a function, type constructor, class etc. |
:help |
:? |
Give a complete list of GHCi commands. |
:! command |
Execute a shell command. e.g. :! pwd. |
|
:quit |
:q |
Exit from GHCi and return to shell. |
| \(\uparrow\), \(\downarrow\) | Move up and down in command history. | |
| tab | Completion of name or command from partial entry. e.g. Tr<TAB> -> True. |
|
let x = pi |
Give x the value of pi in this GHCi session. |
Adapted from S. Thompson, Haskell: the craft of functional programming.
Some exercises to try in your own time using GHCi commands:
- How do I list all the functions in scope for
Area.hs? - What is the type of
areaTriangle? - How do I find more information about the
Doubletype?
Where can I search Haskell commands and keywords?
The Haskell API search engine Hoogle can be very useful, or you can search the Prelude source code.
Merge Conflicts [Optional]
These instructions have been attached here as reference. You do not need to use these instructions in this lab.
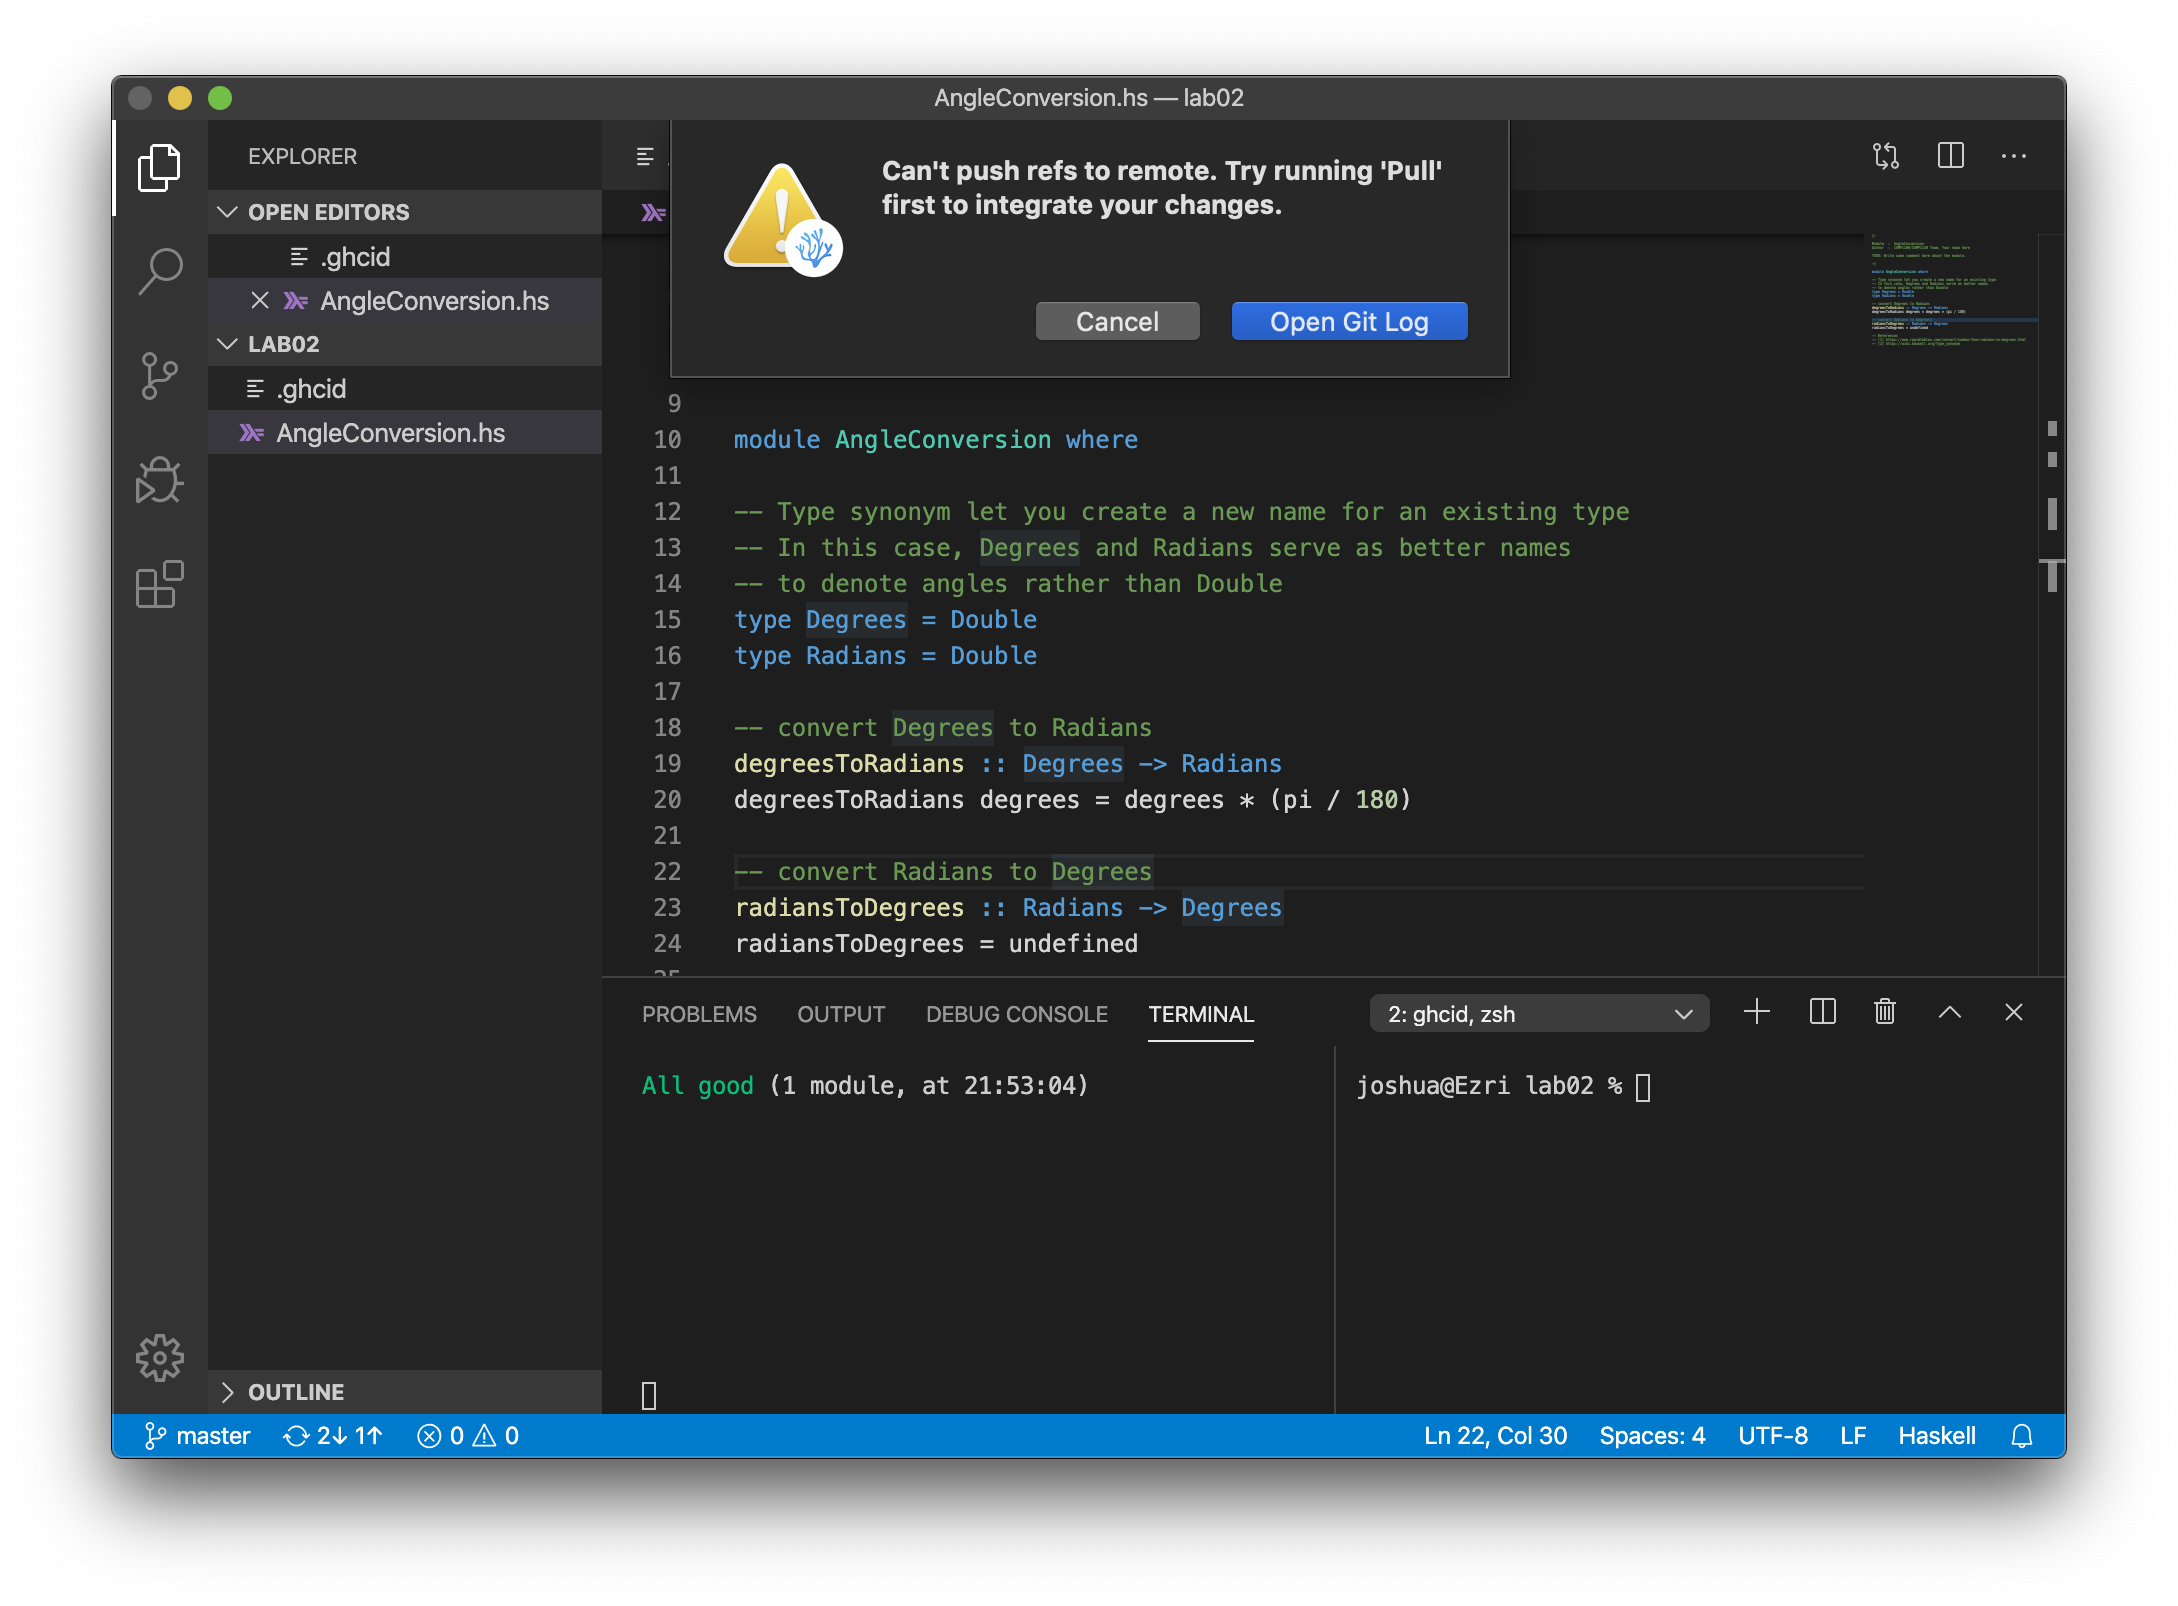
If you have not followed the Git workflow carefully, you may encounter merge conflicts. Merge conflicts occur when different changes are made to the same line of a file. VSCode may inform you of a merge conflict by giving a message “Can’t push refs to remote. Try running ‘Pull’ first to integrate your changes”.
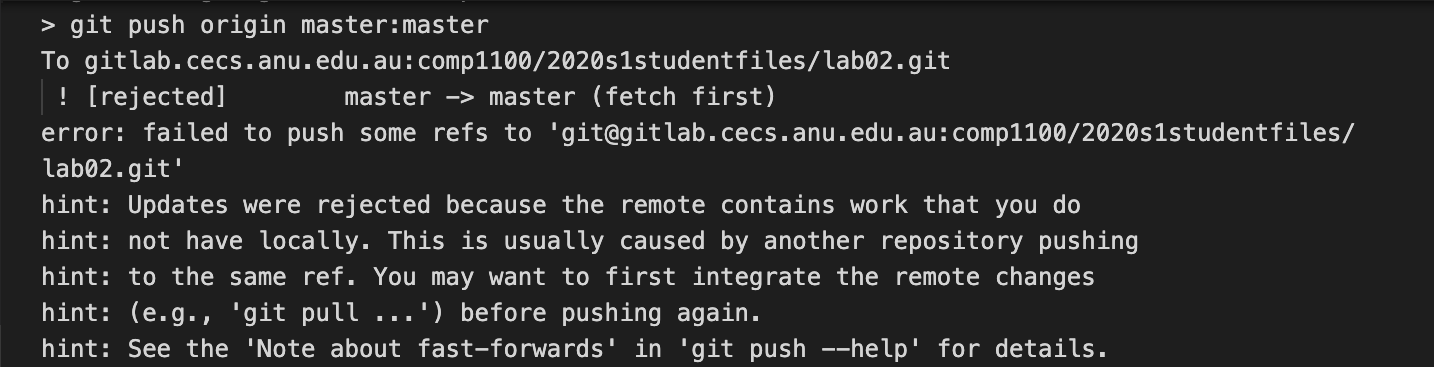
Opening the Git log will explain that the remote repo contains changes that you do not have locally.
To resolve merge conflicts:
- Run Git: Pull from the Command Palette.
- In the VSCode text editor, you will see the conflicting changes,
one from your local repo and one from the remote repo. They will be
labelled as such: “Current Change” and “Incoming Change”,
respectively.
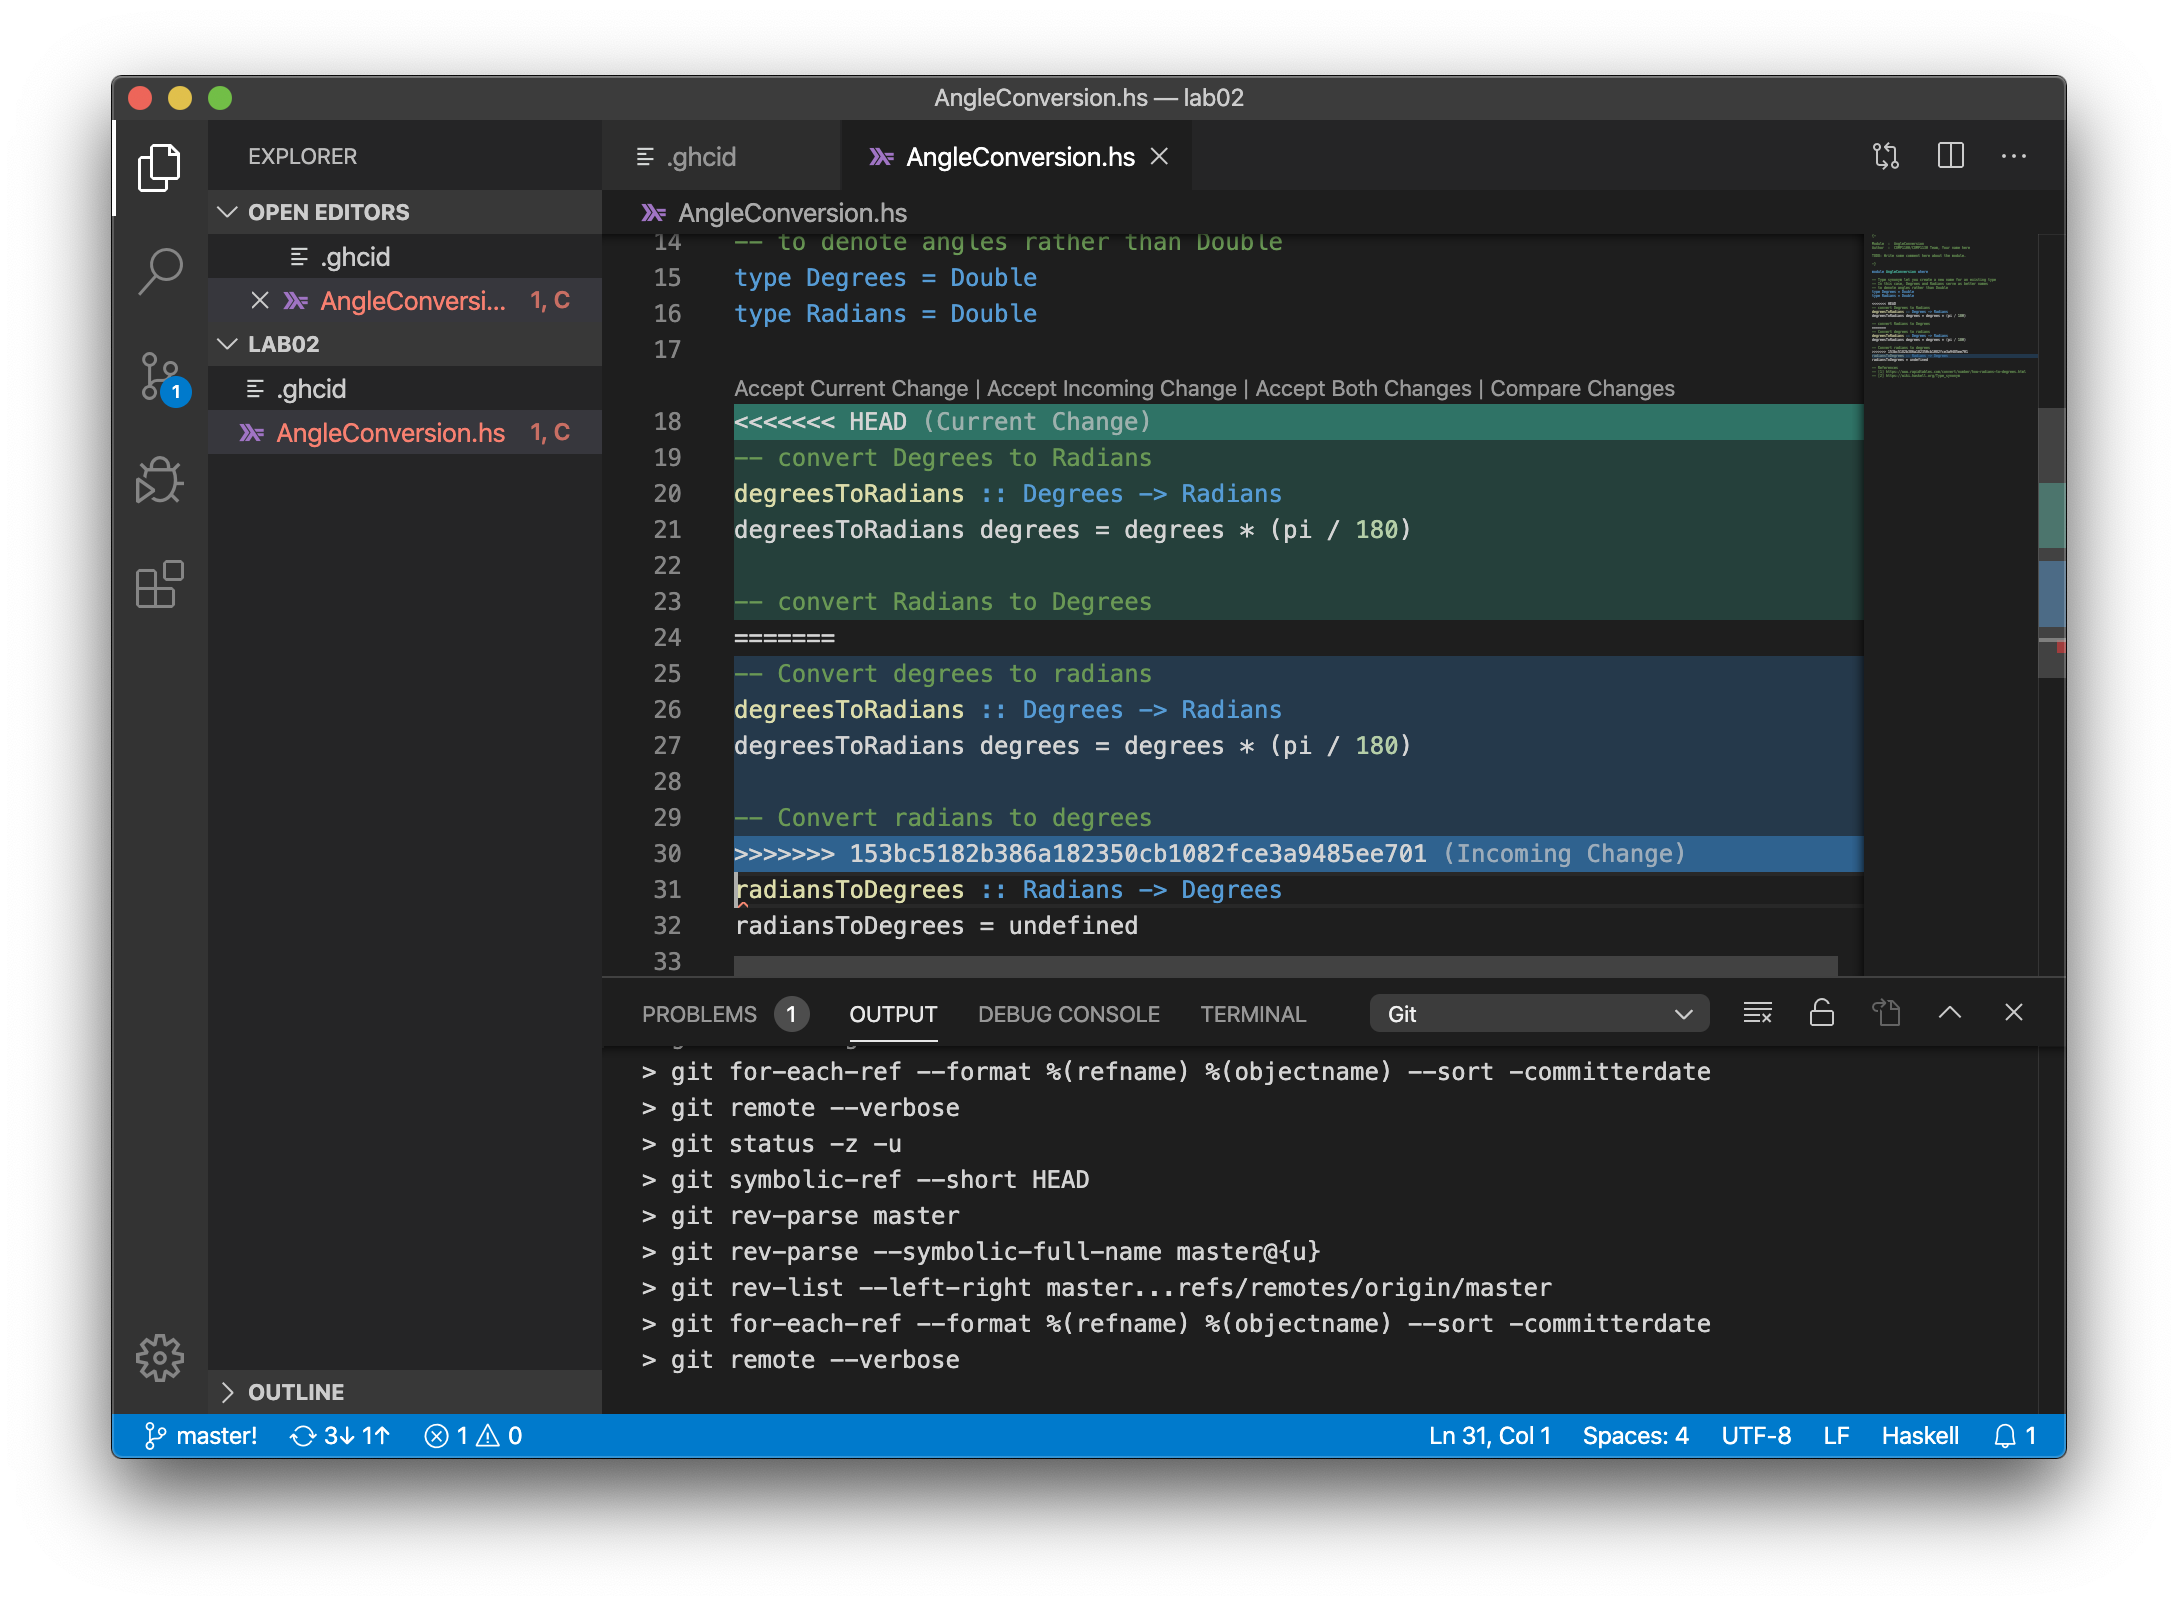
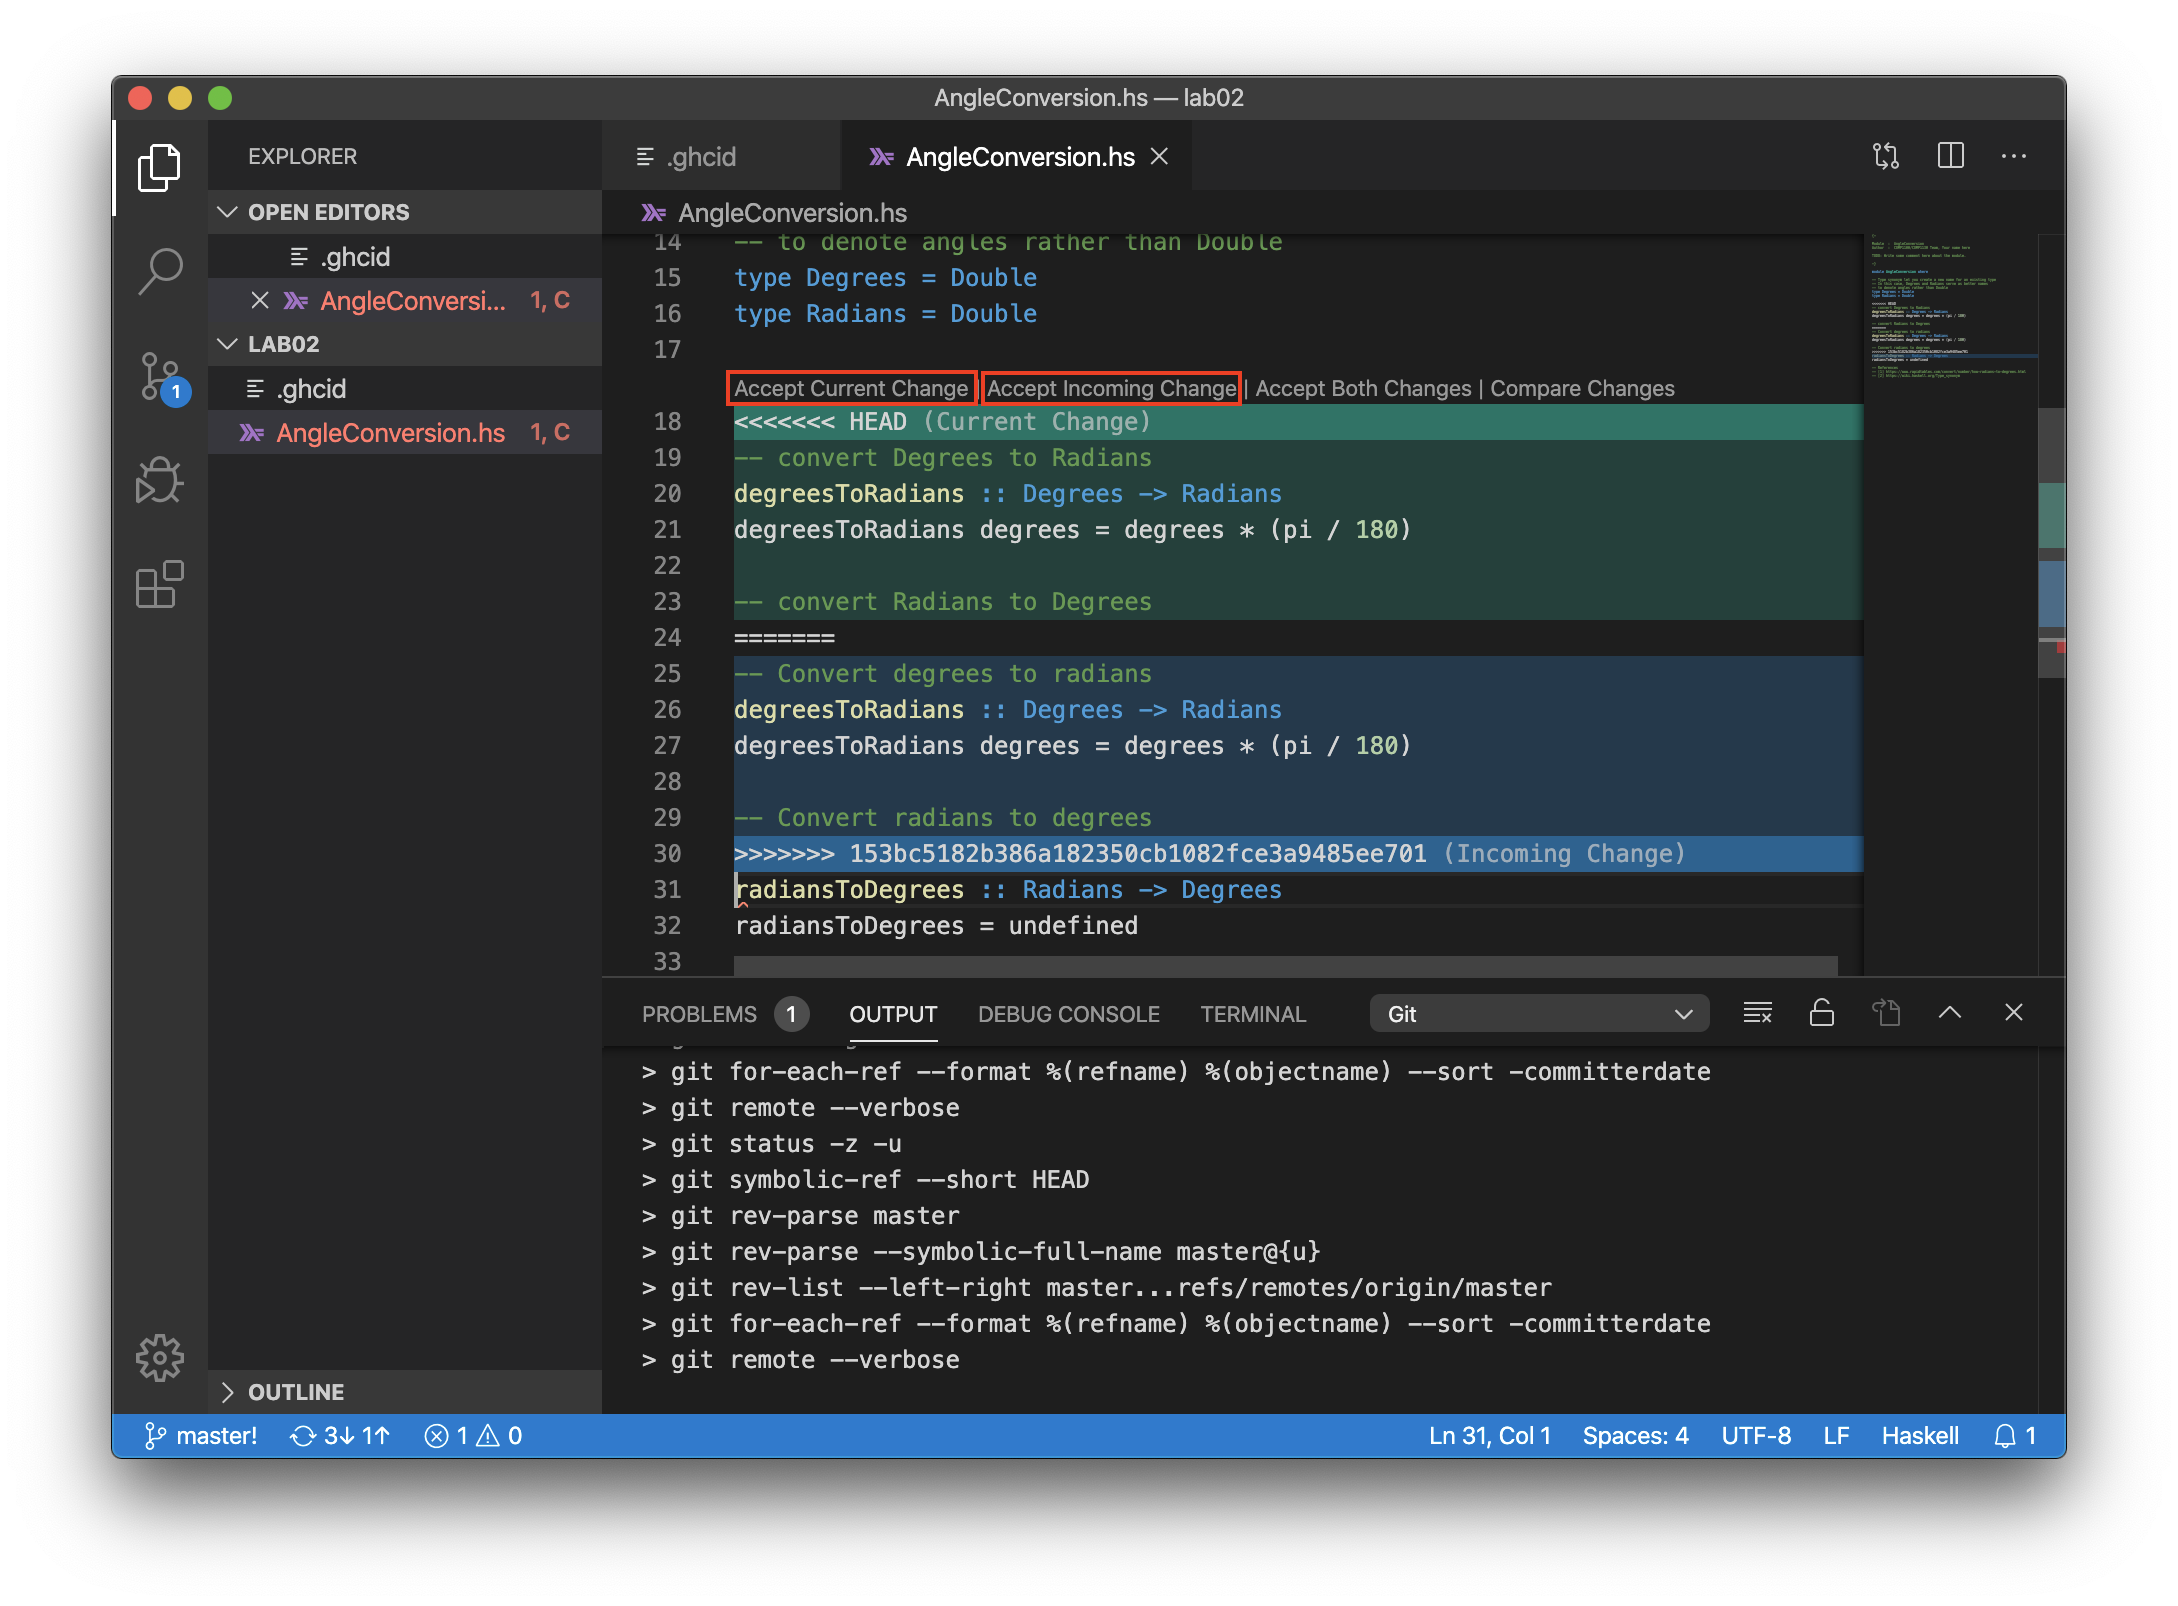
- To resolve the conflict, you must choose one to keep. You can do so
by either clicking Accept Current Change or Accept Incoming
Change button.
- Finalise your choice by continuing to commit and push your work through the Command Palette as described in the sections above.