Outline#
- Deadline: 3 October 2024, 11:59 pm
- Assessment template: link
- Specification: keep reading 🙂
- Weighting: 5%
- Marked out of: _ / 5
Rules and Policies#
- this is an individual assessment task, ensure you fork your repo as private
- you may re-use code from your labs
- late submission is not permitted without an extension
Background#
Goal#
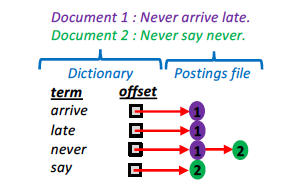
In this checkpoint you will learn to implement hash indices for key-value data stores. Specifically, we provide you a raw dataset in the form of a CSV file that consists of keys (words) and values (array of unsigned integers). In real-world key-value databases, keys and values are typically strings. Our dataset is closest to how search engines organize indices for speeding up search queries on the web. First, each document on the web (e.g., web page or tweet or social media post) is assigned a unique (unsigned) integer identifier (id). Each word (term) that appears in any document is stored as a key. The value is an array and it consists of the document ids where the word appears.
When we search for a specific term (or sequence of terms) using a search engine, a program called a query evaluator retrieves the array of document ids. Searching across billions of documents happens so fast due to this special key-value store maintained by search engines. The key-value pair <word, array of doc ids> is called a posting list. Real-life engines store term frequency (number of occurrences of a term in a document and position of the term in a document) as additional meta-data. The meta-data consisting of doc id, term frequency, and term position is called a posting. We will only assume doc ids in a single posting. We will refer to the key-value database simply as a database or a postings file. The postings file is typically so big that it resides on a storage device, such as a disk or an SSD.
Need for Speed#
There is one problem. Once the query arrives, if the query evaluator performs a sequential search over the postings file to retrieve the list of doc ids, it would take a long time to resolve the queries and return the search results to the user. User-facing applications such as web search are latency-critical and require optimizations to return results to the user facing the screen as fast as possible. Search engines and key-value databases in general use an in-memory dictionary data structure (hash table for example) to store the mapping of keys (terms in our case) to their offsets in the disk-resident database (or postings) file. The combination of the dictionary and the postings file is called an inverted index.
This index mimics the index you find at the back of most books. Humans are incredibly fast at scanning the few pages of the index in books so a separate dictionary data structure is not needed in print. And most books do not contain as many pages as the volume of data on the web. If the dictionary is stored in main memory the query evaluator finds out where on disk the posting list for a word is stored in constant time. Once it retrieves the posting list it begins retrieving the actual documents corresponding to the doc ids. In the real world these documents are hopefully also cached in a web proxy to improve performance1. For now, this checkpoint is about optimising the doc id retrieval step.
Synthetic Dataset#
In real-life search engines, programs such as web crawlers and ingesters and indexers scan each document on the web and build the inverted index. This involves a lot of text processing and handling end of each word and line and accounting for words that are too common such as prepositions. Good news - you don’t have to write crawlers and do elaborate text processing in this assessment. We have provided you with some CSV files that contain raw data mimicking the web.
Specifically, we provide a raw key-value file where each line contains a posting list - i.e., word (term) and an array of unsigned integers representing document ids. You will be working with these CSV files and completing a number of tasks explained below. We do not want you to perform queries on top of a CSV file so we will ask you to build a binary postings file in a specific format. The postings file you will generate will look like an append-only sequential log as discussed in week 7/8 lectures.
- Open the
basickey-value CSV file (in thetests/filesdirectory) containing a small number of posting lists as key-value pairs and make sure you understand what the file data represents.
Input (CSV) File Format#
The entries in the input CSV file from which you will create the database file will be of the following form:
their,74,112,135,154,155,171
The key is a single word of arbitrary length (that contains no whitespace characters) followed by a variable number of zero or more integers. Each integer is separated by a comma. The integers are listed in sorted (ascending) order.
You can make the following assumptions about the input CSV file:
- All unsigned integer values fit into four bytes,
- Everything following the initial key is a valid integer.
- Each record (key and integer values) appear in a new line.
Binary File Format (Postings File)#
Running queries against the CSV file is not optimal. Your code would have to perform text processing (e.g., dealing with end of line and comma separators) while the impatient user awaits search results. We hence introduce a binary file format that eliminates the extra stuff required to make the postings human readable, so the computer can search it and add more postings to it faster. This will form the actual database, or “postings file”, that you will query.
In the binary file format, for each posting list we have the following items:
- Null-terminated key string
- The number of postings
- The postings as raw binary numbers (as opposed to ASCII encoded strings)
- Some padding for alignment, which will be discussed later
The following image illustrates what the binary file will look like for the posting list/entry a_key,2,6,10:

Multiple posting lists/entries are written directly after each other, such as in the following example:

Description of Tasks#
Your task is to write a program db_engine.c in C that
creates a binary-format inverted index, a.k.a. postings file, functions to query (search for doc ids corresponding to a word) the postings file, and convert the postings file back into the original CSV format.
The program takes a (case-sensitive) command name followed by two file names as arguments.
The three valid command names are:
| Command | Behaviour |
|---|---|
| CREATE | Create a synthetic key-value database file (postings file) by reading raw postings from the provided CSV file using the create_db function. |
| QUERY | Load the postings file (which is your database) into memory, read queries from a second file and write the results of the queries to standard output. |
| Convert the postings file into the same format as the CSV file used in the CREATE step. |
You are given db_engine.c, which contains functions you will need to fill in.
The main function that handles argument parsing has already been written for you,
and you do not need to modify it.
Creating a Synthetic Key-Value Database#
The first function you need to implement is the create_db function which creates the binary format
postings file from the CSV format one:
void create_db(const char *src_file, const char *dst_file);
This function will be called when you run ./db_engine CREATE src_file dst_file.
It will take two file names as arguments (src_file and dst_file).
The src_file is the name of a CSV file. The dst_file is the
name of the file to which you write the (binary-format) postings file.
Your create_db function will need to:
- Create a file stream for each of the two files by calling
fopen. - Reading one line (posting list) at a time from the source file stream:
- Write the key or word (including the terminating null character) in the posting list to the destination file stream
- Determine the attribute count or number of doc ids in our case that follow, and write the number as an integer value to the destination file stream, potentially inserting extra padding characters before (see the alignment section below).
- Write each of the comma separated doc ids (integer values) to the destination file stream. The next key will be written sequentially to the postings file.
- Close both file streams.
If you encounter any error in opening/reading/writing files you should print an appropriate error message to standard error and exit.
Alignment#
After you have written the key string to the destination file stream but before you write the attribute count you may need to insert additional padding. This is to ensure you start writing the subsequent integer values at 4-byte aligned offsets in the file.
In the example above, after writing the key and terminating null character the file position is at 0x6. Two extra bytes are written to ensure that the number of attributes is written at an offset that is a multiple of four bytes.
What are the benefits of adding additional padding so the integer values are all written at offsets that are a multiple of 4?
Querying the Key-Value Database#
The second function you need to implement is the query_db function:
void query_db(const char *db_file, const char *cmd_file);
This function is called by invoking the program with the arguments ./db_engine QUERY file1 file2.
The first file (file1) is the postings file you created
in the create step. The second file (file2)
contains a list of queries to perform on the database. Every line in the file
is a separate query. Each query is either a single term (key) or two terms. In the case of a single key, your code retrieves the value by a simple lookup. For two queries, we require you to
compute the intersection of the two value arrays.
The query_db function will need to open file1 and mmap it’s contents into memory.
- Open
file1(the postings file) andmmapit into virtual memory. - Open
file2(using I/O style you wish but we suggest using a stdlib function) and read each line to determine the query you need to perform.- Lookup: When a line just contains a single key, search for the given key in the postings file. If there is a matching entry, print the key and each of its associated values as a comma separated list.
- Intersection: When a line contains two keys (separated by a single space), we need to search for all documents that contain both of the keys (not necessarily consecutively). To do this, we get the posting lists for both keys and calculate their intersection; that is, the list of postings which are in both lists, and hence documents which contain both keys. Print the two keys to standard output followed by all integers present in both entries as a comma separated list to standard output. Each doc id is only printed once.
- To handle cases where a query is for one or more keys not present in the postings file:
- If a query is a lookup for a single key that is not present, print
[key] not found(where[key]is replaced with the key that was queried). - If a query is an intersection between two keys and one of them is not present,
print
[key] not found(where[key]is replaced with the key that was not found). - If a query is an intersection between two keys and both are not present, print
[key] not foundon separate lines for both keys.
- If a query is a lookup for a single key that is not present, print
Database Search for Resolving Queries#
To retrieve the doc ids for a single key or the intersection of two keys will require implementing a way to search the memory-mapped database. There are two main ways you may approach this task:
Naive solution:
- Starting at offset 0, compare the key you are searching for with the key at the current offset.
- If it is a match, print the entry and continue onto the next query (or stop if you have reached the end of the file).
- If it is not a match, calculate the offset of the next key. Repeat the process of comparing keys and calculating the next offset until you either find a match or have reached the end of the database.
- When calculating the intersection of two keys, you will have to perform this search for both keys.
Optimized solution:
- As explained earlier, sequentially scanning the database for each key is extremely slow, and a better approach is to use an in-memory hash table.
- You are required to construct this hash index when the database is first loaded into memory before executing queries (e.g., inside the query_db function).
Organization of Querying Code#
You should use the #ifdef directives in C to write the naive and optimized versions of querying code in the query_db function. The directives are declared already in the db_engine.c for your convenience.
Hash Tables#
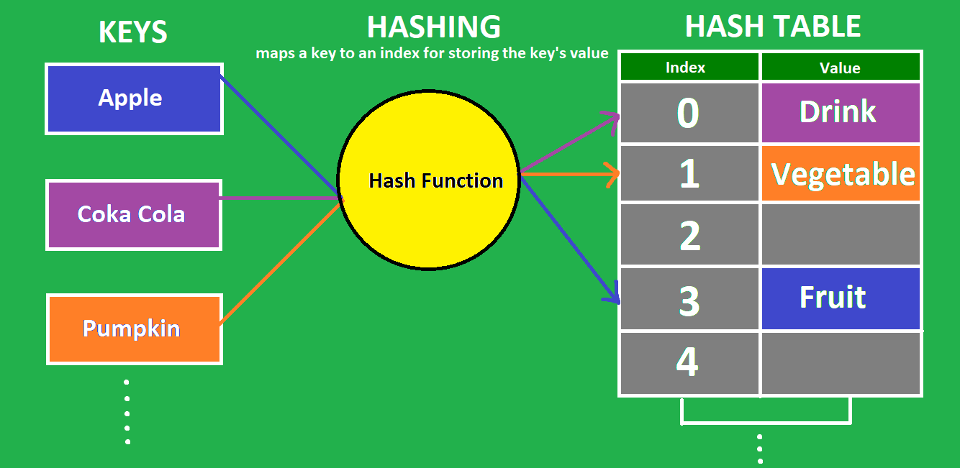
Hash tables provide an efficient way to implement search operations. Fundamentally, a hash table consists of an array in which data is accessed via a special index called the key. Hash functions establish a mapping between the set of all possible keys in the hash table to their locations. A hash function accepts a key and returns its hash coding or hash value. These hash functions use mathematical theory to provide hash codings that are unique to a key. Keys vary in type, but hash codings are always integers. Despite best effort, for a limited-sized hash table, multiple keys collide for the same location in the table. There are different ways to handle hash collisions, such as, open addressing and chaining. We leave it to you to read about the details but implementing hash tables is out of scope of this course. They key idea is that in-memory hash tables enable constant-time lookup operations over a database.
We provide a hash table API for constant-time inserts and lookups. Our hash table uses open addressing. We encourage you to read the hash lookup/insert code but you do not need to understand open addressing to be able to use the provided code. You will need the hash table API for building and using the in-memory hash index for the postings file. Your hash keys are words (terms) and the values stored in the hash table are offsets into the postings file.
Each entry in the hash table is called a hash bucket. Our provided hash table API imposes certain restrictions on the organization of the hash bucket. We provide the bucket data structure for you as a starting point in hashing.h. You are welcome to optimize the hash bucket structure as per your needs. Note that due to the possibility of collisions it is necessary to store the key in the hash buckets.
Generating the CSV File from the Key-Value Database#
The third function to implement is print_db:
void print_db(const char *db_file, const char *dst_file);
This function is called when the program is invoked as ./db_engine PRINT file1 file2.
This function takes two file names - the key-value database you create in the create_db function,
and a destination file to write the CSV file. The result of this function is
a CSV file that looks similar to the input file (dataset) we provide you in the original repo.
Note that there should be no whitespace before and after each comma in the CSV file you generate.
Error Handling#
While you may assume certain things about the content of the files you are given, you will still need to handle potential errors with the I/O functions you use. For example, your program should gracefully handle the case where you attempt to read from an input file that does not exist.
If any error occurs in a function that sets the global errno (such as fopen, mmap or stat),
your code should print an appropriate error message to standard error that includes the name of the function that failed, and the reason for the error (hint: use the strerror function). It should then call exit with status 1.
Testing#
Some of the tests will compare the results of your create_db function against
a database (postings) file. These test cases assume that your machine is little-endian.
We have provided some test cases for you to check the behaviour of your code by comparing the output with what is expected, alongside a bash script that will run these tests for you automatically. You can run this script with the command:
./run_tests.sh
The testing script has a number of different options available. You can see a
brief explanation of available options by running ./run_tests.sh -h, or reading
the following table:
| Option | Behaviour |
|---|---|
-h |
Display usage information and exit. |
-t test |
Run only one test (test is the name of the test to run). |
-v |
Print the contents of stdout and stderr when running tests. |
-n |
Disable color in the testing script output. |
When running the tests for querying and printing, the tests use pre-built posting
files present in the tests directory, rather than the ones you generate
directly with create_db. This is to help you work on each of the required
functions independently if you get stuck. As always, feel free to write your own
additional test cases.
Tips, Tricks and Hints#
-
It may be difficult to read the contents of the postings files you create directly using an editor, such as, VSCode or your editor of choice. You can use a tool like
hexdumporxxdto view the raw bytes contained in a file directly. Runman hexdumporman xxdfor information on how to use these tools. -
Remember there is a difference between reading and writing an integer value and the ASCII representation of an integer. When creating the database, integers must be written as their value. When printing values as a response to a query or printing the database, integers must be written as their ASCII representation. Also remember that some keys could contain numeric characters - these should always remain in their ASCII representation.
-
The
getlinefunction can help you read in lines of arbitrary length. To understand how to use this, runman getline. You can also consider using stdlib functionsfgets,strsepandstrtok.
Marking#
This checkpoint will be marked out of 5. Your code will be partially auto-marked by running tests in the CI. These tests are the same provided to you in the repository. We will also take into account the efficiency with which you resolve the search queries.
Submission#
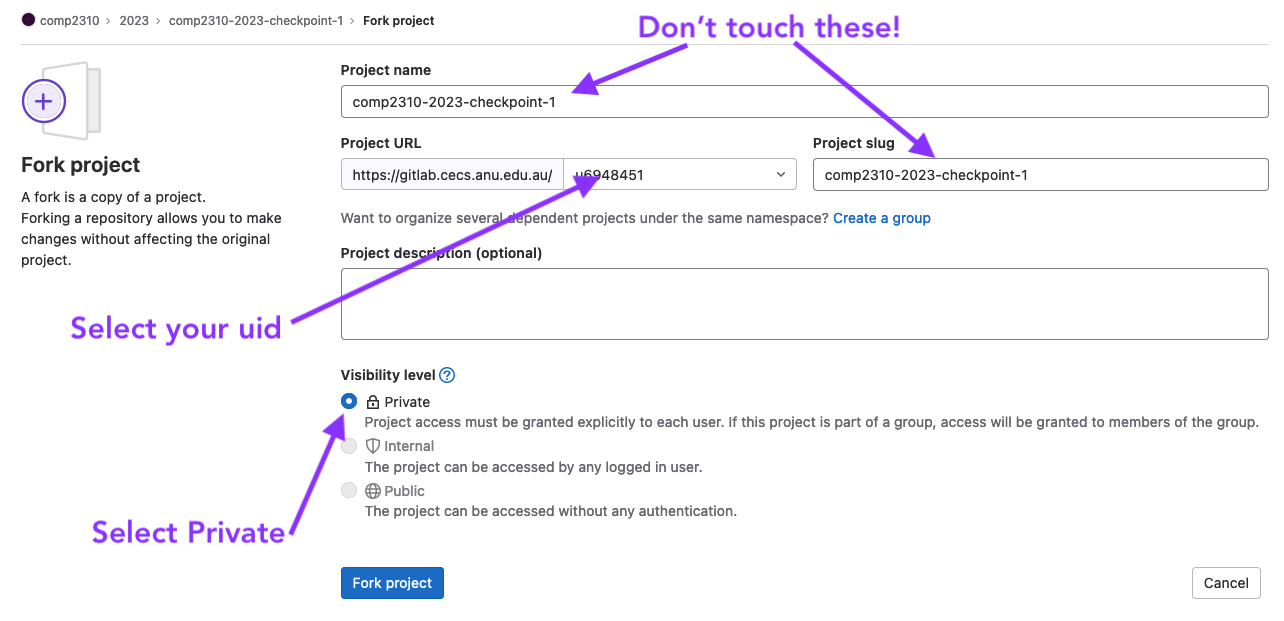
Submission is through GitLab, the most recently pushed commit of your fork of the assessment template before the deadline is taken to be your assessment submission.
Getting Started#
- read this assessment page completely
- fork and clone the assessment template
- ensure you fork your project as private
- do NOT change the name or path of the repo, or it may get missed by our software
- work on each task, testing, committing and pushing as you go
- make a mistake or get stuck, then ask a good question on the course forum.
Completion Checklist#
- you have completed the code in the files provided and have not renamed or moved them
- you have run your files against local test(s) and they pass successfully
- you have created your own tests for your files and they pass successfully
- you have saved, committed and pushed your files to gitlab
- you have filled out, committed, and pushed your statement of originality
- you have checked the gitlab ci tests and they are passing
- you have checked the pdf artifact on gitlab to ensure it is correct
Gitlab CI and Artifacts#
You should be familiar with the CI jobs from assignment 1 and checkpoint 1. As a reminder:
To view the CI pipeline for your repo, click on the little icon to the right of your most recent commit.
![]()
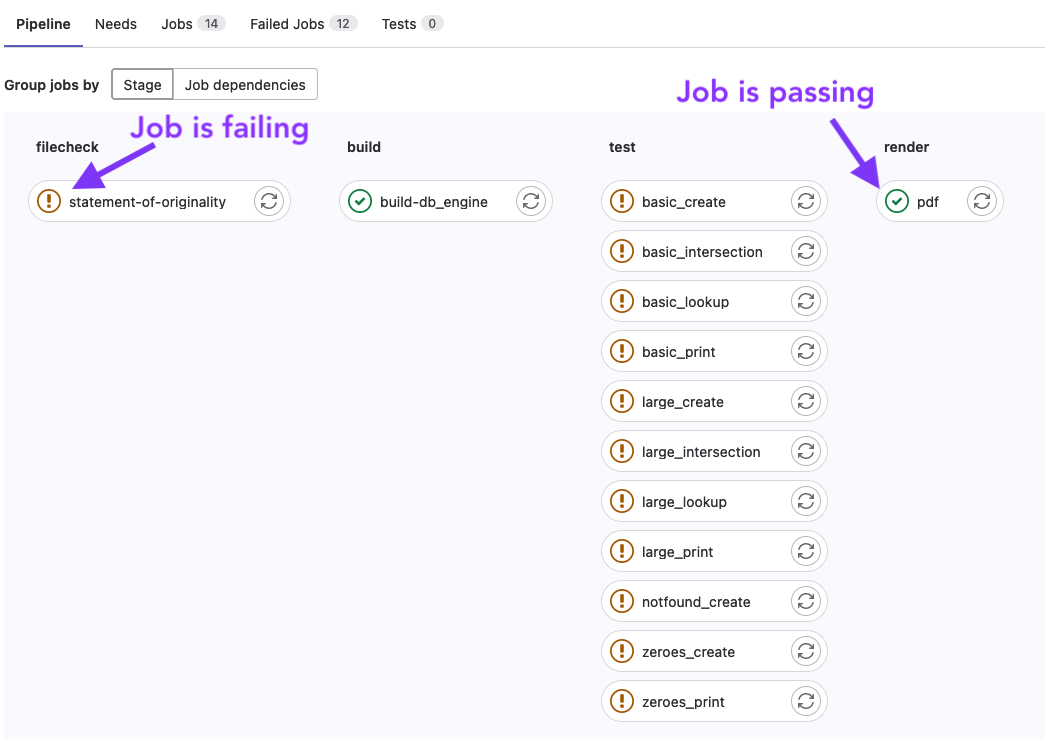
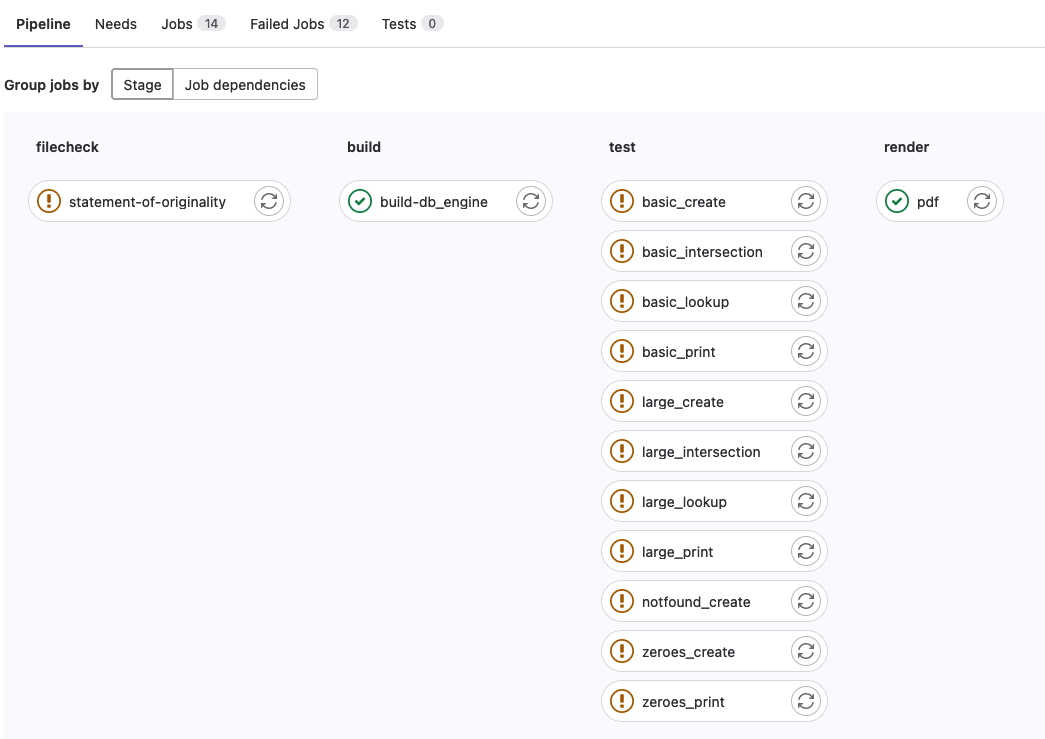
Then you’ll be presented with a list of the jobs, you’ll want to make sure that the jobs are passing once you’ve completed the corresponding task.
Filecheck stages ensure that the file exists and has been updated from the default. Test stages run the submitted files against our tests to measure correctness.
PDF Artifact#
Your repo will be packaged into a pdf for marking purposes. As such it is important that you see what the result
of the pdf job is and make sure the output makes sense.
It will:
- take your name and uid from the
statement-of-originality.md - take the results of the provided CI tests
- take your report written in the
report.mdfile - take test results from the CI
- take references from the
statement-of-originality.md
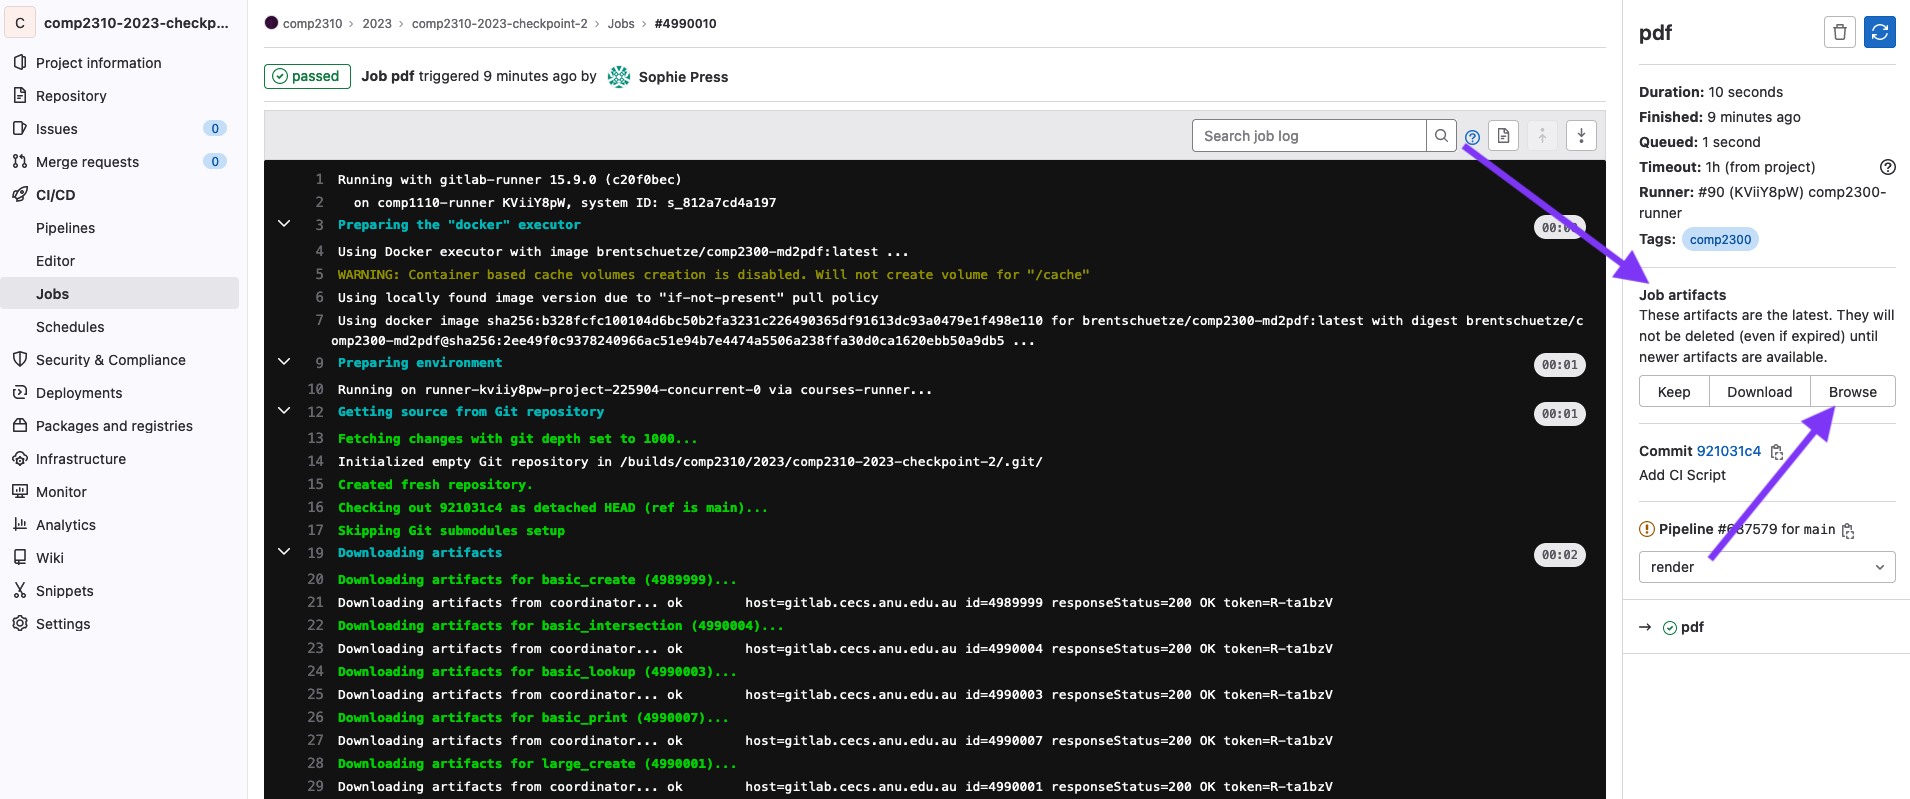
To view the pdf, first click the ci icon on your most recent commit (as above), then click on the
pdf job.
Then, you’ll be taken to the job page, where you should see a “Job Artifacts” section, click on the Browse button.
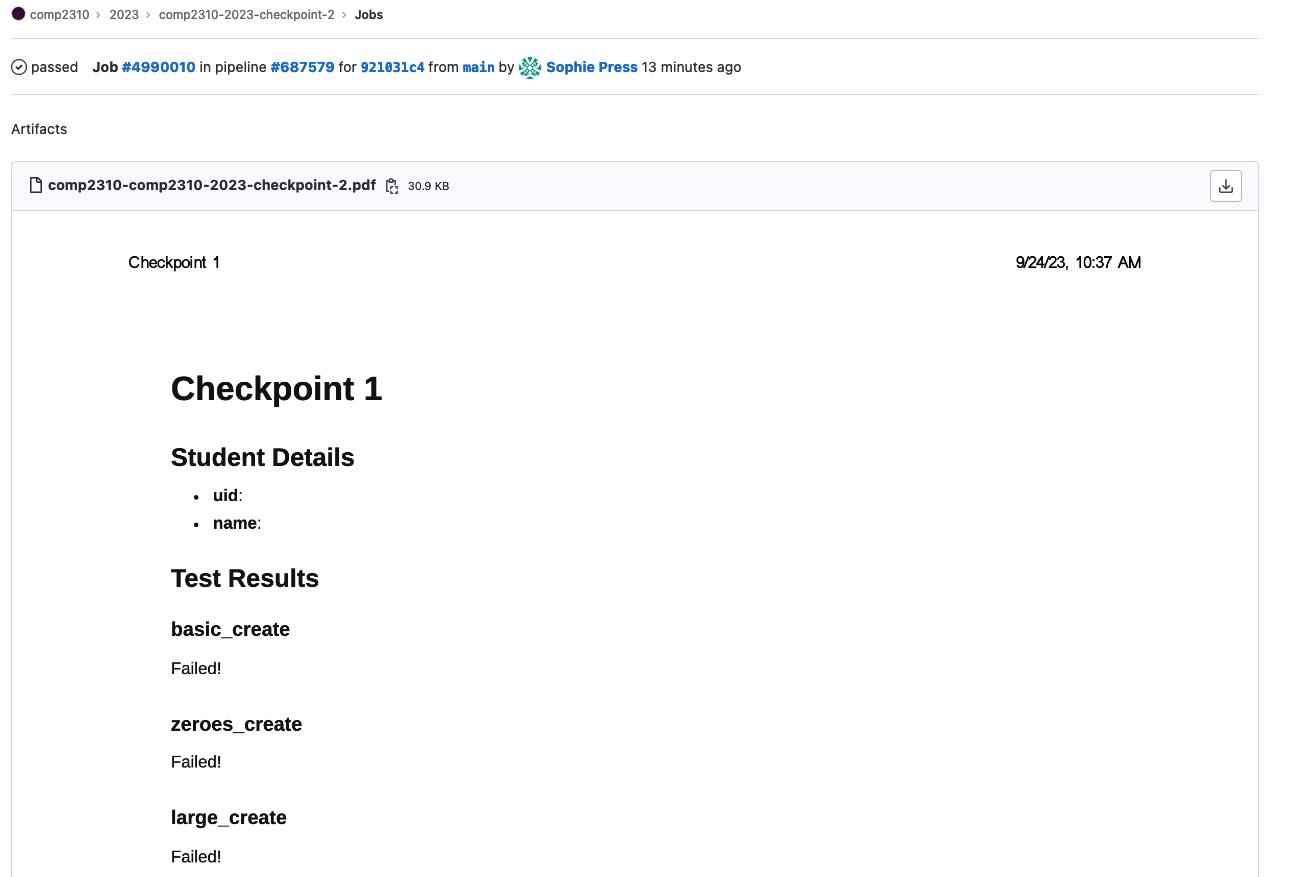
Click on the file to preview what your pdf looks like:

Which should look something like this:
FAQ#
My code don’t work, can I email you for help?#
Sorry, you won’t get help over email or Teams. We provide a course forum which is the only way we are able to help outside of labs.
Forum posts related to your assessment submission must be “private” if they contain code or other sensitive information (as for any individual assessment task).
It’s [5 minutes, 60 minutes, 12 hours] before the deadline and my CI Jobs aren’t finishing!#
Unfortunately on the day that an assessment is due, when many students are pushing updates at once, the CI servers can’t keep up. You may not see your CI jobs finish before the deadline. You will just have to manually check that your files have been submitted correctly and that you are passing tests locally.
The best way to avoid this issue is to start early and finish early 😇
If there’s any issues with your git repository after the deadline. Please let us know (after the deadline) through a private forum post and there may be something we can do.
How do I know my assessment has been submitted?#
If:
- the files in your fork of the assessment are correct (i.e., the files you intend to submit) when checking on the gitlab website
- the time is before the deadline
then your assessment has been submitted (well done!).
Please don’t ask us to “check”, we would be just doing exactly the same thing as the above steps which you can do yourself.
-
This is the subject of the second assignment, so do not worry about the document retrieval for now. ↩