Outline
In this lab you will:
- gain an understanding of Objects and Functions in JavaScript
- familiarise yourself with the Tone.js library
- explore oscillators in Tone.js
- employ audio synthesis techniques like additive synthesis and
- modulation
Pre-lab checklist
Today’s lab is to be completed online.
There is a video of your instructor demonstrating what you need to do and how to do it.
Watch the video — your participation (i.e. attendance) for this lesson is dependent on you completing 3 tasks:
- Watch the video in Wattle for Lab 10: Oscillators
- Fork and Clone the lab repository. Complete all tasks. Stage, commit and push your changes to Gitlab
- Complete the quiz in Wattle
Full participation is expected: you should complete all of these 3 tasks. Watch the video first. You can read this lab instruction with the video, or separately. You can complete tasks 2 and 3 in any order, programming first or quiz first. Note: there are no “correct” answers - you just have to answer all quiz questions and make changes to the code which you push to GitLab.
Before you attempt this lab session, make sure:
- you can fork, pull, stage, commit & push to GitLab
There’s not much else on the “pre-lab checklist” for this lab, because we’re starting a new term and a new section of this course. You don’t need to know much in advance, but you should bring your enthusiasm to learn ☺
Introduction
Welcome to the computer music section of this course. Hopefully you had a nice break and you’re ready to get stuck in to making some sounds.
But first let’s talk about Functions and Objects!
Part 0: Functions and Objects
Functions and Objects are super important programming concepts — so, if you feel like you need more practice, work through Part 0 and post questions on our Teams Q and A Channel if you have any questions.
Suggested resources for you to review in your own time are the COMP1720 Lectures on Functions and Objects.
Functions
We’ve been using functions since the beginning of this course!
function setup() {
    // sketch setup code
}
and
function draw() {
    // sketch drawing and interaction code
}
are core components of p5.js. You have already written functions!
You have also called functions.
background(20); // call the function to flood the background with a dark grey
fill("red"); // call the function which determines what colour the next draw command will fill the contents of the drawn area with
rect(mouseX, mouseY, 5, 5); // call the function which draws a rectangle at the given coordinates, with the specified width and height
Functions are great because we can use them to simplify our code: instead of writing out the same code over and over again, we can store it in a function and save ourselves some typing!
They also:
- encapsulate behaviour: they do just one job
- parameterise behaviour: we don’t need separate functions for
background_darkgrey()andbackground_blue(). Adding colour as a parameter (aka argument), enables flexibility, and better code reuse. - code quality: breaking code down into functions modularises the code. We can test each function separately to ensure that it behaves as expected under all conditions.
- communicating purpose: Effective modularisation and code naming strategies help communicate the meaning and purpose of the code.
- abstraction: along with the quality comes trust. We don’t need to design from scratch, we can build on existing libraries of functions, allowing us to conceptualise at a higher degree of abstraction
- and much more…
In the following code we declare a function doAssignment. Note that we’ve only
declared the function here, we haven’t actually used it yet (or as we say in the
business, “called” it). This function has three parameters: title, topic, and
deadline. These parameters are variables which only exist inside the function,
and are set when we call it.
function doAssignment(title, topic, deadline) {
  // hello world
}
To call our function, we need to make sure we provide values for each of the parameters we declared earlier.
doAssignment("The relationship between blue and red: a PhD thesis", "blue and red", "next Monday");
doAssignment("What I did on the weekend", "blog post about my life", "before next weekend");
Edit the following code to declare a function called ringDoorbell with two
parameters, one named address and another named time.
Now, fix this code so it calls the function we just wrote.
Objects
We use objects when we’re coding because they allow us to group a bunch of variables (or, as we call them in the context of an object: properties) together, often with associated behaviours (methods). The relationship between the variables is tied to the way we impose meaning on code: objects in programming relate to objects, things, or concepts that we understand as “things”.
The following code describes a variable called toast, with a value which is an object. This object contains four properties:
- breadType: an enum value from the enum BreadTypes
- slicesOfCheese: a number
- buttered: a boolean (a value that can only be
trueorfalse) - spread: a string (any selection of characters put between quotation marks)
enum BreadTypes {
    White,
    Wholemeal,
    Multigrain,
    Sourdough,
    Rye,
    GlutenFree
};

let toast = {
  breadType: BreadTypes.Wholemeal,
  slicesOfCheese: 2,
  buttered: true,
  spread: "vegemite"
};
Edit the following code to add a property called milk which has the value almond to the mug object.
It’s important to remember that objects can have any properties in them—no one is going to tell you not to put a pineapple property in your pizza object while you’re writing JavaScript! An object is just a collection of properties & their values, and it’s up to the programmer (i.e. you!) to create & use objects which are useful.
Obviously having all of these properties is great, but what if we want to do something with them? Well, we can access properties in objects using “dot notation”. This looks like the following:
if (toast.spread == "vegemite") {
  cutASliceOfCheeseAndPutOnToast(toast);
}
The dot allows us to get a value out of an object—the text before the dot is the name of the variable containing the object, and the text after is the name of the property within the object.
Can you edit the following code so it fills up partially drunk mugs? If you can’t remember all the properties in the mug object, that’s okay—take a look at the previous widget, it has the definition in it.
We can use this syntax, along with the assignment operator (=) we’ve been
using to set variables to update the values of objects after they’ve been
created.
toast.spread = "blackberry jam";
Can you fix the following code so it sets the "milk" property of the mug object
to the value "dairy".
You haven’t quite completed all the activities yet. Keep going, you’re almost there! Ask on the Teams Q and A channel if you need some help.
Objects and Functions in Harmony
In p5.js especially, it’s handy to combine objects and functions together. It means we can do things like:
- Use the dot syntax mentioned previously to use a property from an object as a value in a function call
let shape = { x: 100, y: 200, }; function drawShape(x, y) { rect(x, y, 100); } drawShape(shape.x, shape.y); - Use objects themselves as values in a function call:
 function clean(thing) {
   thing.dirty = false;
 }

 let potato = {
   weight: 300,
   dirty: true,
 };

 clean(potato);
Now, can you fix this code so it calls the sayHiTo function, with the name
property of the doggo object as the first parameter?
And now, finally, let’s put it all together. Edit the following code so it draws the blob in the correct location with the correct size.
You haven’t quite finished the exercises yet—finish them off before you continue. If you’re stuck, ask on the Teams Q and A Channel!
Part 1: Tone.js
Last term we used the p5.js library to make visuals on the web. This week, we will be introducing you to a new library called Tone.js for making music on the web. The programming language is still JavaScript—same as p5—but there will be a few differences due to
the fact that music and visuals work in different ways. Still, the starting
“template” for this lab (and most of the music labs this term) will still use
p5’s setup(), draw(), keyPressed()1 etc functions as a starting point, so hopefully it’ll be a bit familiar.
In today’s lab, we will briefly introduce you to some important concepts in Tone.js, which are actually fundamental to any form of computer music. It won’t be covered in the lab content (i.e. the text you’re reading now), but we will go into these concepts at greater depth in the coming weeks. The lab content for this week will introduce you to oscillators in Tone.js and how they can be used to create a synthetic instrument.
do: To get started, fork and then clone the lab 10 template repo, open it in VSCode and start the live server.
Part 2: Oscillators
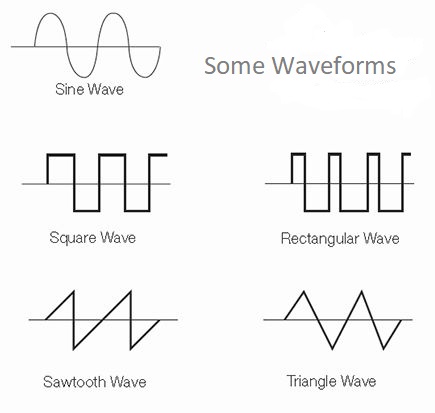
Oscillators can be thought of as signals which have a repeating shape. The shape of an oscillator can be sinusoidal (like a sine wave), triangular, square or sawtooth. We are about to ‘produce’ our own oscillator signal to feed to the speakers in your computer.
NOTE: When making sounds with code, you may accidentally increase the volume, or the power, of the sound beyond what it is safe to listen to (especially when using headphones). Ensure you set the system volume low prior to running any code - and slowly increase.
If you have a look at your template code, within the setup() function, you’ll see that there is a single oscillator which is connected to the master audio output (toDestination()). What’s going on with this toDestination() stuff you ask? Well any oscillator we create in Tone.js has a very weak signal. In order to make the signal of the oscillator audible, we need to connect it to the master audio output i.e. the ‘Destination’ and amplify its signal. It’s very similar to plugging an electronic instrument into a physical amplifier. This model allows us to chain instruments and effects together to create complex sounds.
The osc oscillator in your template repo is initialised to have a frequency of 440hz // Note A4. We can directly access the frequency of an oscillator by referencing the value of its frequency property using osc.frequency.value – you can think of this as a variable where the value of the oscillator’s frequency is stored. Just like any other variable, you can assign different numbers to the oscillator’s frequency value. Paste the code below at the bottom of your setup() function and restart your live server. Can you hear/see a different frequency?
osc.frequency.value = 261.63; // C4
Now that we know how to access and modify the frequency of the oscillator, we can drive changes in the frequency based on user interactions.
do: Do you choose to implement a Notes -based instrument, or a continuous tone Theremin -like instrument?
I Choose Notes: Write a function noteUp() which will increase the oscillator frequency by one note. Write another function called noteDown()which decreases the oscillator frequency by one note. Inside your keyPressed() function, call noteDown() when LEFT_ARROW is pressed, and call noteUp() when RIGHT_ARROW is pressed. Once you’ve done this, use your keyboard to play the oscillator notes – you’ve just created your first interactive synthetic instrument!
I Choose Theremin: Write a function called theremin() which maps the mouseX value from [0,screen width] to your chosen [min frequency, max frequency]. Call this function on mouseMoved(). You should use osc.frequency.value to access the oscillator’s frequency. Ask your instructors if you need any help with this. Once you’ve done this, use your mouse to play the oscillator – you’ve just created your first interactive synthetic instrument!
Part 3: Additive Synthesis
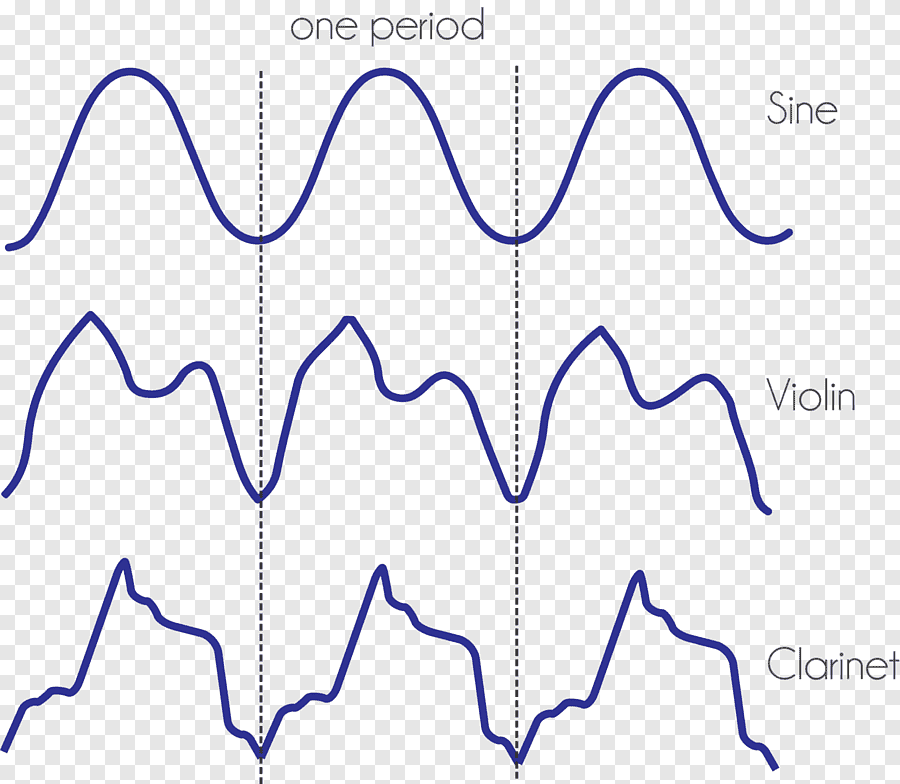
Additive synthesis is a technique where multiple audio waves are combined together by adding the corresponding output values of each wave together. In Tone.js we can indirectly add several oscillators together by simply connecting them all to the master audio output i.e. using toDestination(). If we compare our standard sine oscillator at frequency 440hz (which is equivalent to an A note) to if we were to hold an A on an instrument like a clarinet, the waveform of a clarinet is not as smooth and produces a richer tone. We can mimic this ‘harmonic richness’ by adding multiple oscillators with various frequencies together.
do: Create a second oscillator and connect it to the master audio using toDestination(). This oscillator should have a fixed frequency of 220hz. You can look at how the osc oscillator was created and follow it as an example. Once you’ve done this, use your mouse to change the frequency of the original osc oscillator and see what the effect is on the wave drawn on your screen.
talk: How many distinct mouse positions can you find where the wave drawn on your screen resembles a sine wave? Talk to/message someone in the class and discuss why there might be more than one.
In the same way that we accessed and modified the frequency of our oscillator, we can access and modify the shape of our oscillator using osc.type. See the example code below.
// sets the oscillator's shape to triangle, regardless of the frequency
osc.type = 'triangle';

// sets the first two partials of the oscillator to triangle
osc2.type = 'triangle2';
do:Create a series of oscillators, making sure to plug them all into the master audio output using toDestination(). You can vary their frequency, shape, or any other properties you’d like. The oscillators properties in the documentation should help give you some ideas. Develop a custom tone and any time you like what you hear, commit and push your code to git.
Part 4: Modulation
Modulation is a technique where we can control certain parameters of an audio wave, like its frequency or amplitude using the output of another wave. For this example, we’ll stick to frequency modulation and we’ll just use single-frequency oscillators as our modulators. Our task is to interpret the output of one oscillator as the frequency of another. This will have the effect of creating a siren-like sound where the oscillator’s frequency gradually changes between a maximum and minimum frequency.
There is an oscillator in Tone.js which is specifically designated for low frequencies. In the biz, we call this an LFO or Low Frequency Oscillators (yeah, can you tell we reserve the creativity for the music making?). The LFO in Tone.js can take on a frequency anywhere between 0.1hz and 10hz.
    // creates a low freq oscillator with freq 0.1hz and max - 210, min value - 180
    lfo = new Tone.LFO("0.1hz", 180, 210);
    lfo.connect(/*modulated value*/);
    lfo.start();
do:Create a new variable to store your LFO oscillator and paste the code above at the bottom of your setup() function. You will need to replace modulated value with whatever value you want to modulate using your LFO – one example of a value you can modulate is the frequency of an oscillator.
Part 5: Play
In this section of the lab, we want you to play around with various features of oscillators and various synthesis techniques to create as many instruments as you can. The aim is to create a custom palette of sounds which you can use in the next lab where you will work together in groups to perform in an in-class drone gig.
You can experiment with the nature of the interaction e.g. triggering changes in the audio based on mouse position, or whether your mouse is within a certain region in your canvas, or keyboard input.
Summary
Congratulations! In this lab you:
- learned a little about functions and objects
- familiarized yourself with the Tone.js library
- explored oscillators in Tone.js
- employed audio synthesis techniques like additive synthesis and modulation
-
Your browser requires some kind of user interaction to occur before any sound can be played. In labs for the computer music part of the course, we check if the spacebar has been pressed in the
keyPressed()function before we initialize the audio context and start playing sounds. ↩