Outline#
Now that you’ve known how to fork and clone a repository, let’s learn how to save and share your changes! In this page, we will use a simple example to explore basic commands for your local repository in detail, including add, commit, and push. Before we begin, we need to configure some important settings so that Git recognizes our identity. Please relax and follow the instructions below.
Configuration#
After following the previous instructions, you may have noticed that you can directly create or modify files on GitLab. This is because you have already logged in, and GitLab recognizes your identity and permissions. However, in this page, we will focus on creating and modifying files in your local repository. Initially, a local repository does not have information about the user operating on the files. So we need to specify our identity in the first place.
- First, we need to go into our local repository by using
cd [repo-name]command, such ascd comp1720-2024-labs. - Enter
git config user.name [Your Name]to set your full name. - Enter
git config user.email [uxxxxxxx@anu.edu.au]to set your email address, which must be identical to the one you use to login GitLab. - [Optional] Enter
git config core.editor "nano"orgit config core.editor "vim"to set your preferred command-line editor. Your OS will use the default command-line editor if you skip it, e.g. Nano for Ubuntu.
If you want your full name or email settings to be applied to all local repositories, you can modify the commands in step 2, 3 and 4 by adding a --global flag, such as git config --global user.name [Your Name], to set your name, email address and preferred editor globally.
That’s all done! You can double check by using git config --list:
$ git config --list
user.name=xxx
user.email=uxxxxxxx@anu.edu.au
...
remote.origin.url=git@gitlab.anu.edu.au:uxxxxxxx/yyy.git
...
If you see your name and email set up, you are ready to head forward.
Add & Commit#
Great! Let’s start by quickly reviewing Git’s data model:
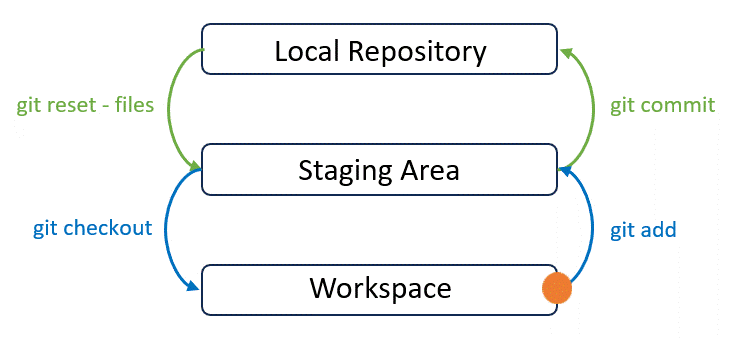
After we make some changes to any file, these changes remain in our workspace. To let Git keeps track of these changes, we need to commit these changes all the way up to the top. This leads to the definition of commit: A commit is a record of what files you have changed since the last time you made a commit, and the changes that you performed in these files.
A step-by-step video guide for git add is included below—feel free to follow along with the visuals or use the written instructions, whichever works the best for you! Ready to dive in? Press play or scroll down to start.
To commit these changes, we first need to run git add command to add changes to the staging area. Then we can run git commit command to move them from the staging area to the local repository, where snapshots of all changes are stored in order. Simply follow the instructions below to finish this step.
Suppose we only have a README file after cloning. We can use ls command to double-check. The output looks like this:
$ ls
README.md
We now need to create a new file, contribution.md, in our repository to save each teammate’s contribution. We can use touch command to create this file:
touch contribution.md
Now use ls command again to confirm this new file has been created:
$ ls
README.md  contribution.md
If you are using Windows, you will be stuck at the very first step. This is because OS-related commands are different in Windows and Linux. So you may replace ls with dir or just open this folder in File Explorer to create this new file with your mouse.
Note that Git keeps track of all changes in our repository. So what happens after we create this new file? We can use git status to check out its current status:
$ git status
On branch main
Your branch is up to date with 'origin/main'.

Untracked files:
  (use "git add <file>..." to include in what will be committed)
        contribution.md

nothing added to commit but untracked files present (use "git add" to track)
The log output gives us a lot of helpful information. Don’t panic. Let’s analyse the log together:
- “On branch main” shows we are at a branch called “main”. Branching is a fundamental feature of Git that allows you to create independent development workflows within a repository. It allows you to work on different things simultaneously, keeping changes isolated. We will discuss branching with more details in page 6. With no additional setting, “main” is the default branch.
You may wonder why we need branching. We will delve into branching next page. One benefit of branching can be explained with a simple example: Imagine an assignment consisting of two independent tasks. You and your other teammate agree to work on one of them. In this case, you may hope changes made to finish your task can be separated so that any problems belonging to one task wouldn’t interfere with the other. This is a great benefit of branching—you and your teammate can create two independent development workflows and you will find it handy to only focus on your task while coding.
- “Your branch is up to date with ‘origin/main’” indicates that this local branch “main” is up to date with the remote branch “main” on GitLab. You don’t need to update your local branch to stay in sync with the latest changes in the “main” branch on GitLab.
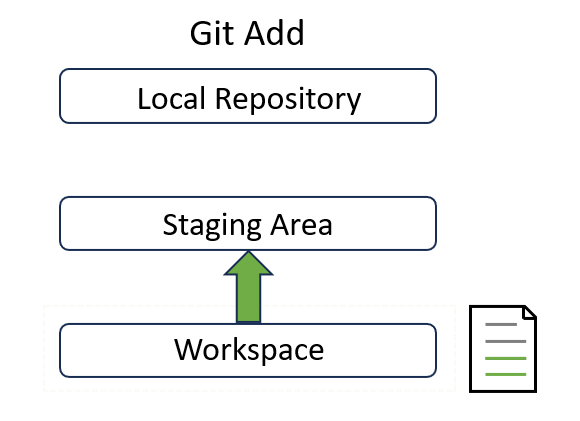
- “Untracked files” means Git detects new changes to the listed files. In this example, we added
contribution.mdinto our repository. Its snapshot remains in the workspace and needs to be tracked by registering this file to the staging area. - You can see that a snapshot of
contribution.mdis now at the the bottom layer:
The last line suggests how to track new changes: “Use git add to track”. So let’s try it out!
Add#
The syntax of git add command is git add [file_name1] [file_name2] ..., and we need to replace [file_name] with the name/path of that new file:
git add contribution.md
Sometimes you may have made changes to many files. In IDEs like VSCode and Intellij, you can easily select all of them by clicking something like a “select all” button. How can we do it in command? The easiest way is to replace [file_name] with a single dot . , meaning you want to add all changed files: git add . Make sure all files are meant to be added when you are lazy :)
Let’s see what happened by using git status again:
$ git status
On branch main
Your branch is up to date with 'origin/main'.

Changes to be committed:
  (use "git restore --staged <file>..." to unstage)
        new file:   contribution.md
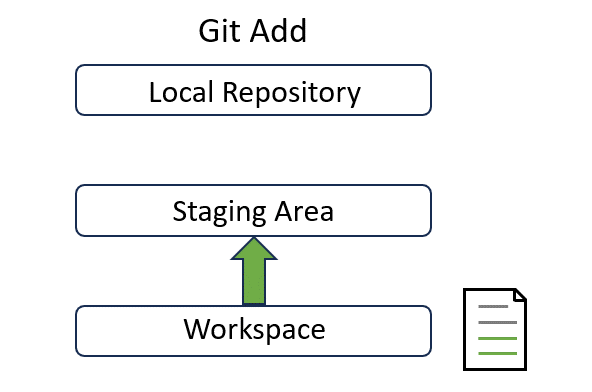
Note that the last part of the output log has changed. Now Git recognises the snapshot of a new file contribution.md is put into the staging area and needs “to be committed”.
Inside the log, you may notice a suggestion at the end if you read carefully: use "git restore --staged <file>..." to unstage. Git allows you to stage changes from the workspace to the staging area. Likewise, Git also allows you to move them back from the staging area to workspace. We will explore this technique in page 11.
Now a snapshot of contribution.md sits in the staging area at the middle:
Hang on before we move to the next step! Recall that staging area is like a snapshot before time travel. You may be curious about what snapshot actually means in the given example. Don’t worry. You can quickly comprehend this concept in the section below.
Snapshot#
Read only!!! In Git, a snapshot is like a photo of your project at a specific moment. Unlike saving over a file repeatedly, these snapshots let you track changes over time—and even rewind to older versions if necessary. If you think Git as a time machine, snapshots are like checkpoints.
In the video below, we’ll show what a snapshot is in a practical example. You can also read the text explanation instead.
Following the previous example, note that we have added contribution.md. Assume you and your teammates all agree to distribute your contribution evenly. So you add a new line to this file and save it. What happens in Git now? Does this file stays in the staging area, or is it automatically moved back to our working directory? Let’s find out:
$ git status
On branch main
Your branch is up to date with 'origin/main'.

Changes to be committed:
  (use "git restore --staged <file>..." to unstage)
        new file:   contribution.md

Changes not staged for commit:
  (use "git add <file>..." to update what will be committed)
  (use "git restore <file>..." to discard changes in working directory)
        modified:   contribution.md
Looks confusing? How can a file waiting be committed and not staged for commit at the same time? Don’t panic. You have hit the nature of snapshot now.
Assume your repository is an art project consisting of drawings. In Git, a snapshot is like taking a photo of your drawing at a particular moment. It captures how your drawing looks like at that time, and a “commit” may consist of multiple snapshots.
- The second paragraph starting with “Changes to be committed” shows the first snapshot before we edit
contribution.md, which is made when we first created this file. - The last paragraph starting with “Changes not staged for commit” indicates that we need to make a new snapshot for Git to keep track of new changes for
contribution.mdin workspace.
They don’t conflict with each other because Git tracks snapshots rather than files themselves. It’s beneficial to remember the concept of snapshot while using Git.
Commit#
A quick video guide is available below, but don’t miss the detailed explanation after it!
To commit new changes, use git commit command: git commit -m "commit message". Simply replace “commit message” with the actual commit message, such as:
$ git commit -m "created contribution.md"
[main 21c83db] created contribution.md
 1 file changed, 1 insertion(+)
 create mode 100644 contribution.md
You may wonder what “-m” stands for and if it’s optional. Actually, this manual uses “-m” for a reason: avoid using the command-line editor Vim/Nano. When you ignore “-m” and only enter git commit, your terminal will open a command-line editor. Vim/Nano is unlike other editors and can get you stuck if you aren’t familiar. So we can avoid using it by attaching the commit message after “-m” parameter. “-m” stands for “message” and is one of many other parameters that git commit can use, such as -s. You may find the full documentation if you are interested.
You have successfully made a commit if you see your output log similar to the log above. Double check by using git status again:
$ git status
On branch main
Your branch is ahead of 'origin/main' by 1 commit.
  (use "git push" to publish your local commits)

nothing to commit, working tree clean
Git will also keep a log of all commits you made. Simply type git log and you’ll see your commit logged:
$ git log
commit 057083ac5d9e2718626854c90b2ba6226e6f57f2 (HEAD -> main)
Author: [Your name] <Your email address>
Date:   [Commit date]

    [Your commit message]
The log lists all commits in reverse chronological order. Each commit consists of a hash value, the author’s name and email, a date when this commit was created and the commit message. The hash value is like the commit ID and thus it uniquely identifies each commit. As a result, we can use it to revert/reset our changes back to a previous version like time travel. We will cover this topic in page 11.
As the project develops, you and your teammates can (and should) create many commits. When you view the log list, it will be hard to find an old commit because each commit take up too much space and you have to scroll down for a long time. Alternatively, you can set a parameter --oneline to only make git log print out a hash value and the corresponding commit message for each commit to save space, that is, git log --oneline.
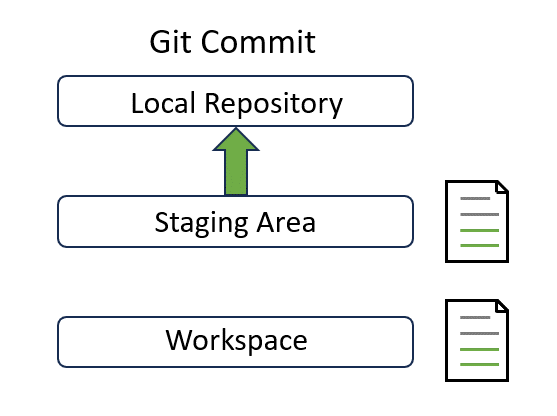
Congratulations! Note that the status has been updated. It tells you that “your branch is ahead of ‘origin/main’ by 1 commit” and “use git push to publish your local commits”. Now our local changes in the “main” branch are 1 commit ahead of the remote “main” branch on GitLab. We have successfully moved our changes to the top layer:
Shortcut?#
You may find the above two-step way inconvenient to commit changes. But in reality, professional engineers think the opposite. One big advantage of Git is providing you with more fine-grained control by allowing you to stage the changes you need for the current commit and stage the other changes for the next commit.
Suppose you have done lots of work on many files. Compared to compacting everything in a single commit, distributing your changes into different commits facilitates much better traceability for future improvement. You can use this time machine to return to any commit to discover the root of new bugs or rewrite codes for better performance. That’s one reason why engineers like to add changed files manually.
However, there’s a shortcut if you don’t want this level of control or only have changed a few files. Use git commit -a -m "commit message" to let Git automatically add and commit all changes with a single command. The flag -a means all! You don’t need to manually add files before committing if you use the shortcut instead.
After committing, We can finally update the remote branch with the git push command. Hang in there and get ready for the last step!
Push#
Pushing is the act of taking one or multiple changes (commits) made to the repo, each labelled with a commit message, and copying these changes to the remote version on GitLab. After pushing, your teammates can see the updated version on GitLab with your work added in. They can collaborate with you by progressing their work on top of yours.
git push is the command for it:
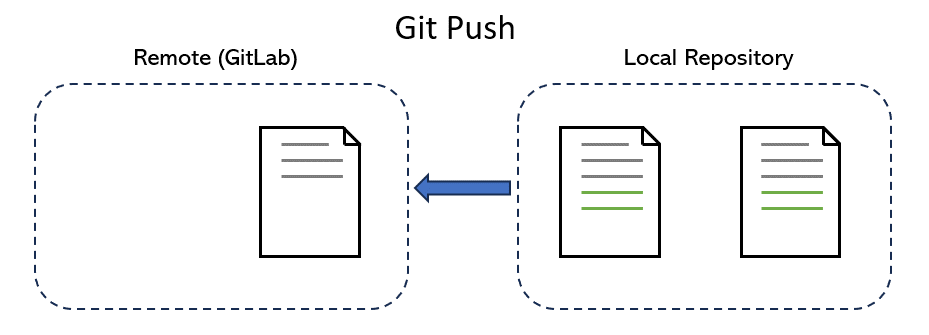
We now need to push the new file contribution.md to the repo on GitLab. The syntax of push command is git push [remote_name] [branch_name].
But what is [remote_name]? We can check it out with git remote command:
$ git remote
origin
Git answers that “origin” is the name of remote. So we need to push our changes in the “main” branch to our remote repository, which is translated into:
$ git push origin main
Enumerating objects: 3, done.
Counting objects: 100% (3/3), done.
Delta compression using up to 16 threads
Compressing objects: 100% (2/2), done.
Writing objects: 100% (3/3), 305 bytes | 305.00 KiB/s, done.
Total 3 (delta 0), reused 0 (delta 0), pack-reused 0
To gitlab.anu.edu.au:uxxxxxxx/yyy.git
   d3d9858..21c83db  main -> main
You may need to type in your username and password after entering the command, depending on whether you have set up an SSH key.
Remember, you can only push if Git confirms that there are no pending changes to tracked files which have not been committed. This rule is enforced because Git wants to be sure that when a push is made, the states of the local version and the uploaded version are consistent (except for untracked files). In the given example, if you follow the instructions in the previous “snapshot” section but forget to commit, Git will prevent you from pushing because a new change to contribution.md hasn’t been committed.
If you see a log output similar to the above one, congratulations! You just successfully learned how to git push! Now, login to your GitLab account, and you will see your local changes to contribution.md has been updated to your GitLab repo. Well done!
Further Reading#
If you’re interested in learning more about Git commits, pushes, and related topics, here are some resources you can explore:
- How to make my first Git commit?
- If I have a Git repository, how can I import it to GitLab?
- How can I transfer my project to another namespace?
- If I want to program GitLab operations, how can I do this?
- Now I know how to program GitLab operations through GitLab API, but where are the documentation for all the operation that I can use?
Moving on#
Now you have learned how to synchronise your local changes to the remote repository. But how to synchronise in reverse? Imagine your teammates see your changes on GitLab and add their changes too. How can you see their changes locally?
In the next page, we will learn how to do it using git pull. It might be harder than you expect, but take it easy. Follow the instructions when you are ready, and nothing will stop you!