Introduction#
In this manual, we are going to explore Git, which is one of the most popular frameworks people use pretty much anywhere. In this chapter, we first introduce version control, the critical concept behind Git, and why you should learn Git to manage your work. The next few chapters cover the basic commands and techniques you will often use for your projects and assignments.
Git can seem strange to new users, but it’s not as scary as it looks. While learning how to work with Git, you can use this manual as a guide for your first practice of code versioning. Later on, you will likely remember when and how to use the basic commands on your own (hooray!). Please fasten your seat belt, and we are ready to go!
What is Version Control?#
As you study at the School of Computing, you will notice many courses require teamwork to finish assignments. Learning to work as a team is crucial in the workplace, but collaboration on the same codebase can be challenging if participants don’t share a structured workflow.
Imagine a world without Git. When you want to work on the same assignment with your teammates, you might upload your codes to Google Docs or other similar platforms and share a link to your project. After your teammates download your project and make some changes, they can do the same thing and share their links. It might sound okay for a small team, but imagine how chaotic and inefficient it can be when your team has 10 or more members! It’s hard to keep track of all separate files and changes made and recover to a previous version if something breaks.
Fortunately, pioneers developed wonderful version control tools to make our life easier. Among many advantages of version control, we will find the following particularly helpful:
- Collaboration: facilitates multiple people to work on the same codebase
- History and tracking: keep track of the entire history of changes to code and project files
- Error recovery: version control allows you to roll back to a previous working state if bugs or errors are introduced
- Accountability: records who made each change and when each change was made and provides a clear audit trail of contributions
With version control, multiple people can collaborate on a project efficiently and keep track of different versions of files over time. At ANU, the version control tool we use is Git.
Key Concepts#
To understand Git and version control, we need to keep in mind a few fundamental concepts:
Repository#
A repository contains a collection of files that are managed by Git as well as the complete history of changes to those files.
Branch#
A branch is an independent line of development. It allows for separate, isolated work on a feature or bug fix. In industry, engineers always create new branches before they start working, such as adding new features and fixing bugs. Usually, you can take main branch as the final version of your project.
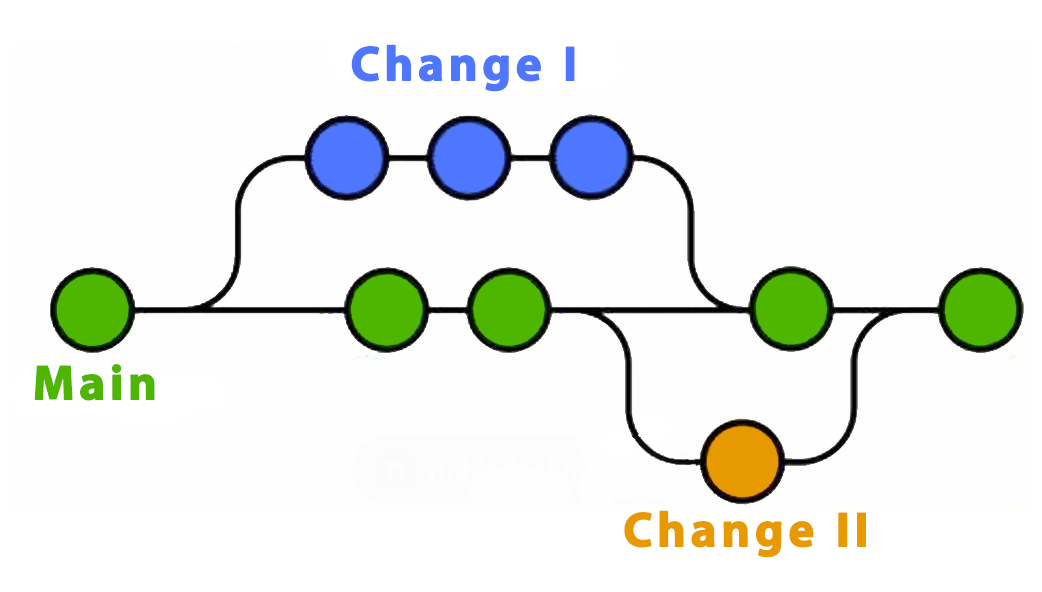
Great! Based on the fundamental concepts above, we can now move on and understand why the first lab session or tutorial asks you to fork or clone a repository:
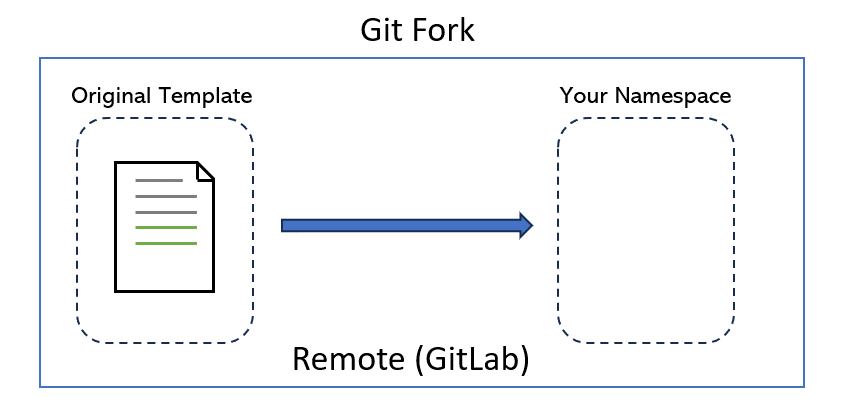
Fork#
Only you can decide who can touch your repository. Likewise, if you are not the repository owner, you will need permission from the original creator to make changes. But can we create a copy of repositories that we don’t own? Yes, by forking.
To fork a repo is to make a copy of the repo under a namespace that you control. This gives you full control over the new copy of the repo.
In the next chapter, we will see how to give others privileges to a repo so that they can make changes without having to make their own fork.
Clone#
After you log in to GitLab on your web browser, You may notice that you can directly edit files in your repositories. But imagine trying to program using that interface! Instead, we want to make a local copy of a repo and make changes as we see fit using more powerful software development tools, such as VSCode and IntelliJ. And we make a local copy by cloning.
By cloning a repo, we download the latest version of the repo from the cloud (i.e. GitLab) to our computer. As we make changes, we can use other commands listed below to track these changes and upload them back to the GitLab version.

Fantastic! Now we can make changes to a local copy of a repository using a powerful editor on our computer. What should we do next? In this stage, we can be a magician and do whatever we want to the local copy. But there are 4 most commonly used commands: add, pull, commit and push.
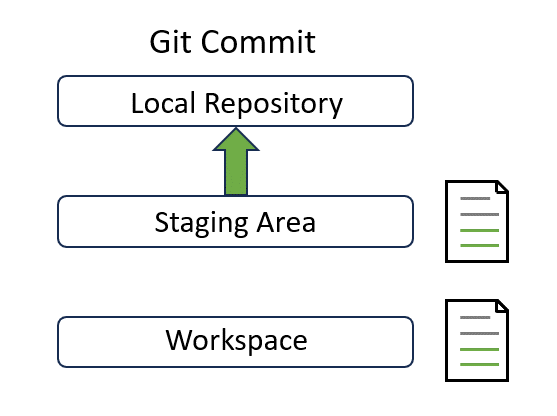
Before we get to know what are them, we need to take a look at an image first:
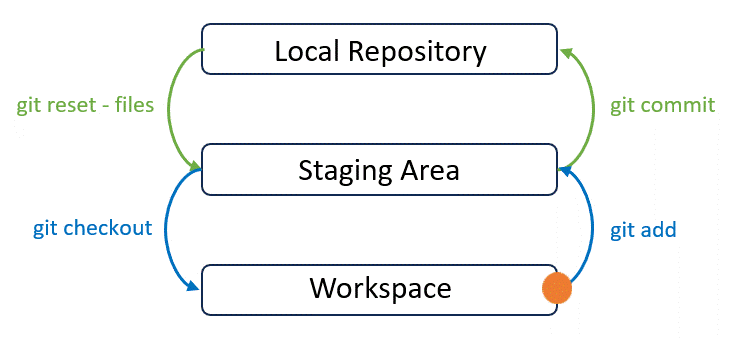
This image summarises Git’s data model. Git roughly consists of 3 layers: Working Directory, Stage and History. To simply, you may imagine Git as a time machine:
- Workspace is like the present moment where you make changes to your local copy.
- Staging Area is like a snapshot before time travel. You can select and prepare specific changes or files to be included before travelling.
- Local Repository stores a collection of snapshots or time-travel checkpoints. Each commit represents a specific point in the timeline of your project. It captures a complete snapshot of files and directories in the repository. You can think of it as a series of successive snapshots that you can explore, effectively enabling you to travel back and forth in time to see the project’s evolution.
After we make some changes to our local copy, we can now travel in time using the following commands:
Add#
Add is to decide which files should be tracked by Git by adding into the snapshot:
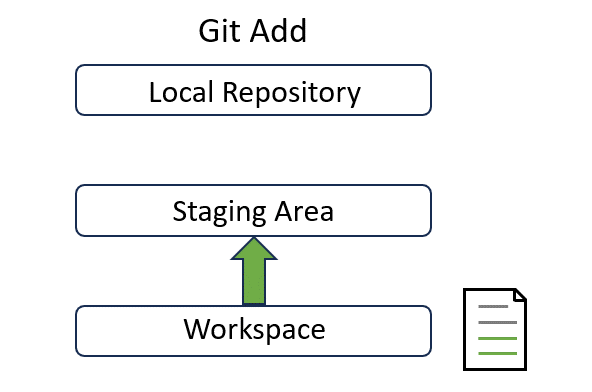
In the third chapter, we will explain how to use it in detail with a real example.
Commit#
A commit represents a local snapshot of the project at a specific point in time. After you make some changes, you need to commit those changes so that they are ready to be synchronized to GitLab:
If you wish to commit all changes, git add can be skipped. But using git add is recommended in most cases as it offers more control and allows for fine-grained commit management.
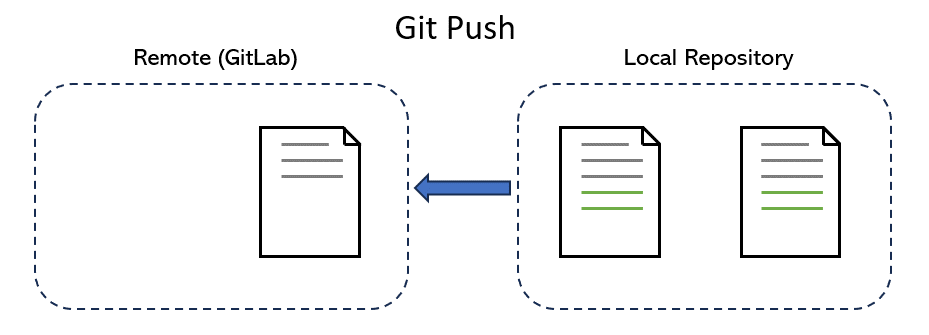
Push#
Pushing is the act of taking one or multiple snapshots (commits) of the repo, each labelled with a commit message, and copying these changes to another version of the repository (such as the one on GitLab). Briefly speaking, pushing is the act of taking a savepoint and uploading it to the online version of the repo:
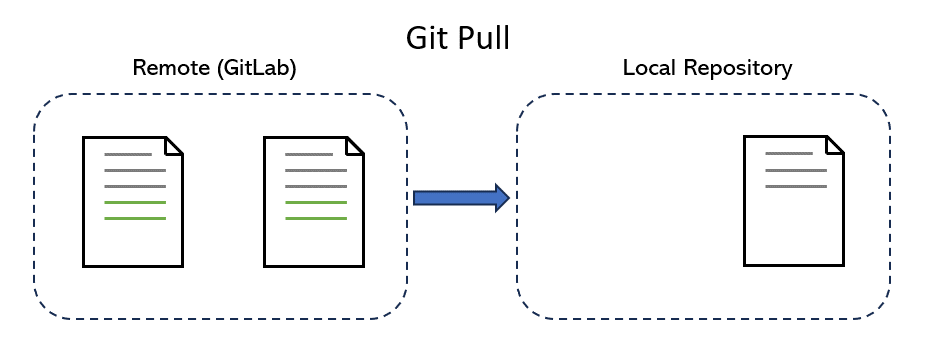
Pull#
Pulling is the act of keeping your local repository up-to-date with the latest changes from a remote repository.
Let’s say that you want to share your work with someone else after adding, committing and pushing. Your Git repo has added your friend with the correct privileges so that they can edit files on your repo. You send them the URL for your Git repo, and they clone this repo.
Notice that, in this case, your friend does not need to fork the repo first since they want to work on your copy of the repo so that you can collaborate!
Let’s assume your friend doesn’t like your (rushed) version of the README, so they decide to change it. They open a text editor, change the file, and commit their changes with a helpful commit message explaining the changes and why they were made. Finally, they push their commits to your fork of the repository.
The next time you work on the project, your first step should be to ensure that your local version of the repo matches the online version. To do this, you use git pull, which applies any new commits available online to your local version of the repo. Just like a push, a pull requires you to specify a remote and a branch.
After pulling, you will see the changes made by your friend:
This is the basis of collaboration in Git!
Now that we’ve covered most basic concepts of version control and Git. You now understand the concepts of common commands in Git.
Hooray! You made it to the end! But we are missing one last thing: How about GitLab? If Git can do everything above, why do we need GitLab? What’s the relationship between Git and GitLab?
What does GitLab do?#
Just like Git manages your project’s history, GitLab builds upon Git and adds extra superpowers to make collaboration even easier. It provides a web-based interface where you can visualize and organize your project’s changes, invite teammates to join, and manage different branches of your project effortlessly.
You can think of GitLab as a command centre for your project. It helps you keep track of who made what changes, coordinate work among team members, and seamlessly merge everyone’s contributions together. Moreover, you can also set up automatic tests with GitLab, ensuring that your codebase always looks its best.
Moving on#
Git might seem complicated and hard to learn but don’t be terrified. Despite the abstract definitions of terminologies and concepts, you will gradually get familiar with how to use Git and GitLab in future chapters. Ready? In the next chapter, let’s move on to forking and cloning.