Introduction#
So far, we’ve learned all the basics of commonly used Git commands. Once you become familiar with these commonly used commands, you should feel no pressure to use Git to manage your personal projects. Well done!
But for collaborative projects, knowing all the commands is not enough. For a group project, we need a agreed workflow to facilitate all teammates to work together happily and avoid spending too much time dealing with conflicts and chaos. There are many workflows available with different attentions. In this page, we will delve into the GitHub Workflow.
Main Idea#
Do you recall the big picture of Git in page 2?

With this big picture, we explained the benefits of using a version control system. For Git, it can be expanded into the following one with more details:
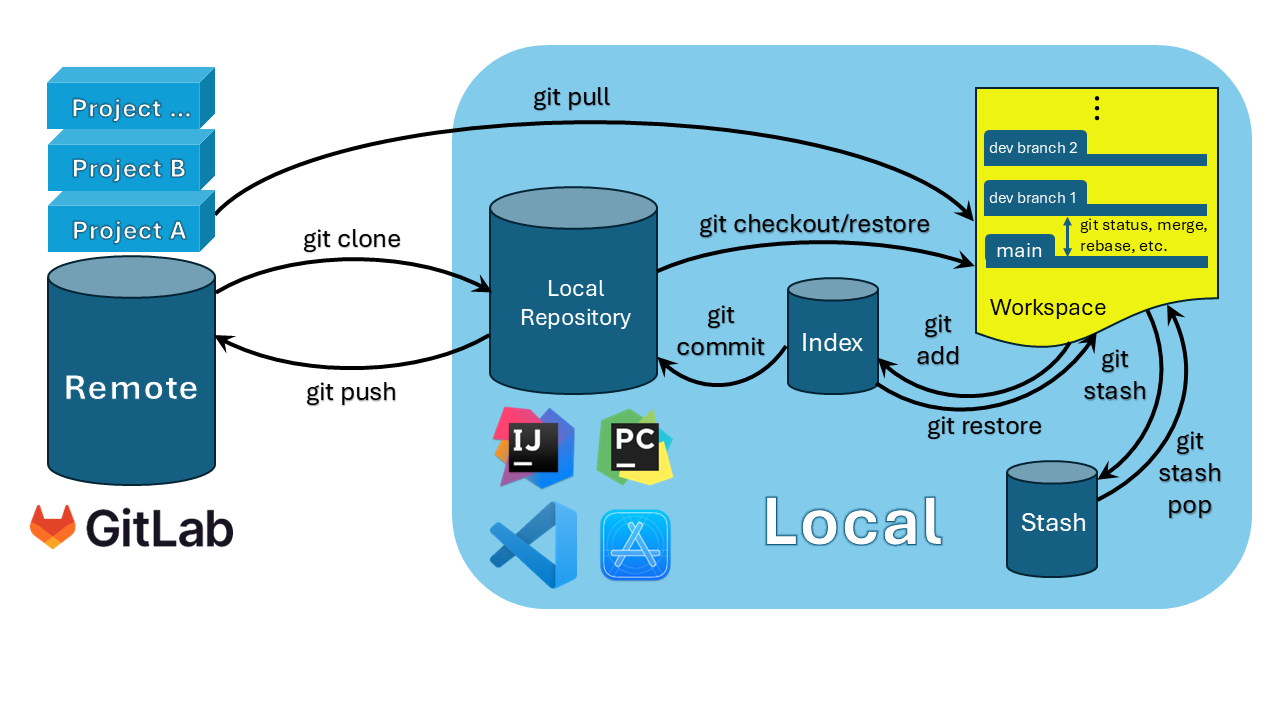
You can run many git commands as appropriate. When many teammates are contributing to the same remote project, it’s important for everyone to follow an agreed workflow so that people’s work doesn’t fight with each other. For GitHub Workflow, the main idea is to create a dedicated branch for every feature or change you want to implement in the codebase. This approach facilitates parallel development, providing a clean and organized way to manage the development process, ensuring that the main branch always remains stable and reliable.
Some of you may think it saves time and efforts to create new files in the “main” branch instead. This is okay for individual projects because no one collaborates with you. But for group projects, we should not directly operate on the “main” branch. Think of the “main” branch as the master copy of our project — it’s the version that everyone relies on and trusts to be stable and working. If we make changes directly to the “main” branch, there’s a higher risk of introducing errors or bugs that could affect the entire project. Even small mistakes could cause problems for everyone else working on the project. Instead, it’s better to create a separate branch for any new features or fixes you’re working on.
How does GitHub Workflow work#
Let’s explore how to follow the GitHub Workflow in a simple example:
There’s actually one more step before step 1. In a real project, many new branches will be created. They can be for a new feature or a bug fix, and we need a good way to track them to know what they do and who did them instead of guessing what a branch does from its name. In GitLab, Issue is the good tool of tracking what needs to be done in what branch and who is responsible for it. Before creating a new branch, it’s recommended to create an issue first. We’ll talk about how to use Issue in the last section.
- Create new files and commit them: Assume we have created and checkout to a new branch “task-1” using
git checkout -b task-1. Let’s do the first step in this feature branch - create and commit a new filec.md. To create this new file, we can usetouch c.md. Then we write something in it with an editor and commit it:git commit -m "created c.md". Afterwards, you should see “nothing to commit, working tree clean” in thegit status. - Rebase the current branch onto main: Like what we discussed in page 9, it’s recommended to rebase the local feature branch onto main branch. To do this, we first update the main branch by
git fetch main. If everything is good, we can rebase the current branch onto main:git rebase main. - Push the current branch: Finally, we need to push this branch to GitLab. Remember the command? It’s
git push origin task-1. - Check out this new branch on GitLab: After it’s successfully pushed, let’s log in to GitLab and have a look at our remote repository. If everything goes well, you should see
c.mdmissing in “main” branch. Only when you switch to your branch “task-1”, you can see this new file. But how can we merge this new file into the main branch? - Open a Merge Request: This is the core of GitHub Workflow. GitLab provides a wonderful feature to allow you to make a formal request to merge your changes into the main branch. We’ll explore how it works in the next section.
- Review and discuss: Once you opened a merge request, your team members can review it. They can comment on specific lines of code, suggest changes, and discuss the implementation. The Merge Request serves as a collaborative space where enhancements and refinements can be made before merging.
- (No need to worry about) Continuous Integration: During the merge request process, GitLab CI will run automated tests and checks on the code. These tests ensure that the new changes do not break existing functionality and meet the project’s quality standards. In almost all cases, you should not change anything about the CI process. Some computing courses at ANU use GitLab CI to help test code you have written in labs or assignments. The outcomes of these tests can be useful as feedback to you (as a student) to know whether you have completed parts of an assignment specification.
- Merge the Merge Request: Once the merge request is approved by your teammates, it can be merged into the main branch. This integration step updates the main branch with your new changes.
There’s also one more step after merging the Merge Request. After the Merge Request is merged, the corresponding Issue can be closed, signaling that the task is complete. If your team doesn’t use Issues, you can ignore this step.
The above 8 steps summarize GitHub Workflow. Although it may look complicated, it enjoys many benefits, including Structured Collaboration, Enhanced Code Quality, Transparency and Flexibility. No matter how many team members you have, you can always find the development progress transparent through Issues and Merge Requests and collaboration structured with clearly defined steps.
Next, let’s explore how to open a merge request and make an issue in the following two sections.
Merge Request#
Aside from managing the local repository, a lot of teamwork also happens on GitLab. As discussed in page 2, GitLab is a remote hosting service where you can request to merge your work into the “main” branch and approve teammates’ merge requests.
GitLab has a wonderful feature to help us merge a feature branch into the “main” branch effortlessly. It’s called Merge Request.

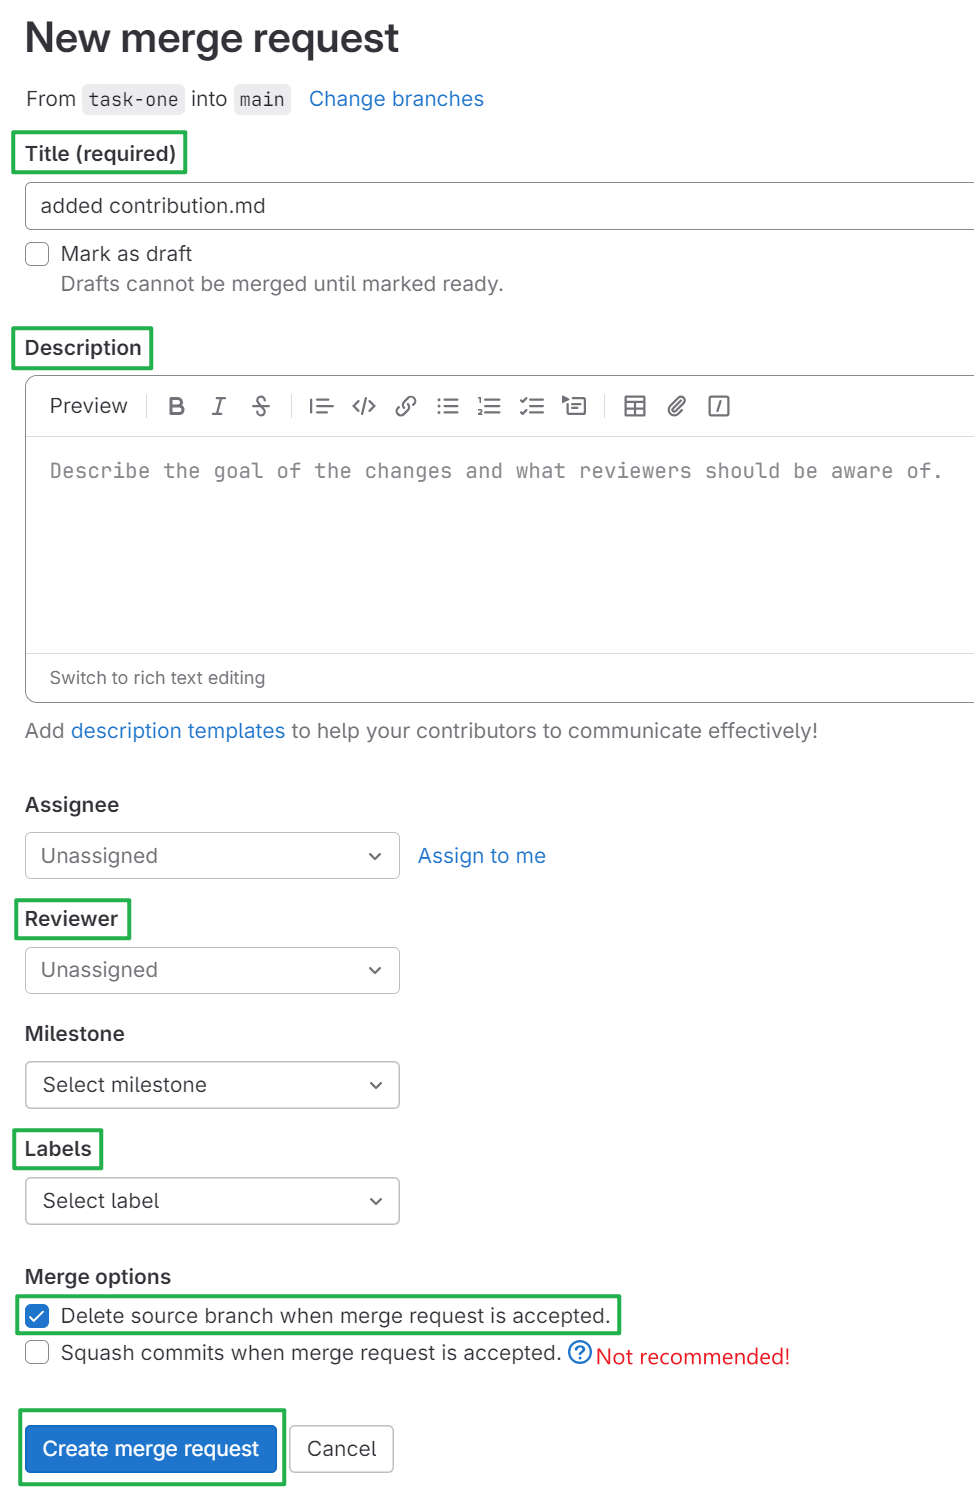
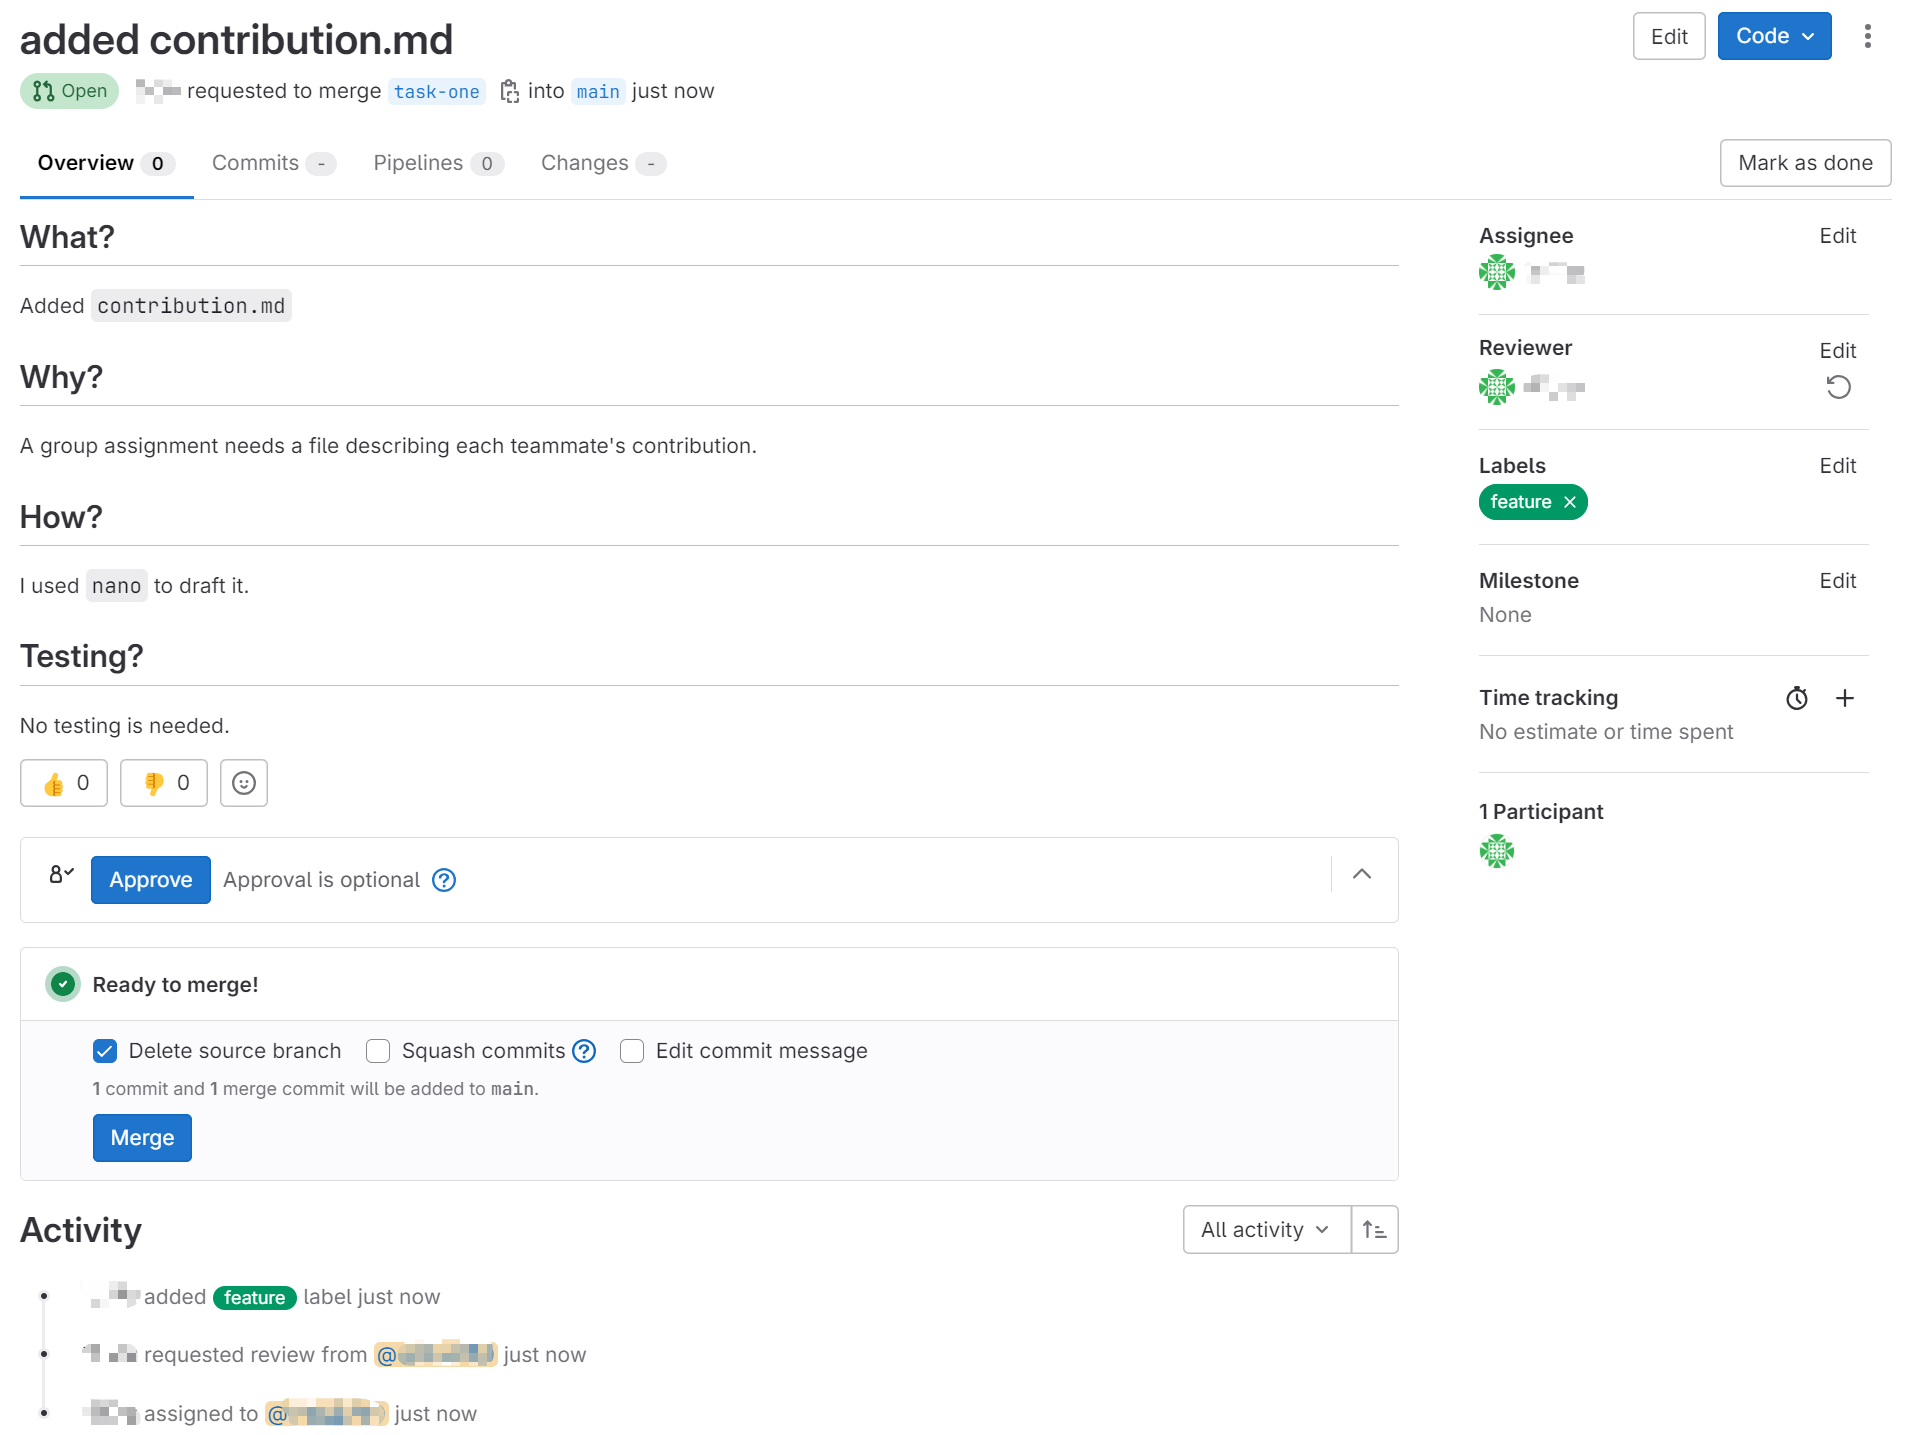
After you click this button, you will be navigated to a new page where you can type in basic information of your work, such as title, description and reviewer. It’s important to write a good description. We recommend a description to include the following six parts:
- What? - Explain the changes you’ve made in a high level.
- Why? - Tells what business or engineering goal this change achieves.
- How? - Draw attention to the significant design decisions.
- Testing? - Let the reviewer know how you tested them
- Screenshots (optional)
- Anything Else? (optional) - such as calling out challenges, optimizations, etc.
You can tick “Delete source branch when merge request is accepted” in the “Merge options”. This option will delete this feature branch on GitLab after the merge request is approved and proceeded. So it still stays in your local repository, and you can keep it or remove it later. If GitLab detects no conflicts between your branch and the “main” branch, you should see a blue button “Create merge request” at the bottom.
However, in some cases, you might notice that conflicts happen in this page, causing this button disabled. A conflict happens when two people try to put their code into the same spot at the same time. GitLab doesn’t know which change should be kept when we try to merge everything back together. That’s when we get a merge conflict. As we discussed in page 9, this is why we recommend to rebase the local feature branch onto main branch. If you forget to do so, a conflict at this stage is the “unexpected trouble” you don’t want to face. We’ll see an example to explore how to resolve a merge conflict in page 12.
After clicking it, a request to merge your branch into the “main” branch is created. Your teammates can then go to this page to review your work. This is called Code Review. You can see a full history of activities at the bottom, a list of reviewers at the right hand side and the “Approve” and “Merge” button.
Great! Let’s discuss a few things to pay attention to during code review.
Code Review#
The second last step of GitHub Workflow is to act as a referee and review your peer’s work. You can leave comments wherever you want. When it comes to your comments, it’s important to stay respectful and constructive. Always avoid using negative or dismissive language and try to offer suggestions for improvements. Your teammate can be extremely frustrated if you only export negative emotions and point out what’s wrong with no advice. Be encouraging and friendly!
Based on proper respect, you should understand the context first and then give constructive advice on how to improve code quality against five key points: readability, consistency, performance, testing and security.
It’s important to maintain a positive and collaborative environment for teamwork. Also don’t be shy to give feedback. Remember, every teammate is the owner of your project.
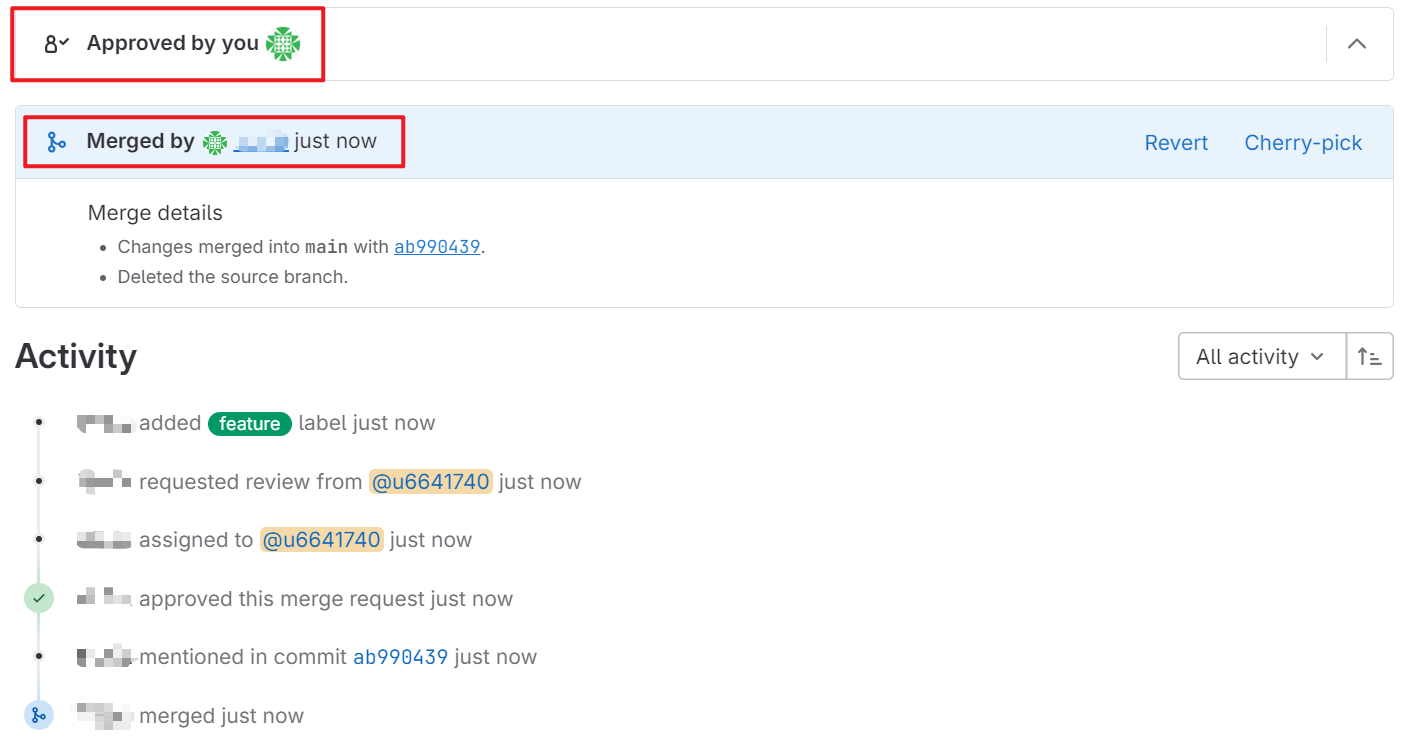
If everything seems good, you may approve and merge it. Once the merge request finishes, you should see these new changes in the “main” branch.
Issues#
In terms of teamwork, GitLab offers another key feature to track and manage tasks, enhancements, bugs, and other work items: Issue. Each “issue” is a discussion thread that can include a description, comments, labels, and assignees. It serves as a central place for collaboration and tracking progress on specific topics or problems within the project.
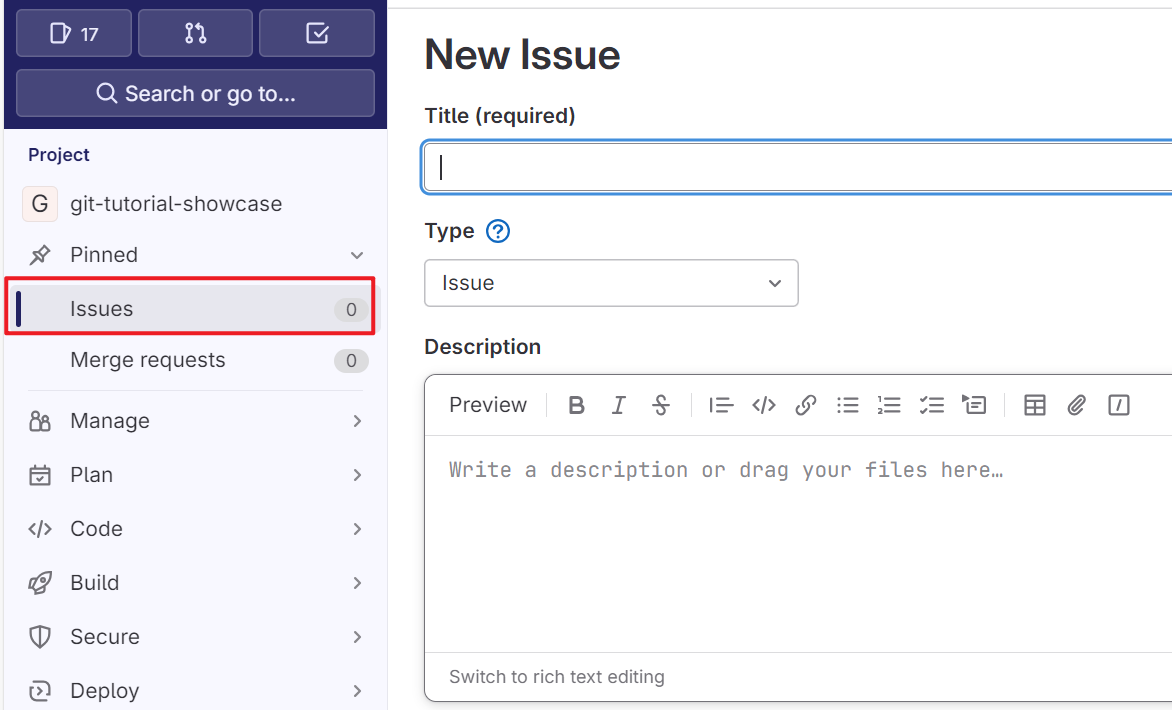
For example, if you discover something is wrong with the previous code, you can open an issue page to describe it in five points (You can use other templates as desired):
- System Info (System or software version)
- Information (What this issue is about)
- Tasks (Explain this issue in detail)
- Reproduction (If it’s a bug, how to reproduce it)
- Expected Bahaviour (What should happen according to your design)
It’s important to keep the title clear and use one or more labels to define your issue. In addition, you can assign this issue to one or many responsible teammates.
After sufficient discussion, you or your teammates can create a new branch to finish this task. During development, people can also update their progress in the corresponding thread, such as hardship and advice. It’s ideal that one issue is for one task. After development finishes, just remember to close the issue.
In addition, GitLab also supports assigning workflow and label to Issues. GitLab provides an Issue board where you and your teammates can easily see which category an issue is sitting at:
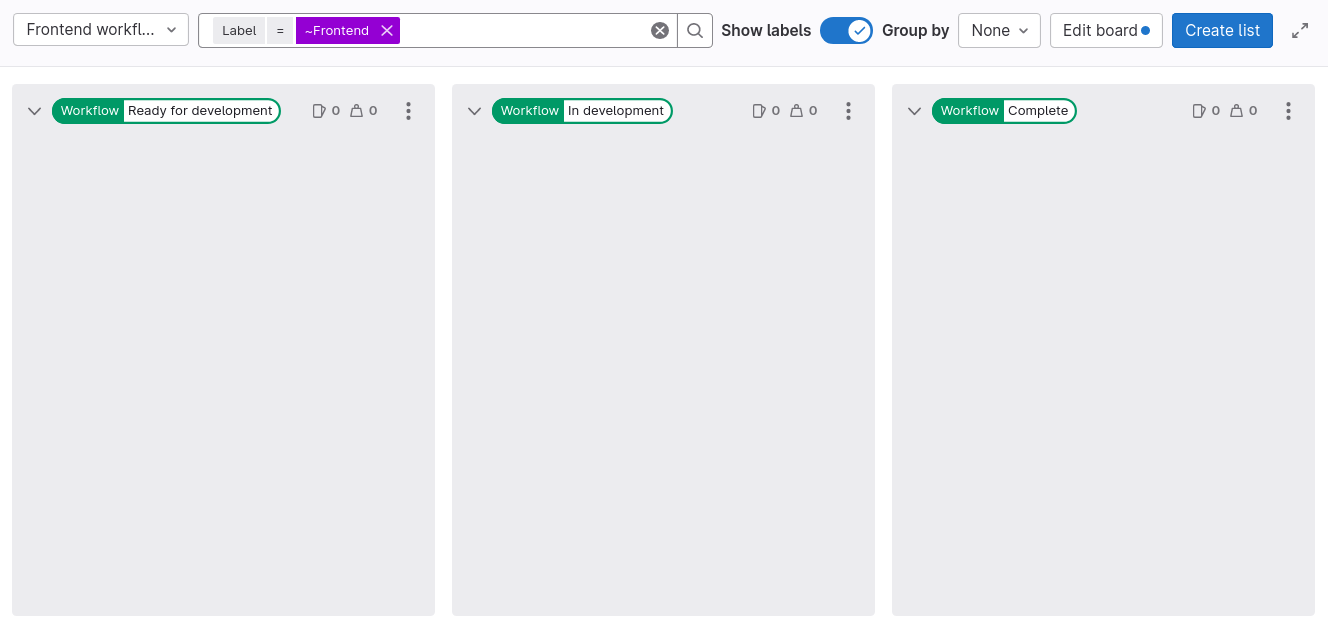
This page explains to you how to set up an Issue board in detail.
Moving On#
With a solid understanding of the GitHub Workflow, you now know how to effectively collaborate with others, manage feature branches, and seamlessly integrate changes into your project. This workflow is the backbone of efficient team development, helping you organize and streamline contributions.
In the next page, we will discuss other useful techniques, such as how to restore your staged commits back to the workspace and how to make Git intentionally ignore specific files. There’s no need to rush; just move on when you are ready.