Outline#
This page introduces essential Linux concepts and command-line editors. While each topic could easily fill an entire textbook, we will concentrate on the essential elements, including common Linux commands and basic usage of Nano and Vim. You only need to pick one text editor to learn.
Back in the early days, Linux doesn’t have a graphical user interface (GUI) like Windows or MacOS. Users need to type various commands to interact with the operating system (OS), such as DOS. As Git doesn’t come with a GUI and essentially uses command-line interface, we will introduce commonly used commands in Linux and command-line editors as you will be using both Git and Linux commands together.
What is Linux#
By definition, Linux is an open-source operating system (OS) based on the Unix architecture. Many said Unix is the best OS ever invented (and Linux is a type of Unix). It is now widely used in servers, desktops, and embedded systems. The key components of Linux include but not limited to:
- Kernel: The core of the OS, managing system resources and hardware.
- Shell: The interface that allows users to interact with the kernel through commands.
- File System: The organization of files and directories.
Without a GUI, you might assume that Linux lags behind modern technological developments. However, that’s far from the truth. Many Linux distributions, such as Ubuntu and Fedora, come with a built-in GUI. The reason why a GUI isn’t included by default in many other distributions is quite simple: GUI is often not necessary. You must know what a blue screen error is in Windows:
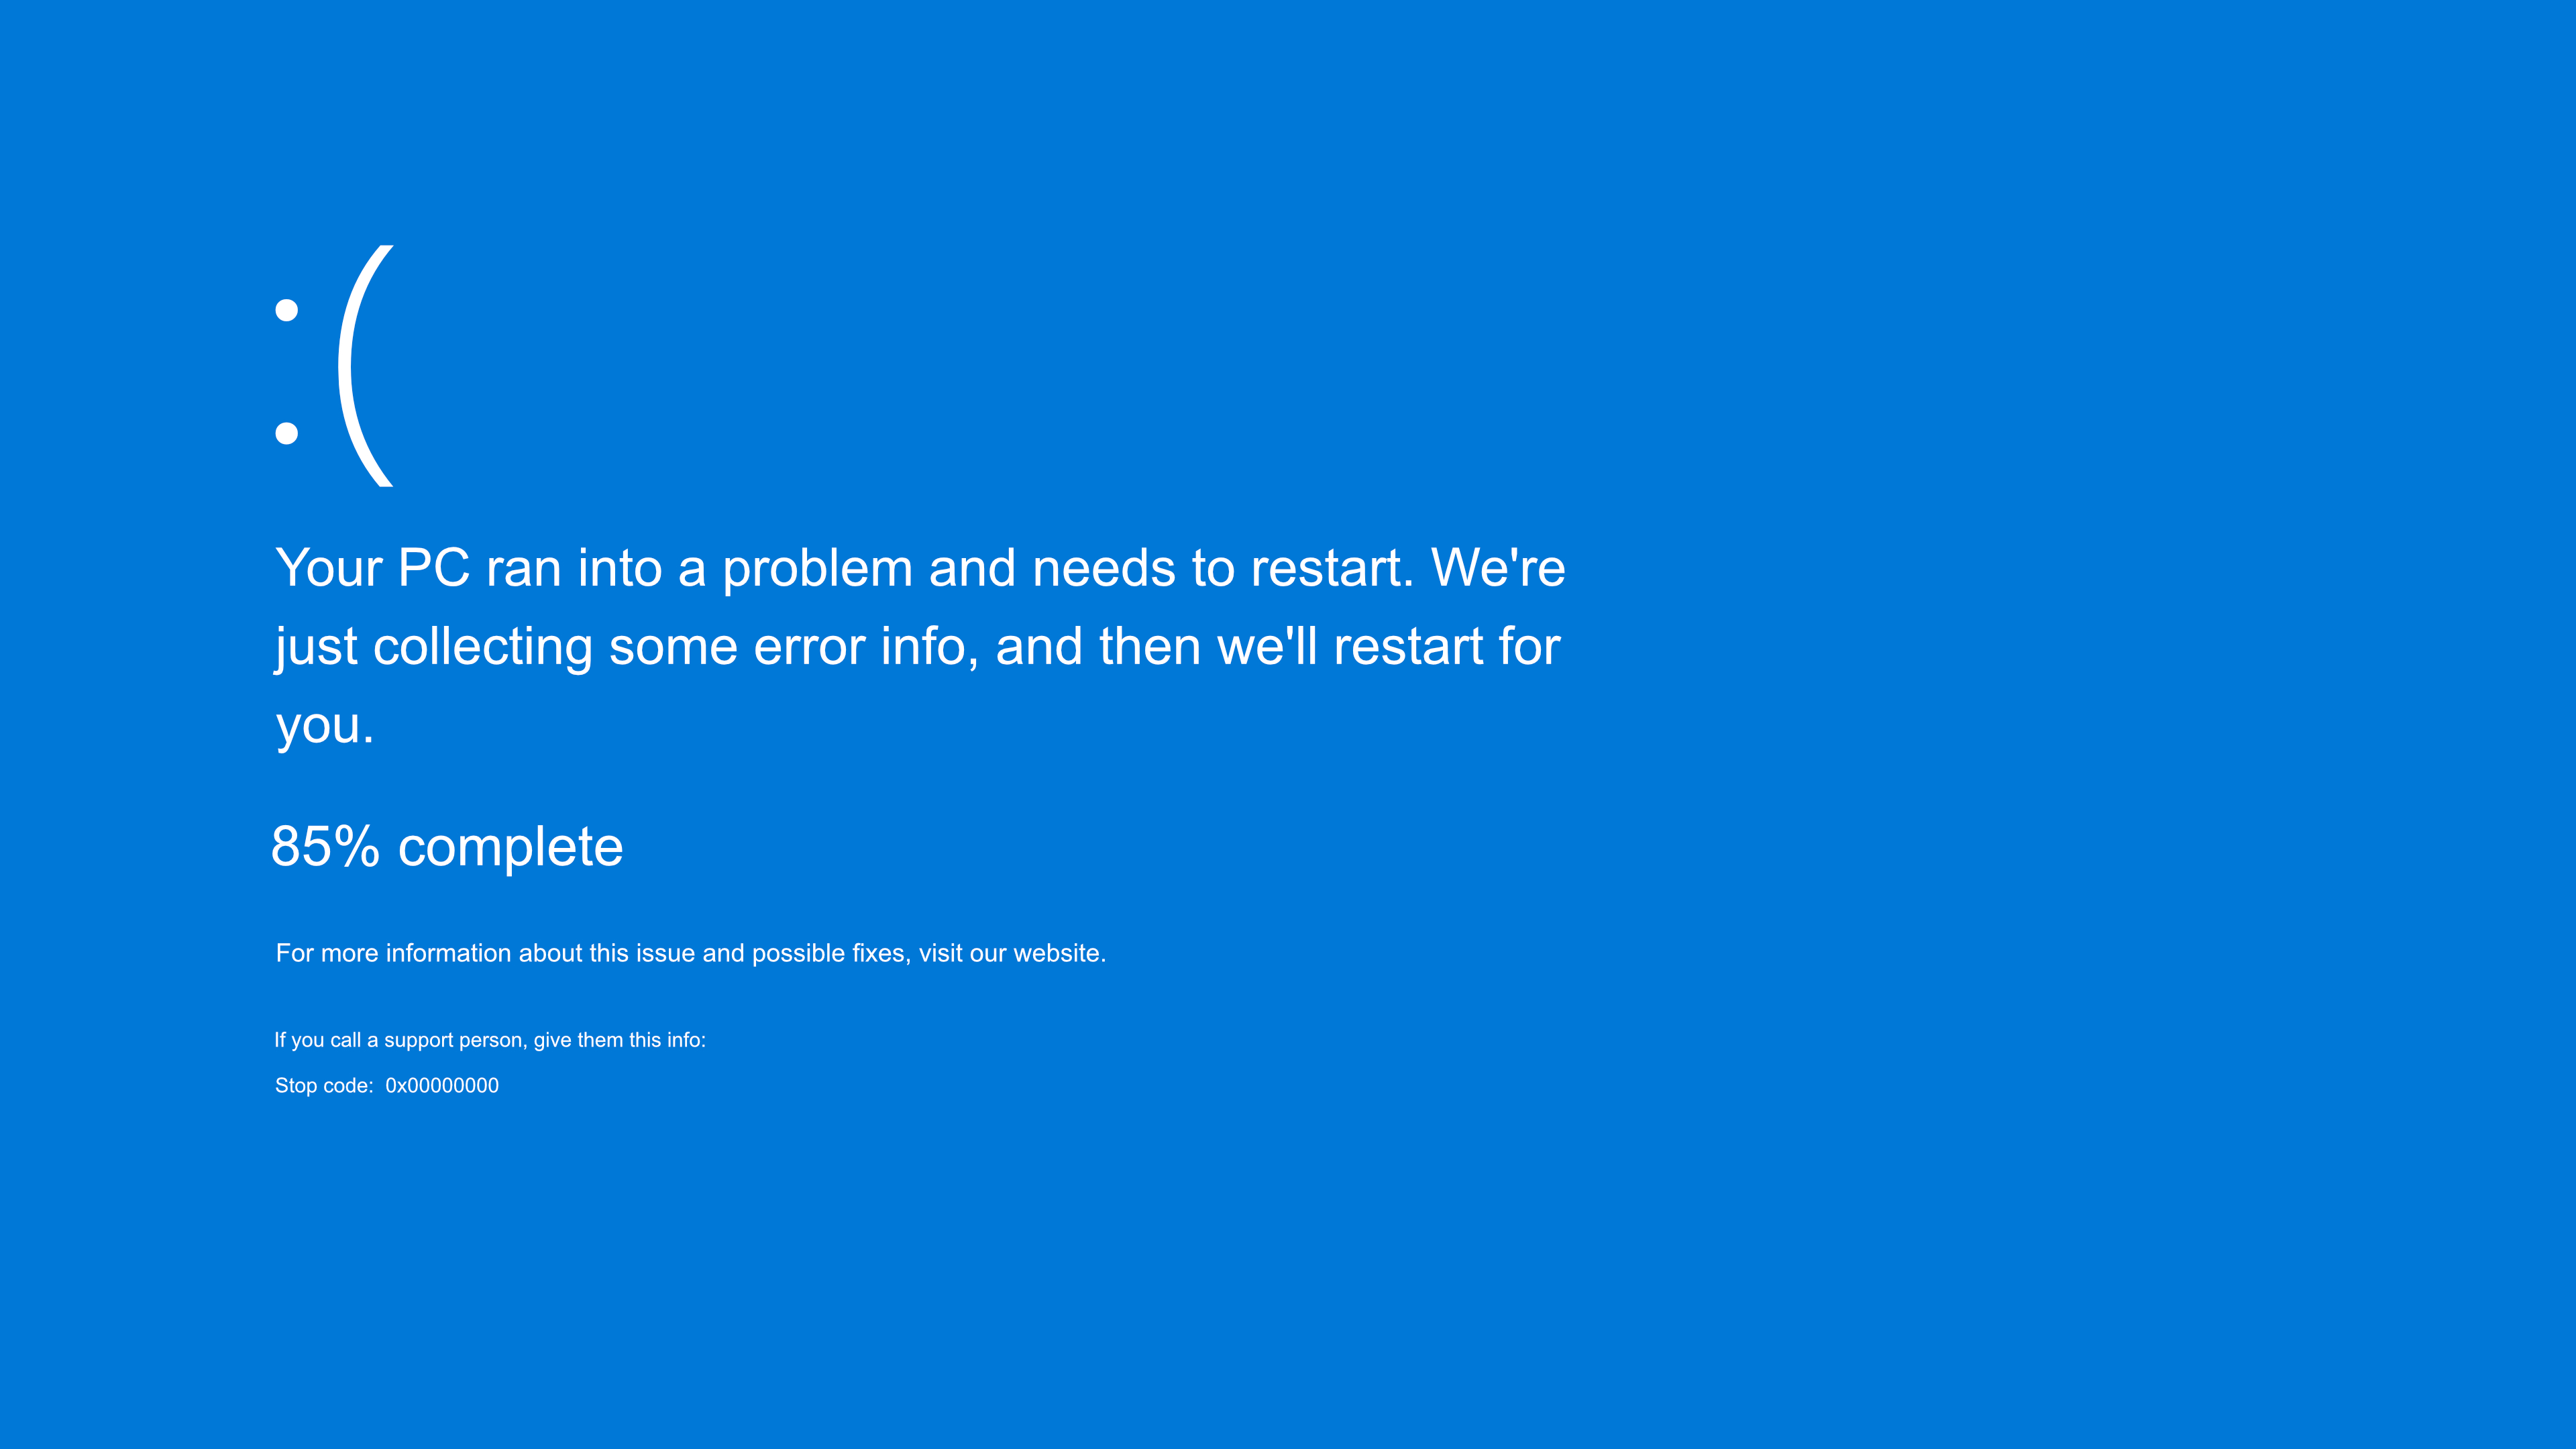
Windows is widely recognized as an easy-to-use operating system, but this ease of use often comes at the cost of stability. In contrast, Linux is far more stable, making it the preferred choice for servers where reliability is critical. For example, servers are tasked with providing essential services such as data exchange, web page delivery, and file storage. Since these tasks don’t require graphical interfaces, including a GUI would be unnecessary and a waste of valuable system resources.
It’s crucial to remember that neither your computer nor Linux is just lifeless machinery. Think of it as an extension of your mind, a dynamic tool that responds to your thought processes. When you use Linux, you’re not simply working on a machine; you’re working with a system built by real people. Every command, every concept, is the masterpiece of bright and innovative pioneers. In exploring Linux and Git, you’re engaging with their ideas and creations. The deeper you delve, the more you’ll discover the beauty and artistry inherent in these tools. Isn’t that romantic?
Linux and the Command Line#
The command line, also known as the terminal or shell, is a text-based and powerful tool for interacting with the Linux operating system. Unlike graphical user interfaces (GUIs), the command line requires you to type commands directly to perform tasks. This approach offers efficiency, automation capabilities, and more flexibility. It might seem less user-friendly, but it offers you more control because it allows you to directly communicate with the computer’s operating system. You can utilize the potential of it to automate tasks and customize system, which GUI often lacks.
Think of command-line in this way: the GUI is like using a remote control to navigate through a TV menu—you see everything laid out in front of you and can choose what you need by clicking buttons. The command-line is like using a TV with voice commands – you tell the TV exactly what to do with specific words or phrases, and it responds directly to your instructions if it understands what you say.
Basic Commands#
Before we get our hands on Git, let’s quickly learn some basic Linux commands first so that you can freely navigate the file system and operate on files and folders in Linux, just like what we normally do on Windows and MacOS. Let’s make friends with these commands together.
Help Manual#
Whenever you are not sure about a command, feel free to check out the explanation of it in the built-in manual. To read a brief help manual, run <command> --help. To read the comprehensive manual, simply run man <command>. For example, you can read the manual of ls by running ls --help or man ls.
Useful Commands for Navigation#
In summary, tables of these commands are available below:
| Command | Name | Usage |
|---|---|---|
pwd |
print working directory | Display the current working directory in the directory (folder) tree, which is the directory at which the terminal is currently positioned. It shows you the absolute path starting from /home. |
cd directory |
change directory | Changes the working directory to the given directory. |
cd ~ |
~ is an alias for your home directory. Will change to your home directory. | |
cd . |
. means the current directory you are at. Will move to the current directory, meaning nothing happens. | |
cd .. |
Move up into the parent directory (if one exists). If you are in /students/uXXXXXXX/Desktop and you type cd .., you will end up in /students/uXXXXXXX. |
|
cd - |
Return to previous directory. | |
ls |
list | Lists the contents of the directory you are currently in. |
ls directory |
List the files in the specified directory. e.g. ls comp1100. |
|
ls -l |
List files one file per line. This also shows you additional info about the file, such as permission and modified date. | |
ls -a |
List all files, including hidden files. Hidden files are those files that begin with a ".", such as ".bash_history" file in your home directory and ".git" folder in your project directory. | |
ls comp1100/labs/l* |
List all files whose names begin with the letter 'l' in the "comp1100/labs" directory (if such a directory exists). |
Useful Commands for Files and Directories#
| Command | Usage |
|---|---|
touch |
Create a new file. e.g. `touch file.txt`. |
cat |
Display the contents of a text file on the screen. e.g.: cat file.txt would display file.txt. |
head |
Display the first 10 lines in the file by default, e.g., head file.txt would display the first 10 lines of file.txt. You can add `-n` option to specify how many lines to display, e.g., head -n 3 file.txt would display the first 3 lines. |
tail |
Display the last 10 lines in the file. e.g.: tail file.txt would display the last 10 lines of file.txt. You can add `-n` option to specify how many lines to display, e.g., tail -n 3 file.txt would display the last 3 lines. |
file |
Find out what kind of file it is. e.g., file /bin/cat tells us that it is a Linux executable file. |
cp |
Copy a file from one location to another. e.g. cp file.txt comp1100 copies the file.txt file in the current directory to the "comp1100" directory. |
mv |
Move a file to a new location or rename it. e.g. mv file.txt text.txt renames "file.txt" to "text.txt" and mv file.txt .. moves "file.txt" to the parent directory. |
rm |
Delete a file. e.g. rm file.txt deletes "file.txt". Think twice before deleting!!!. |
mkdir |
Make a new directory. e.g. mkdir comp1100 makes a new directory named "comp1100". |
rmdir |
Remove a directory. e.g. rmdir comp1100 deletes a directory named "comp1100". Think twice before deleting!!!. |
tar |
Compress or decompress files. e.g. tar -cvf file.tar *.txt creates a tar file which compresses all TXT files in the current directory; tar -xvf file.tar extracts all files from file.tar into the current directory. |
Useful shortcuts for command line#
| Shortcut | Description |
|---|---|
| Tab auto completion | If you type a partial command or filename that the shell recognizes, you can have it automatically completed for you if you press the Tab key. Try typing the first few characters of your favourite Linux command, then hit Tab a couple of times to see what happens. |
man command |
If you don't know how to use a specific command, simply check out the manual of it. e.g. man ls will list the name, description, synopsis and acceptable options for the ls command. It gives you a detailed manual of how to use ls. |
history command |
Show your complete command history. |
| Ctrl + C abort | Whenever you are stuck or have been waiting too long for a running command and hope to stop, you can abort it with a key combination by first holding the key Ctrl and then pressing C. |
| Ctrl + R | Search previous commands. |
| Ctrl + A or home | Go to beginning of line. |
| Ctrl + E or end | Go to end of line. |
| Ctrl + K | Remove everything after cursor. |
| Ctrl + U | Clear line. |
| Ctrl + L | Clear terminal window. |
| ↑ and ↓ arrow keys | Scroll through your most recent commands. You can scroll back to an old command, hit Enter, and execute the command without having to re-type it. |
| Scrolling the screen with Shift + PgUp and Shift + PgDn | Scroll back and forward through your terminal. |
Command-line Text Editor#
Now we’ve learned the commonly used commands to perform basic tasks. But what about filling empty file with contents and editing existing files? This is where a command-line text editor is used. However, the editor is entirely operated from the keyboard. You cannot use a mouse to interact with it, meaning you will have to learn some simple keyboard commands.
You can think a command-line text editor as a notepad in Linux. It only works with plain texts and doesn’t work with pictures, spreadsheets or videos. Besides, a command-line text editor doesn’t have a GUI and its learning curve can be steep. As a result, developers have created more powerful GUI-based editors such as Atom and Visual Studio Code. But it’s beneficial to learn how to use a command-line text editor if you want to dive into the world of Linux.
Nano#
In contrast to other editors, Nano is relatively easier to learn because it provides an experience similar to Windows’ graphical text editor. So relax :-)
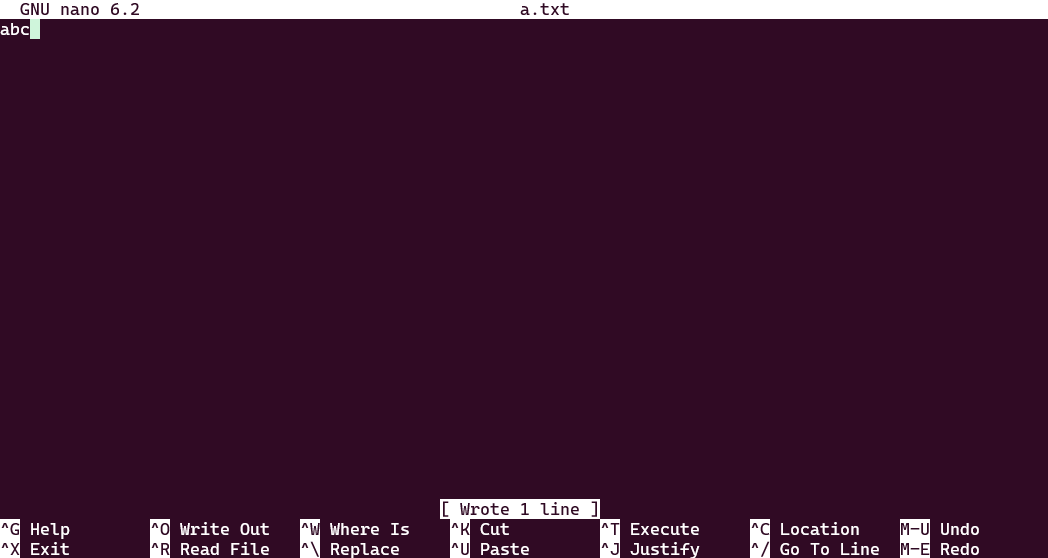
Assume you want to create a text file a.txt. The command to open it is nano a.txt. After hitting Enter, you should see an interface like below:
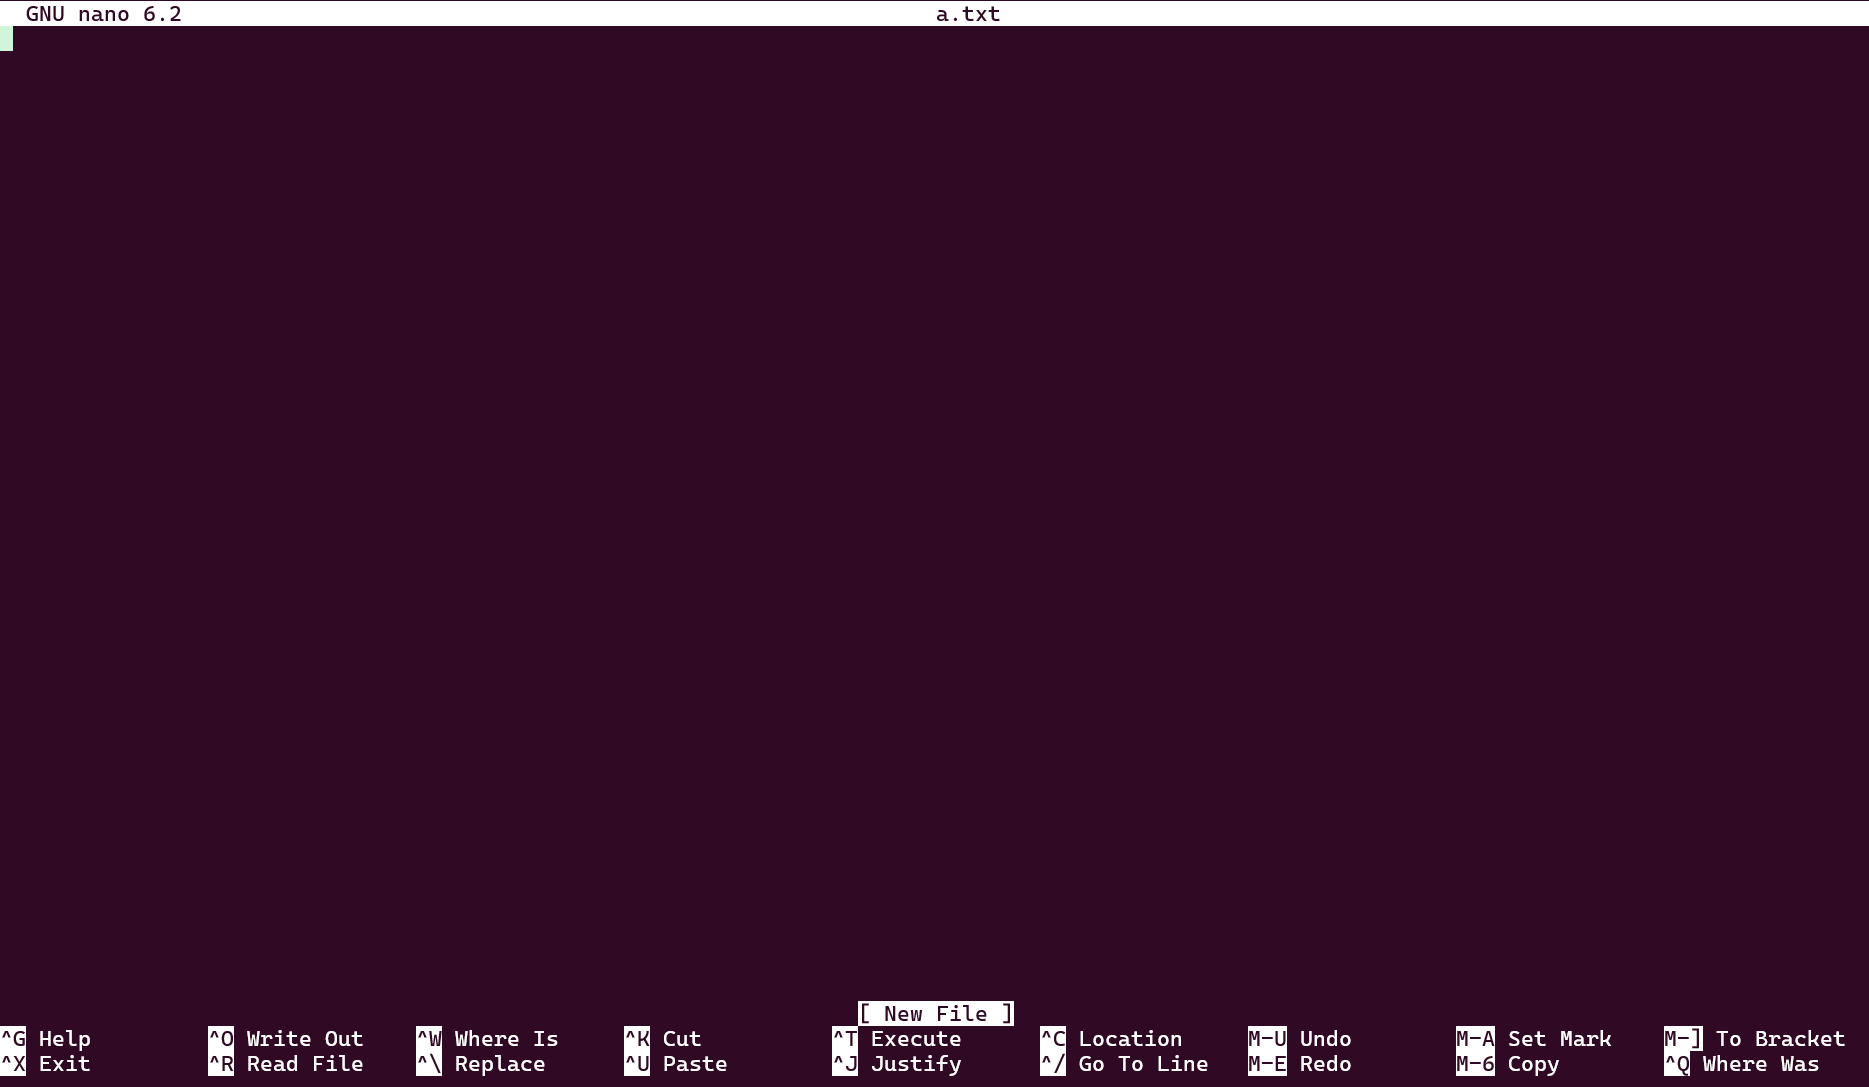
The interface looks quite simple. Please pay attention to the following elements from top to bottom:
- In the top line, we can see the version of
Nanoat the left hand side and the filename in the middle. - The third line from the bottom is the status line. It indicates the status of file you’re editing. As we see the current status is “New File”.
- The last two lines show a menu of commands. For example,
^Gmeans pressing Ctrl + G will show you a help manual, which explains that “Control-key sequences are notated with a ‘^’ and can be entered either by using the Ctrl key or pressing the Esc key twice.” You can also see a full list of available commands in it, including those for saving, exiting and undoing.
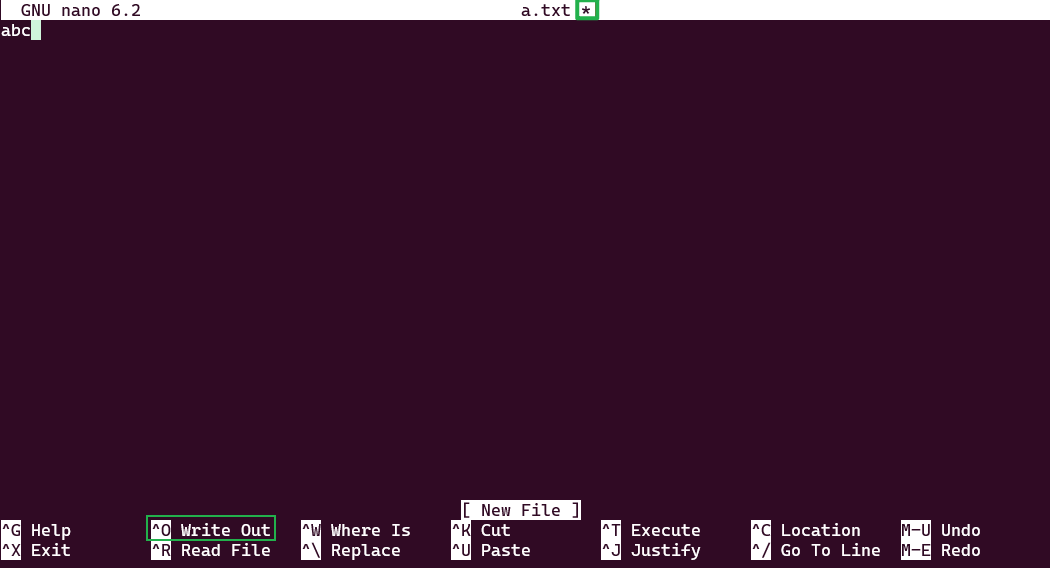
Just like a normal notebook, you can start editing the file as soon as you open it. As soon as you type the first letter, you can see a star beside the filename at the top. This means you have changed the contents of this file but your changes have not been saved.
Copy and Paste in Nano#
To copy texts in the file, you need to move the cursor to the beginning of the text you want to copy. Press Ctrl + 6 to mark the starting point. Then, navigate to the end of the desired text by using arrow keys. Once the text is selected, press Alt + 6 to copy the selected text and Ctrl + U to paste the copied text at the cursor position. In addition, you can cut a line by pressing Ctrl + K.
To copy all texts, you need to move the cursor to the beginning of the first line by pressing Alt + \. Then you need to set a mark by using Ctrl + 6. Finally, press Alt + / to go to the end of file and Alt + 6 to copy the selected text.
In opposite, if you want to delete all texts, you also need to move the cursor to the beginning of the first line by pressing Alt + \. Then press Alt + T to delete everything. In fact, pressing Alt + T delete everything from the cursor to the end of file.
If you’ve copied texts into the system clipboard outside Nano and want to paste them into Nano, use Ctrl + Shift + V in the terminal.
Search in Nano#
Press Ctrl + W to search. Type the word or phrase you want to find and then press Enter. Nano will jump to the first match. To find the next match, press Ctrl + W again and press Enter. Repeat until you’ve found all matches. If you want to do case sensitive search, after pressing Ctrl + W to start a search, simply press Alt + C to make Nano look for words with the case sensitive.
If you want to replace all matched texts, press Ctrl + \. Then type the texts you want to change and press Enter. Nano will show the first place it finds the match. Similarly, you can press Alt + C to make Nano look for words with the case sensitive. Now you can type in new text. Once the new text is typed in, press Enter. Now Nano you prompt you to press Y to change just that one, press N to jump to the next find, press A to change every one or press C to cancel.

Changing words in Nano cannot be undone! So make a copy before you change a lot of words.
Undo and Redo in Nano#
Undoing and Redoing in Nano are also simple. Press Alt + U to undo the previous change and Alt + E to redo it.
But from what we see at the bottom, there is no such an option to “save”. Actually, saving a file is equivalent to writing it out to the file system. So the option for saving the file is “Write Out”. After you finish typing, you can press the key combination Ctrl + O to “Write Out” new contents to the file system.
After pressing Ctrl + O, the bottom menu and the status line will be changed. The status line shows you the name of this file while the bottom menu lists many key combinations for your next step, such as cancelling this save and opening the help manual. We can now change the file name and press Enter to save the file.
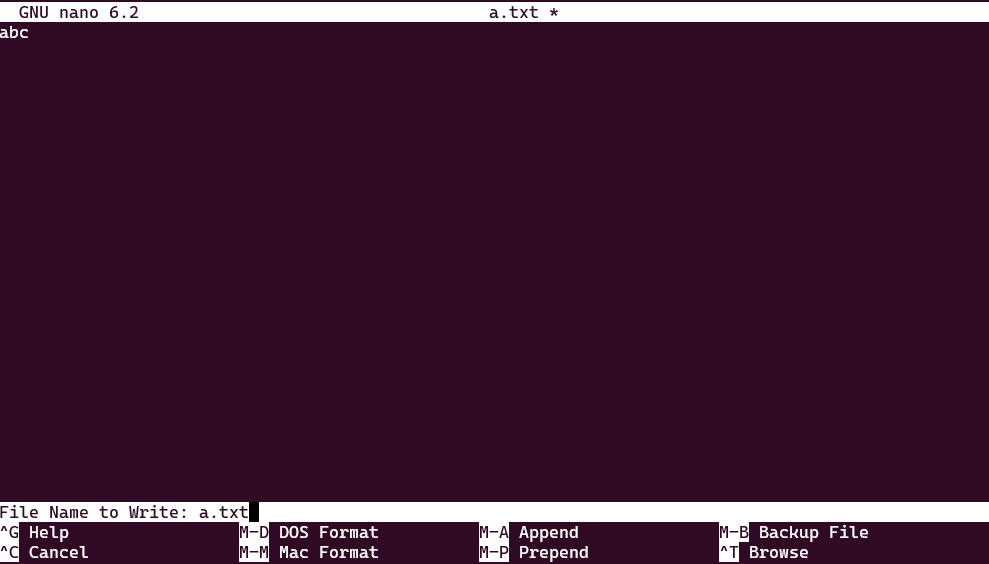
After pressing Enter, nano will display a message at the bottom to indicate how many lines of texts have been written. Since it has been saved, you can see the star beside the filename has disappeared. At this point, you can feel free to exit by pressing Ctrl + X or continue your next edit.
Now you have learned the basics of Nano. To learn more about it, you can press Ctrl + G to check out the help manual and be brave to try out other key combinations! You can also read more comprehensive documentations online such as nano homepage and nano page in Ubuntu documentation.
Vim#
Vim stands for “Vi IMproved” and is an enhanced version of the Vi editor, which was originally created in 1976 by Bill Joy for the Unix operating system. Designed to provide more powerful and flexible text editing capabilities, Vim was first released in 1991. Over the years, Vim has evolved with numerous updates and features and become highly popular among programmers.
Vi is the default editor in many terminals, such as Git Bash on Windows, but the tutorial of Vim is significantly longer than Nano.
Compared to Nano, Vim has a steeper learning curve, but it can achieve higher efficiency and better control. Here are some key points about Vim:
- Modes:
Vimoperates in different modes. The most primary modes we use are normal mode, command mode and insert mode. The normal mode is where we navigate and edit texts while the insert mode is for writing and removing texts. Command mode is where we run commands. There are other modes available like visual mode. - Efficiency: Once users become familiar with the commands and shortcuts that
Vimoffers, they can perform complex tasks more quickly with minimal keystrokes. - Customization: yes,
Vimcan install plugins to achieve customization! This makes it stand out against other editors as users can install different plugins or even write scripts by themselves to suit their workflow. Some developers even make theirVimlook like a GUI-based integrated development environment (IDE)!
Without further ado, let’s jump right into the world of Vim.
Some operating systems don’t have Vim installed by default. To install Vim, you may refer to the following documentations. MacOS has Vi included in its terminal, but it may be lagging behind a bit. You can check out the official website to learn how to install the latest or even a GUI-based version. Windows users can also go to the official website to download an installer. For Linux users, we recommend you to search for the installation commands of your release because different releases install packages differently, such as Ubuntu sudo apt-get install vim and Fedora sudo dnf install vim.
To create a new text file b.txt, we use the command vim b.txt. Once we enter this command, a surprisingly clean interface will be displayed.
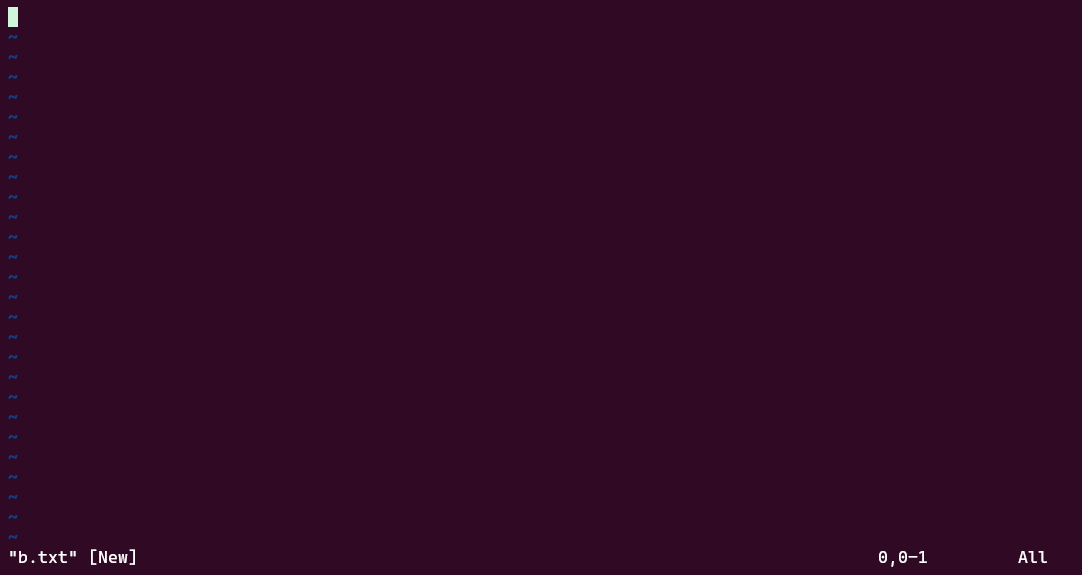
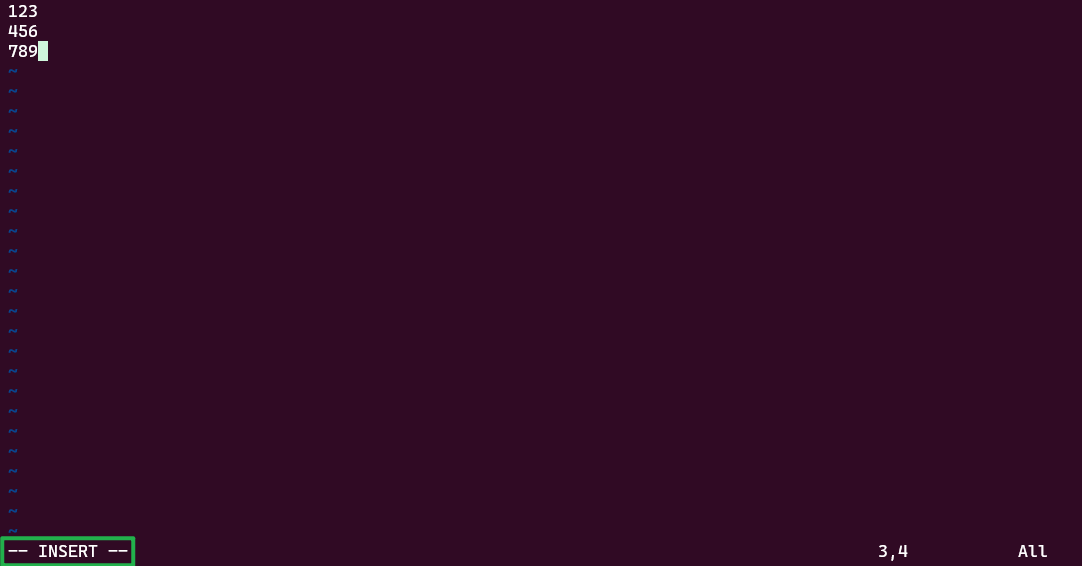
Okay, Vim looks like a rudimentary Nano. Try not to worry about how to save or exit. Let’s start by typing first, such as typing “123” in the first line. I believe you will notice something is “wrong” immediately as no letter is typed on the screen. What is happening?
It turns out that we are now in the normal mode. Because users can only navigate the file and do simple operation (like copying and cutting) in this mode, “123” was not typed into this file. So how can we type something into it? To do it, we need to go to the insert mode. One key to insert mode is to press i (Yes, the letter i).
You can view the normal mode as the starting point to any other modes. To return to normal mode, just press Esc key.
Insert Mode#
After we go to insert mode, Vim will indicate the current mode at the left bottom corner. You can now type in “123” or anything you want. This example types in three lines of numbers. Besides, you can use your friendly ↑, ↓ and Left or Right arrow buttons to move around like using a normal Windows Notepad. Very easy!
In fact, pressing i key means to insert texts before the cursor. This is the most commonly used key to enter Insert mode. There are other keys to enter Insert mode in Vim:
- I (Insert at beginning of line): Inserts text at the beginning of the current line (before the first non-blank character).
- a (Append): Inserts text after the cursor.
- A (Append at end of line): Inserts text at the end of the current line.
- o (Open line below): Opens a new line below the current line and enters Insert mode at the beginning of the new line.
- O (Open line above): Opens a new line above the current line and enters Insert mode at the beginning of the new line.
- s (Substitute): Deletes the character under the cursor and enters Insert mode to replace it.
- S (Substitute line): Deletes the entire current line and enters Insert mode to replace it.
- c (Change): Requires a motion. cw change word, c$ change to end of line, c} change paragraph.
- C (Change to end of line): Deletes from the cursor to the end of the line and enters Insert mode. Equivalent to c$.
It’s impossible to remember all keys at once. So start with i and a because they are the most fundamental and frequently used.
Normal Mode#
As shown in the image above, we have typed in three lines of texts. After we finish typing, we want to save it. In Vim, operations like saving and searching are all available only in the normal mode. To return to Normal mode, press key Esc. If you see “– Insert –” disappear at the left bottom, you are now back in the normal mode.
Moving in Vim#
Where is the cursor now? The numbers at the right bottom actually indicates that. “3,3” means the cursor is now pointing to the 3rd character at the 3rd line, which is “9”. To move the cursor, please stick to the following cheatsheet:
h |
Move the cursor one character to the left. |
j |
Move the cursor down one line. |
k |
Move the cursor up one line. |
l |
Move the cursor one character to the right. |
0 |
Move the cursor one character to the beginning of the line. |
$ |
Move the cursor one character to the end of the line. |
w |
Move the cursor forward one word. |
b |
Move the cursor backward one word. |
G |
Move to the end of file. |
gg |
Move to the beginning of file. |
Here’s a handy tip: prefacing a movement command with a number will execute the movement multiple times, e.g., 6k moves the cursor up 6 lines. This tip also applies to other commands too!
The way to learn is to practice. Take a few minutes to try them out! Once you feel you are getting the hang of it, let’s move on to some editing.
Editing in Vim Style#
Now you know how to move around, let’s try editing. Please stick to the following cheatsheet:
u |
Undo the last operation. |
Ctrl + r |
Redo the last undo. |
x |
Delete the character where the cursor is on. |
dw |
Delete the word from where the cursor is on (Tip: The cursor needs to be at the beginning of a word if you want to delete the whole word). |
dd |
Delete the whole line. |
d0 |
Delete to the beginning of a line. |
d$ |
Delete to the end of a line. |
dgg |
Delete to the beginning of the file. |
dG |
Delete to the end of the file. |
You may have noticed several commands combine keys of edit and movement like dgg. This shows an angle of why Vim is more powerful than other editors.
Copying and Pasting in Vim#
Actually, the texts deleted by using the command d are stored in a buffer. You can easily paste those texts back to the document from the buffer as well. This is equivalent to cutting.
In addition to cutting, the command for copying is y (meaning “yank”). The key combination for y is similar to d.
After you cut or copy something, simply move the cursor to where you want to paste it and press p key to paste.
There are cooler features of using visual mode to copy or cut texts. If you are interested, you can read the following online documentation:
Saving and Quitting in Vim#
Finally, we need to save this file and quit the editor. Saving a file is equivalent to writing it to the disc. So the command to save is w. However, we need to use the command-line to do it. To enter the command-line, we need to press the colon key :. After that, you will see a colon at the left bottom with a cursor ready for input:

Now type in w and press Enter. This will write the file to the existing filename. If it doesn’t have a filename, type in w [filename] instead. Then you should see Vim prompts the file has been “written”:

Nice! We can quit Vim after saving by pressing the colon : again and entering q (‘q’ stands for quit). You are now back to the Linux terminal.
The command w and q can be merged. After pressing : to call out the command-line, you can type in wq to save the file and then quit in a row.
That’s it! You’ve now learned the basics of Vim. Vim isn’t a must skill to learn. So if you feel difficult to work on it, no need to stress at all. Feel free to work on any editor you feel comfortable. Even a GUI-based editor on MacOS or Windows is fine.
Moving On#
Linux is a complicated system. But to work with Git, we only need to learn about the basic knowledge of Linux. Without further ado, let’s move on to forking and your first Git command, cloning.
Further Reading#
The page only includes a small subset of commonly-used shell commands. If you want to learn more, please feel free to search online for more complete tutorials.
- A complete Unix textbook can be found here.
- A GNU Bash Manual can be found here.
- A handy cheat sheet for many common commands can be found here.
- For the command-line editors, please read Vim help files, Nano Command Manual and Getting started with Nano for more features like searching and replacing.
- If you find this
Vimtutorial boring to follow, you can try out this online interactive tutorial.