Outline#
While former chapters focus on the command line, Visual Studio Code offers a powerful, intuitive graphical interface for Git right out of the box. This page will walk you through the essential Git operations using the built-in “Source Control” plugin. A VS Code official doc and a Youtube video tutorial are also available.
Prerequisites:
- Visual Studio Code: Download and install it.
- Git: Download and install Git. VS Code needs Git to be installed on your computer to work.
1. Plugin Panel#
First, open the Source Control panel by clicking the icon ![]() that looks like a branching path in the Activity Bar on the left side of VS Code. This panel is your hub for all things Git. It consists of two parts: CHANGES view and GRAPH view.
that looks like a branching path in the Activity Bar on the left side of VS Code. This panel is your hub for all things Git. It consists of two parts: CHANGES view and GRAPH view.
- CHANGES View:
This is the top section. When you modify, create, or delete files in your project, they will appear here. This section can be divided into three parts:
- Views & More Actions (
...):
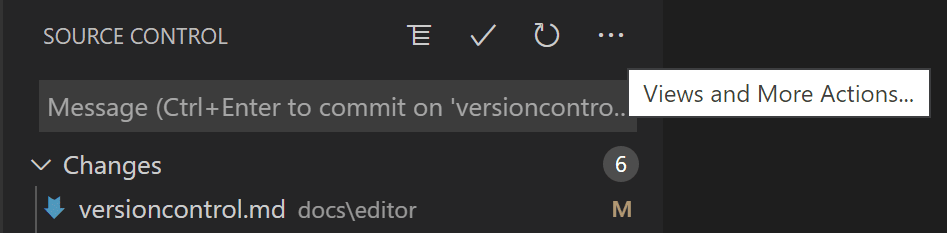
- The first button can switch the File List between “View as List” and “View as Tree”. The second “✓” button is used for committing changes. The last button is for manual refresh.
- The
...button at the top-right of the panel is a treasure trove of almost all commonly-used Git commands. We’ll do some Git operations using this treasure trove later.
- Commit Box:

- This is the message box at the top of the panel. A “commit” is a snapshot of your staged changes at a specific point in time.
- Every commit needs a descriptive message explaining what you changed and why. This is where you’ll write that message before finalizing the commit.
- The large Commit button does the same thing as the second “✓” button in Views & More Actions (
...): commit changes.
- Change List:
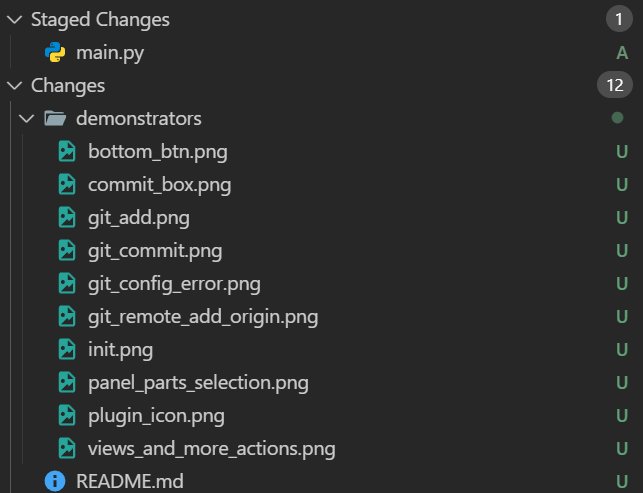
- This is where you see a list of changes made to the Git project, no matter staged or unstaged.
- Files are grouped into Changes (unstaged) and Staged Changes. Think of “staging” as putting items in a box, getting them ready to be saved. Unstaged files are just files you’ve touched but haven’t put in the box yet. Recall the brief explanation of Git Model in the second chapter.
- Views & More Actions (
- GRAPH view: This view sits under the “CHANGES” view:
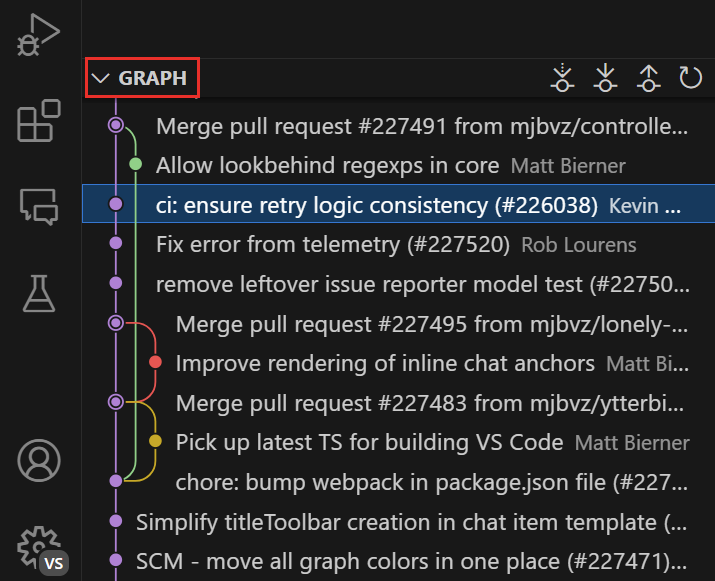
- This is where you see the tree of commit history.
- With the help of plugin “Git Graph”, you can also examine all commits in detail:

- Below the GRAPH section, you can also find a status bar at the left hand side where sits two buttons to help you do git branching and project publishing.

2. Git Project Initialization#
Suppose you have a new project in a folder and want to start tracking it with Git. You need to initialise it with Git at first.
- Open your project folder in VS Code (
File > Open Folder...). - Navigate to the Source Control panel.
- You will see a blue button that says Initialize Repository. Click it.
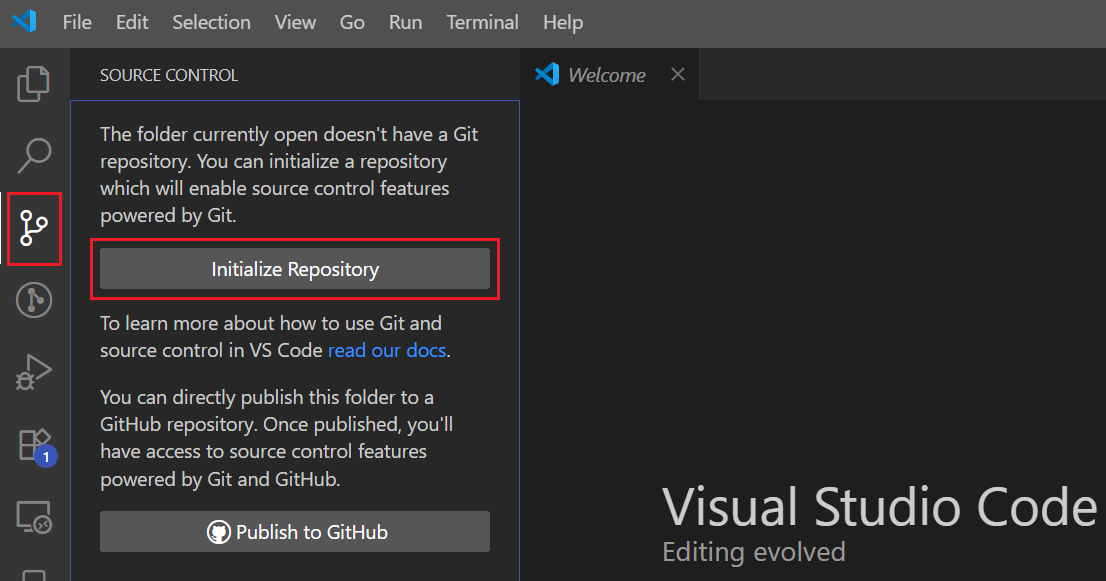
That’s it! VS Code has just run git init in your folder. You’ll notice a (master) or (main) branch indicator in the bottom-left status bar, and your files will appear in the “Changes” view, ready to be committed.
2. How to Fork & Clone#
Alternatively, you can fork a project on GitLab and clone it to your computer in VS Code.
This video will show you how to fork a project on GitLab:
You can then use VS Code to clone this project to your computer:
3. User Name & Email Configuration#
Before you make your first commit, Git needs to know who you are. This information is attached to every commit you make. We recommend you to run two simple commands in the Terminal to do this step:
- Open the integrated terminal in VS Code (
View > Terminalor Ctrl+Shift+`). -
Type the following commands, replacing the placeholder text with your own information:
git config user.name "Your Name"
git config user.email "youremail@example.com"
Git will now stamp every commit you make with this name and email.
If you want your name or email settings to be applied to all local repositories, you can modify the commands by adding a --global flag, such as git config --global user.name [Your Name], to set your name and email address globally.
4. Git Add (Staging Changes)#
Suppose you’ve written some code and modified a few files. Now you need to tell Git which specific changes you want to include in your next commit. This is called staging.
- Stage a Single File: In the “CHANGES” view, hover over a file you’ve modified. Click the
+(plus) icon that appears on the right hand side. This file will then move from the “Changes” list to the “Staged Changes” list. - Stage All Files: Hover over the “Changes” title bar and click the
+(plus) icon there to stage all modified files at once. This is equivalent to commandgit add .orgit add --all.
Staging gives you precise control, allowing you to build up a commit with only the relevant changes.
5. Git Commit#
A commit is a permanent snapshot of your staged files. Here’s a video of how to commit changes on VS Code:
In short, you need to do the following steps:
- Stage Your Changes: Follow the steps in section 4 to stage the files you want to save.
- Write a Commit Message: Go to the message box at the top of the Source Control panel. Write a clear, concise message. A common convention is a short summary (e.g., “Add user login feature”) followed by a more detailed description if needed.
- Commit: Click the “✓ Commit” icon at the top of the panel.
Your staged changes are now safely recorded in your project’s history!
A tip of Commit All: If you want to commit all currently modified files without staging them first, you can use the ... menu. Click ... > Commit > Commit All. This will automatically stage all your changes and commit them with your message.
6. Git Push (Sending Changes to a Remote)#
Commits only exist on your local machine until you push them to a remote repository (like on GitHub, GitLab, or Bitbucket). This video shows you how to do it on VS Code:
If you are pushing for the first time:
- After your first commit, you’ll often see a blue button that says Publish Branch.
- Clicking this will prompt you to enter the URL of your remote repository. After you provide it, VS Code will push your code and “link” your local branch to the remote one.
If you are pushing subsequent changes:
- Option 1: Sync Button: The easiest way is to click the circular arrows icon
 or
or  icon in the status bar at the bottom-left. This button shows pending changes to pull or push. Clicking it will perform a “Sync,” which pulls remote changes and then pushes your local commits.
 - Option 2: Via the
...Menu: Click...> Push.
If you are pushing to multiple upstreams:
Sometimes you might have more than one remote (e.g., your own copy, called origin, and the original project, called upstream).
- Add a new remote: You typically do this via the command palette. Press Ctrl+Shift+P, type
Git: Add Remote, and follow the prompts to give the remote a name (e.g.,upstream) and a URL. - Push to a specific remote: Click
...> Push to…. VS Code will then show you a list of all your configured remotes, and you can choose exactly where to send your commits.
7. Git Pull (Getting Changes from a Remote)#
When you’re collaborating, others will be pushing changes to the remote repository. To get those changes onto your local machine, you pull.
- Sync Button: As mentioned above, the circular arrows icon in the status bar is the primary way. It will indicate if there are new changes to pull down.
- Via the
...Menu: Click...> Pull. This fetches the latest changes from the remote and merges them into your current branch.
8. Git Merge (and Handling Conflicts)#
A “merge” happens when you combine changes from two different branches. This occurs automatically when you git pull, but you might also merge branches manually. Sometimes, Git can’t figure out how to combine the changes automatically. This is called a merge conflict.
When a conflict occurs:
- VS Code will immediately alert you. The conflicted files will be highlighted in the “Changes” view under a new “Merge Changes” section.
- Open a conflicted file. You will see the conflicting sections marked with:
<<<<<<< HEAD(your current changes)=======(a separator)>>>>>>> [some other branch name](the incoming changes)
- VS Code provides helpful links above the conflict block:
- Accept Current Change: Keep only your version.
- Accept Incoming Change: Keep only the other version.
- Accept Both Changes: Keep both versions, one after the other.
- Compare Changes: Opens a side-by-side view to help you decide.
- Resolve the Conflict: Click the actions or manually edit the file until the code is exactly how you want it. Make sure to delete the
<<<<<<<,=======, and>>>>>>>markers. - Finalize the Merge: Save the file. Then, in the Source Control panel, stage the resolved file by clicking the
+icon next to it. - Once all conflicts are resolved and staged, make a new commit. VS Code will automatically populate the commit message with “Merge branch …” for you. Just click the checkmark “✓ Commit”.
Alternatively, you can resolve conflicts in the terminal following the instructions in this previous chapter.
9. Git Revert & Reset (Undoing Mistakes)#
Undoing things in Git can be tricky. Here’s how to handle it in VS Code without extra plugins.
Git Revert: Undoing a Public Commit Safely
Remember, a revert doesn’t delete a commit. Instead, it creates a new commit that does the exact opposite of the bad commit. This is the safe way to undo changes that have already been pushed.
While VS Code’s core UI doesn’t have a big “Revert” button, many Git graph extensions add it. Without an extension, the command line is your friend:
- Find the hash (the unique ID) of the commit you want to revert (you can see this in the commit history in “GRAPH” view).
- Open the terminal and type:
git revert <commit-hash> - Git will create the new, reversed commit for you.
Git Reset: Rewinding Local History
A reset moves your branch pointer back in time, potentially discarding commits. Use with extreme caution, especially on pushed commits!
VS Code provides one very safe and useful reset operation:
-
Undo Last Commit: Made a mistake in your last commit? Click the
...menu > Commit > Undo Last Commit. This will un-commit your changes, putting them back into the “Staged Changes” area. Your work isn’t lost—it’s just no longer committed. This is equivalent togit reset --soft HEAD~1. -
Discarding Changes (Hard Reset on a File): If you want to completely throw away the modifications you’ve made to a file (before committing), go to the “Changes” view, hover over the file, and click the curved arrow icon
 .
.
For more complex resets (--hard, --mixed), it’s often safer to use the terminal, as you have more control.
Further Reading#
Congratulations! You’ve finished the last chapter of this Git manual. Once you are ready for more advanced Git techniques, we have a list of recommended resources which you can dive deeper:
- Pro Git is highly recommended reading. Going through Chapters 1–5 should teach you most of how to use Git proficiently. The later chapters are about more interesting and advanced materials.
- A complete Unix textbook can be found here.
- A GNU Bash Manual can be found here.
- For the command-line editors, please read Vim help files, Nano Command Manual and Getting started with Nano