This assessment requires you to complete two tasks testing your understanding of C programming and their relationship to x86-64 assembly.
We assume you have completed the week 1 and week 2 tutorials and watched the lectures.
Outline#
- Deadline: 14 August 2024, 11:59 pm
- Assessment template: link
- Specification: keep reading 🙂
- Weighting: 5%
- Marked out of: _ / 5
Rules and Policies#
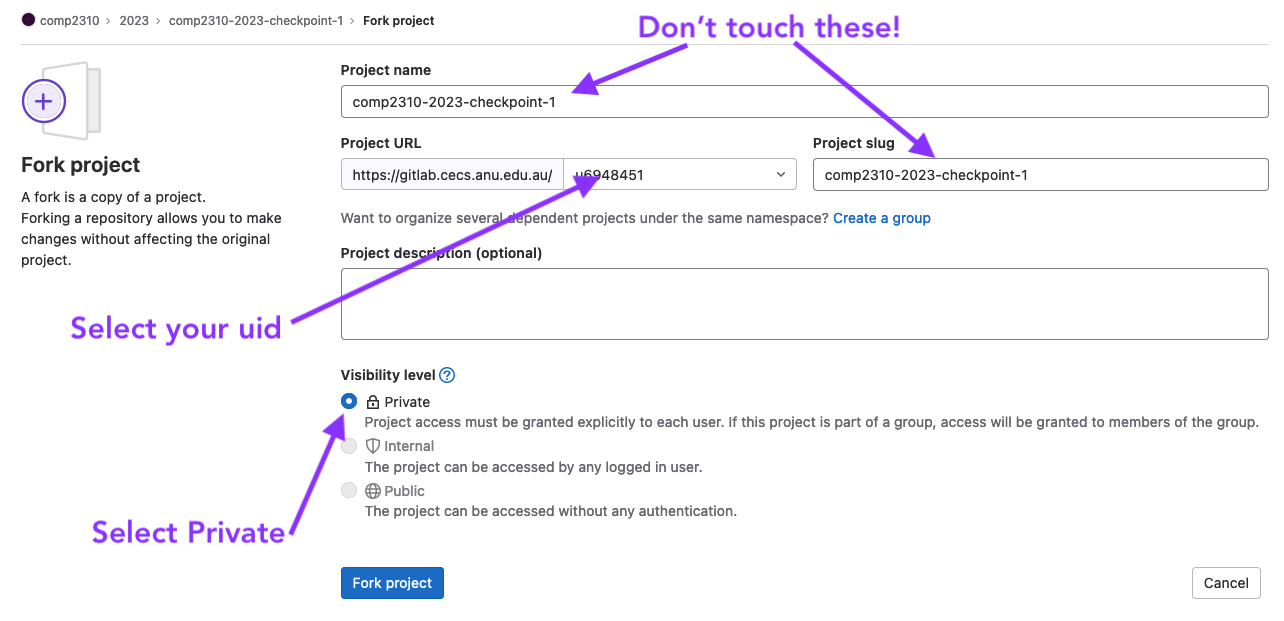
- this is an individual assessment task, ensure you fork your repo as private
- you may re-use code from your labs
- late submission is not permitted without an extension
Exercise 1 - Song Library (2.5 Marks)#
Complete src/ex1/song-lib.c to the following specifications.
Your task is to write a program in C that can read in from stdin to build a song library and then perform
commands on that data.
There has already been template code provided for you and your job is to complete that code to the following specifications.
Main#
Your program will have 2 phases:
Phase 1
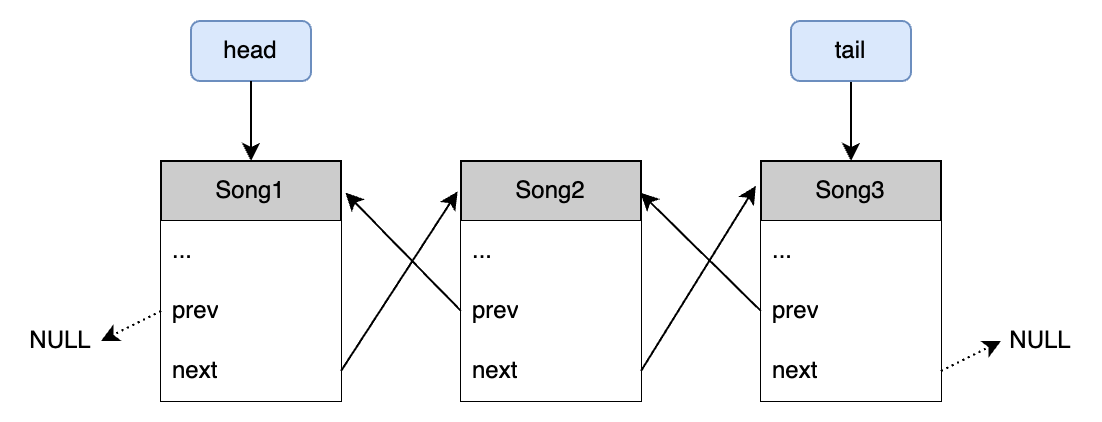
Your program will read in from stdin data about songs, and use the provided SongData struct to build a
doubly linked list, starting off by inserting the first song
at head and then inserting each following song after the previous one.
You created a singly linked list in lab 2. If you want more information, check out the resources section.
For example, after reading in 3 songs in the order Song1 -> Song2 -> Song3, your data structure should look like so:
Phase 2
To ensure that your data structures are being manipulated correctly, your program must print the songs from head to tail using the print_song() function. This needs to happen:
- after you have read in all the songs, but before you have processed any commands
- after you have processed all commands
Then, your program will read in commands from stdin, these commands are composed of 2 numbers:
- A command identifier: this tells you which command to execute
- A command index modifier: this tells you how far to traverse from your current item in the list before you perform your command
The commands are as follows:
| Command | Identifier | Action |
|---|---|---|
| DELETE | 0 | Delete the current item from the list |
| SONG_ID | 1 | Print the song id to stdout |
| SONG_TITLE | 2 | Print the song title to stdout |
| SONG_ARTIST | 3 | Print the song artist to stdout |
| LYRIC_LENGTH | 4 | Print the character count of the lyrics to stdout (does not include the null termination in the count) |
| LYRIC_CONTENT | 5 | Print the song lyrics to stdout |
| SONG_SIZE | 6 | Print the size used by the song to stdout |
| SET_TO_HEAD | 7 | Set the current index to head (ignore the command index modifier for this command) |
| SET_TO_TAIL | 8 | Set the current index to tail (ignore the command index modifier for this command) |
| LIST_LENGTH | 9 | Print the amount of elements currently in the list to stdout |
The commands work on a stateful index modifier, what this means is that your command index will begin at head, and then you will
transition your index forward or backward (using prev and next) from the current index by the amount specified in the
command index modifier.
For example:
At the beginning of your phase 2, your current index is pointing to head.
You receive the command:
- 1 (SONG_ID)
- 2 (Index Modifier)
You increase the current index by 2, traversing using next to now be pointing to the third element in the list.
You then print out the third element’s song_id to stdout.
You then receive the command:
- 3 (SONG_ARTIST)
- -1 (Index Modifier)
You decrease the current index by 1, traversing using prev to now be pointing to the second element in the list.
You then print out the second element’s artist to stdout.
The current index is stateful, so when we receive the second command, we modify the index that we arrived at from the previous command. Start = 1, then + 2, then -1.
The format#
Your main loop will work as such:
- Read in the number of items that will be added to the list (N,
int> 0) - Then for the next N * 5 lines, use the following information to build the linked list:
- read in the song id (
int) - read in the song title (can contain spaces)
- read in the artist (can contain spaces)
- read in the number of characters in lyrics (L,
int> 0) - read in the song lyrics (up to L characters not including the null termination / newline)
- read in the song id (
- After reading in all of the songs, your code must use the
print_songfunction to print the songs from head to tail - Read in an int representing the number of commands that will follow (Q,
int>= 0) - Add a variable (e.g.
current_song) to keep track of the current song and initially set it to point to the head of the linked list - Then for the next 2 * Q lines, read in the arguments and perform the corresponding actions
- read in the command (
int[0 - 9]) - read in the relative index adjustment (
int, signed as it can be negative) - process the command and index adjustment (read on)
- read in the command (
- After performing all of the commands, your code must use the
print_songfunction to print the songs from head to tail of the resulting list (after the commands have been processed)
- The title and artist input will be at least one character and at most 17 characters (not including the newline character).
- The lyrics input will be at least one character and at most L characters (specified by the previous input and not including the newline character)
Song struct#
A song contains the following information:
- id: an
intrepresenting the unique id of the song- note: you are NOT REQUIRED to ensure the uniqueness of this value
- title: a 17 character + null termination (18 in total)
char[]representing the title of the song - artist: a 17 character + null termination (18 in total)
char[]representing the artist of the song - lyrics: a varying length + null termination
char*containing the lyrics of the song - prev: a pointer to the previous song in the linked list (
NULLif it doesn’t exist) - next: a pointer to the next song in the linked list (
NULLif it doesn’t exist)
It is up to you to make sure the strings are null terminated and have enough space for the null termination character. A function has been provided to you to turn the first new-line character in a string into a null termination character.
Provided functions#
Implemented#
You are provided the following functions already implemented:
flush_buffer()- flushes the buffer until it hits a
\ncharacter (and consumes it) - useful to remove leftovers by a
scanfcall before using afgetscall
- flushes the buffer until it hits a
new_line_to_null_termination(char *text)- turns the first new line character into a null termination character in a
char* - useful to ensure that the first newline character is turned into a null termination
- turns the first new line character into a null termination character in a
Not implemented#
You are also provided the following functions to implement:
void insert_song_after(Song *after_song, Song *song)- inserts the
songargument into the linked list after theafter_songargument- updates
song’s prev / next as well as adjacent prev / next pointers to the expected values
- updates
- also updates head / tail if necessary
- after_song can be
NULL. In this case, the linked list is currently empty andsongis to be added as the first element of the list by setting head / tail
- inserts the
void delete_song(Song *song)- deletes the
songargument from the linked list
- deletes the
void print_song(Song *song)- prints out the given song in the format:
id: _ title: _ artist: _ lyrics: _ prev: X next: Y _are replaced with the values from the songXandYare the titles of the previous and next songs, orNULLif they don’t exist.
- prints out the given song in the format:
unsigned long song_size(Song *song)- calculates and returns the size of the song struct
int main()- the main code for the program, use it to tie everything together to meet the spec
Testing#
You can test your program using text files like so:
./ex1 < TEST_FILE_NAME
A test file called, ex1_test.txt has been provided for you, however it may not test all of the edge
cases so you’re encouraged to write your own additional ones.
As the test files aren’t the most easy to read, there is also a more human readable accompanying file
ex1_test_explainer.txt explaining what the commands are doing and on what index.
If you’re stuck trying pass the tests for this exercise, we recommend:
- Reading this specification very carefully as you may have missed a tiny detail somewhere.
- Focus on making sure the linked list you print out is correct before processing any commands. Any mistakes in creating the linked list will cause the commands you execute to return the wrong results. Make sure you’re using
scanf,fgetsand the provided functionsflush_bufferandnew_line_to_null_terminationcorrectly. - After than, implement and test each command individually before moving onto more complex tests involving multiple commands.
Specific workings#
fgets#
Your input will involve spaces, this means that scanf isn’t going to work so well anymore. You can use fgets
to get around this and read in a number of characters or up to a newline character.
fgets is a function that reads in from a
file stream. That isn’t super important yet (you will learn more file streams later in the course), but when using it to get it to read from the input like scanf you should use:
fgets(*string_to_save_to, number_of_characters_to_read, stdin);
where stdin refers to reading from command line.
Index traversal of 0#
This simply means do not adjust the current index.
Index traversal out of bounds#
If at any point, the index traversal requested by a command would mean going beyond the head or tail, then you simply ignore the extra steps and remain at head / tail.
For example if you had a current index pointing to the second element in the list, then received the command:
- 1 (SONG_ID)
- -3 (Index Modifier)
You would traverse using prev to get to the first element, however there is no longer a prev element from here, so you do not traverse further and discard the remaining -2.
Set to head / tail command#
When receiving any of these commands, it is expected that you ignore the previous index and set it to the head / tail respectively. You should also ignore the index modifier value for this command (treat it as 0).
Song title / artist / lyrics longer than expected#
In this instance you should only read in the expected length and then insert the null termination character at the end yourself. However you should still be sure to not leave anything hanging in the input buffer from stdin.
Deleting#
When deleting an element from the list, the pointers of the relevant items need to be updated:
- if the item was not the head, then the item’s previous element should no longer point to it, but instead the new next element
- if the item was not the tail, then the item’s next element should no longer point to it, but instead the new previous element
- if the item was the head, then the head should now point to the new head (next element)
- if the item was the tail, then the tail should point to the new tail (previous element)
- any instance where a pointer was previously valid but is now no longer, should be set to
NULL - the memory for the deleted item should be freed, including the lyrics
After deletion, the current index for commands needs to be updated as the previous item is now deleted. The default behaviour for deletion is that the current index should point to the deleted element’s previous element, the exceptions are:
- if the deleted item was the head, then the current index should point to the deleted element’s next element
- if the deleted item was both the head and tail (the only element in the list), then point to
NULL
Song size#
The size of a struct is the sum of the following:
- the memory used by the struct and all its members
- the memory used by the lyrics string (including the null termination character)
Exercise 2 - Reverse engineering x86-64 (2.5 Marks)#
In the first two weeks of lectures you saw several examples of how C code gets translated into x86-64 assembly. Your second task for this checkpoint is to do this translation the other way around. You will reverse engineer the provided x86-64 assembly code and write the corresponding C code.
The x86-64 assembly is provided to you in the hack_compiled.S file. This file is your guide for determining the C code we used to produce it. You are given five functions, func1 to func5. Each of these functions has a corresponding C function in the hack-solution.c that you will have to fill out.
For example, here is the assembly code for func1:
func1:
.LFB39:
  .cfi_startproc
  endbr64
  movslq  %esi, %rsi
  movslq  %edx, %rdx
  movl  (%rdi,%rdx,4), %eax
  addl  (%rdi,%rsi,4), %eax
  movslq  %ecx, %rcx
  addl  (%rdi,%rcx,4), %eax
  cmpl  %r8d, %eax
  jne  .L3
  leal  1(%r8), %eax
  ret
.L3:
  movl  $-1, %eax
  ret
  .cfi_endproc
This is the corresponding function you must fill out in the hack.c file:
int func1(int *a, int i, int j, int k, int sum) {
  int ret;
  // function body
  // to be filled in
  return ret;
}
You should read through the hack.c file carefully! Each function’s type signature will tell you the number of arguments it takes, what type each argument is, and the type of the value it returns. For task 1, this tells you that the function expects as arguments one pointer of type int “a” and four additional integers i, j, k and sum. While the assembly code does not use these variable names directly, each function follows the x86-64 Linux calling convention, allowing you to determine which register each argument is in when function is called. This is the starting point you should use to determine what each function does.
You will not need to modify the hack-compiled.s file, nor should you modify the function signatures, or any variables currently present in the hack.c file.
Reverse engineer each of func1, func2, func3, func4, func5 in the hack-compiled.s file, and write the corresponding C code in hack.c.
Guidelines for your C code#
The C code that produced hack-compiled.S could have included the following:
- Control flow structures:
for/while/if/switch - Array accesses
- String traversal
- Arithmetic (addition, subtraction, multiplication, division, division by powers of 2)
Tips#
Useful Resources#
Definitely check out the resources we link at the end of this document. Especially the lectures; there will be some things in this exercise that weren’t in the jacobsthal example from Lab 2, but were discussed in the lectures!
Googling particular instructions, like movzbl and leaq, can also be helpful.
Things to ignore#
There’s some extra boilerplate in the x86-64 output which doesn’t affect the semantics of the program and which you can safely ignore. This includes:
- The
endbr64instruction at the beginning of functions (which is for security reasons) - The
.LF...labels - Any line that starts with a dot such as
.cfi_startproc,.size func1, .-func1, etc. These are just assembler directives that give the assembler more information, which you should be familiar with them from ARM assembly.
Some other details:
- Registers by default are 64 bits, but Intel has instructions to operate on only parts of a register such as the
last 32 bits if not using all of the register, such as for
ints. In these cases, different names for registers may be used but they are in fact the same, e.g.rdx,eax,axandalare all the same register. This can give you a bit of info about the type of the variable stored in these registers (e.g.chars are 1 byte so they are stored inal), but for the most part you can ignore it. - The compiler may rearrange blocks of code or negate conditions in if statements when compiling them, which you will have to deal with.
Arrays and pointers#
Some of the functions have arguments of type int *. Recall that arrays can also be treated as pointers, so something
like int *a may actually be an array (i.e. the same as int[])! Array accesses have a very particular form in x86-64 which
should be a dead giveaway, which you can find info on in the lectures.
A hint about func4#
You will notice the numbers 97 and 122 in func4. What could these mean? Hint: notice the input is of type char *,
so these could be characters. How might they be interpreted as characters?
Calling Convention#
The relevant parts of the calling convention that the provided assembly code follows is:
- The first six arguments to a function are stored in registers
%rdi,%rsi,%rdx,%rcx,%r8,%r9, respectively. If a function takes more than 6 arguments, the extras are stored on the stack (note that none of the functions you are given take more than 6 arguments, so you will not need to worry about this). - The return value of a function is stored in
%rax. %rspis the stack pointer, and%rbpis the base pointer (see the x86-64 Assembly: Procedures lecture for more information)
For example, the following C function foo will have x stored in %edi, y stored in %rsi and c stored in %rdx. The return value of the function will be in %eax.
int foo(int x, long y, char *c) {
  return -1;
}
Testing Your Code#
There is another file you are provided, driver.c, that contains some test cases. Feel free to add additional test cases to the file if you wish. The provided Makefile in the src/ex2 folder will build two executables:
-
student-exec: This will produce an executable that runs the code your write inhack-student.c. You can build this using the commandmake student-exec. -
solution-exec: This will produce an executable that runs thedriver.ccode against the provided assembly code inhack-compiled.s. You are allowed to use this to see what the intended behaviour of the functions are. You can build this using the commandmake solution-exec.
You will most likely be unable to build and run solution-exec on non-Linux systems. This is because the provided
assembly code was generated on a Linux machine, and there are differences in how different operating systems handle things like linking and calling conventions. This should only apply to building the solution executable - you will be able to work on and build the student-exec on your own machine. If you are using Windows, you can use the Windows Subsystem for Linux (WSL).
Starting from Lab 4 you will likely need to use Linux anyway since we will start to use the operating system API, but
for this checkpoint it is not strictly necessary. You don’t need to be able to compile hack_compiled.S - you can do
the exercises from just reading and understanding what the assembly code does. Being able to run it is just a potential
way of making sure your own code behaves the same.
Marking#
Your code will be auto-marked based on the test cases provided in the CI. We will also be taking a brief look at your code to make sure you haven’t done something like hardcode your functions in exercise 2 to return the values that are expected by the test cases (which will warrant a zero, by the way)!
Marks are split 50/50 between the two exercises.
Helpful resources#
- Lecture slides about x86-64 from week 1 and week 2
- Reference on x86-64
- Info on doubly linked lists
Submission#
Submission is through GitLab, the most recently pushed commit of your fork of the assessment template before the deadline is taken to be your assessment submission.
Getting Started#
- read this assessment page completely
- fork and clone the assessment template
- ensure you fork your project as private
- do NOT change the name or path of the repo, or it may get missed by our software
- work on each task, testing, committing and pushing as you go
- make a mistake or get stuck, then ask a good question on the course forum.
Completion Checklist#
- you have completed the code in the files provided and have not renamed or moved them
- you have run your files against local test(s) and they pass successfully
- you have created your own tests for your files and they pass successfully
- you have saved, committed and pushed your files to gitlab
- you have filled out, committed, and pushed your statement of originality
- you have checked the gitlab ci tests and they are passing
- you have checked the pdf artifact on gitlab to ensure it is correct
Gitlab CI and Artifacts#
For this assignment, your repo will be partially marked automatically (a tutor will still sight it) based on the tests on gitlab. This is the CI that you may have already been seeing in the labs, however now it isn’t just for your benefit, so it’s important that you understand and check it.
The correctness of your implementations will be marked based on passing the tests for each of the
exN.c files. These tests will be similar to the ones that are already present in the repo, however some may check
extra edge cases that aren’t present in the local files. If you’re failing tests in the CI then it is best
to have a look at the CI results for these tests and see if they are giving you hints as to why.
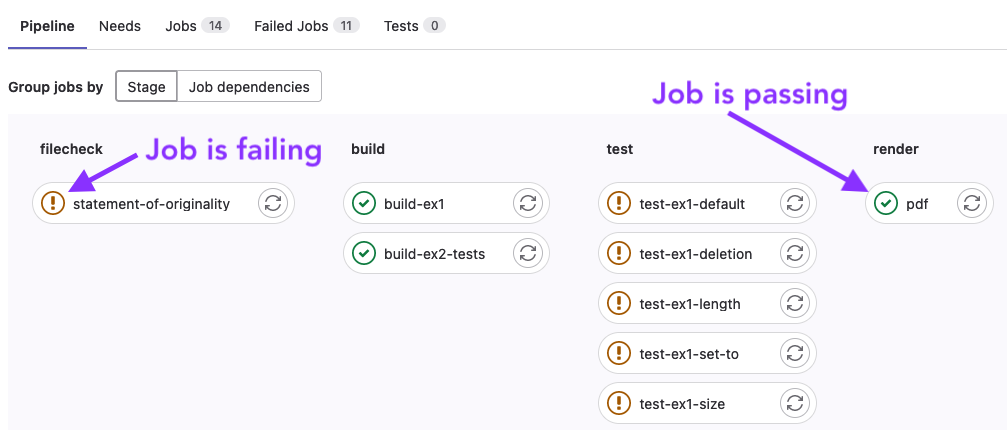
To view the CI pipeline for your repo, click on the little icon to the right of your most recent commit.
![]()
Then you’ll be presented with a list of the jobs, you’ll want to make sure that the jobs are passing once you’ve completed the corresponding task.
Filecheck stages ensure that the file exists and has been updated from the default. Test stages run the submitted files against our tests to measure correctness.
PDF Artifact#
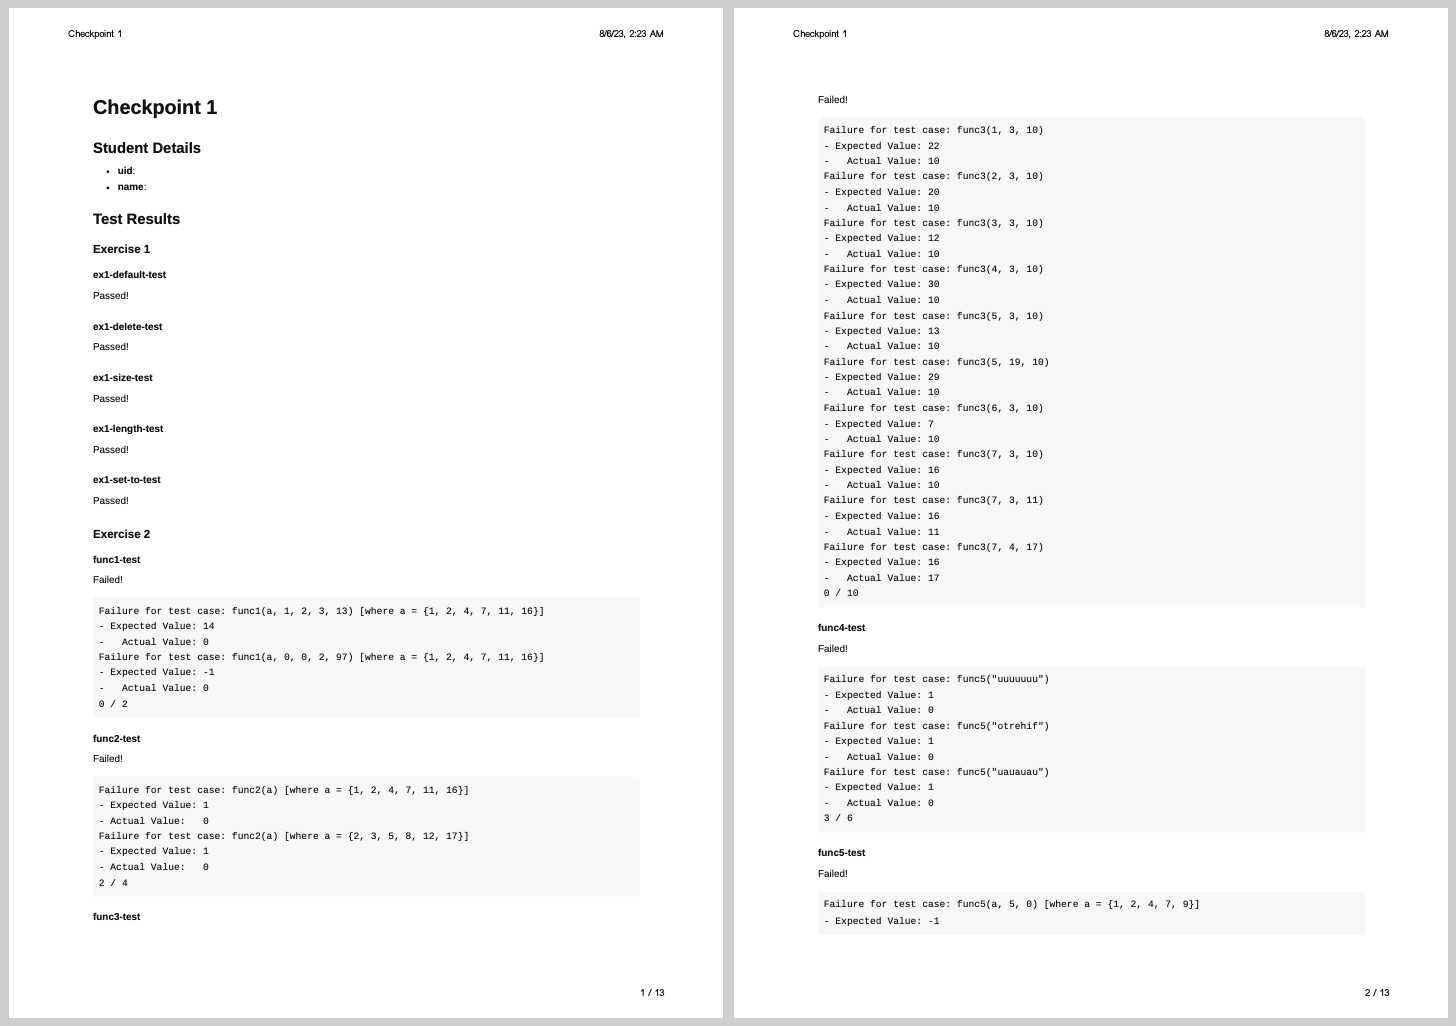
Your repo will be packaged into a pdf for marking purposes. As such it is important that you see what the result
of the pdf job is and make sure the output makes sense.
It will:
- take your name and uid from the
statement-of-originality.md - take code from your
exN.cfiles - take test results from the CI
- take references from the
statement-of-originality.md
To view the pdf, first click the ci icon on your most recent commit (as above), then click on the
pdf job.
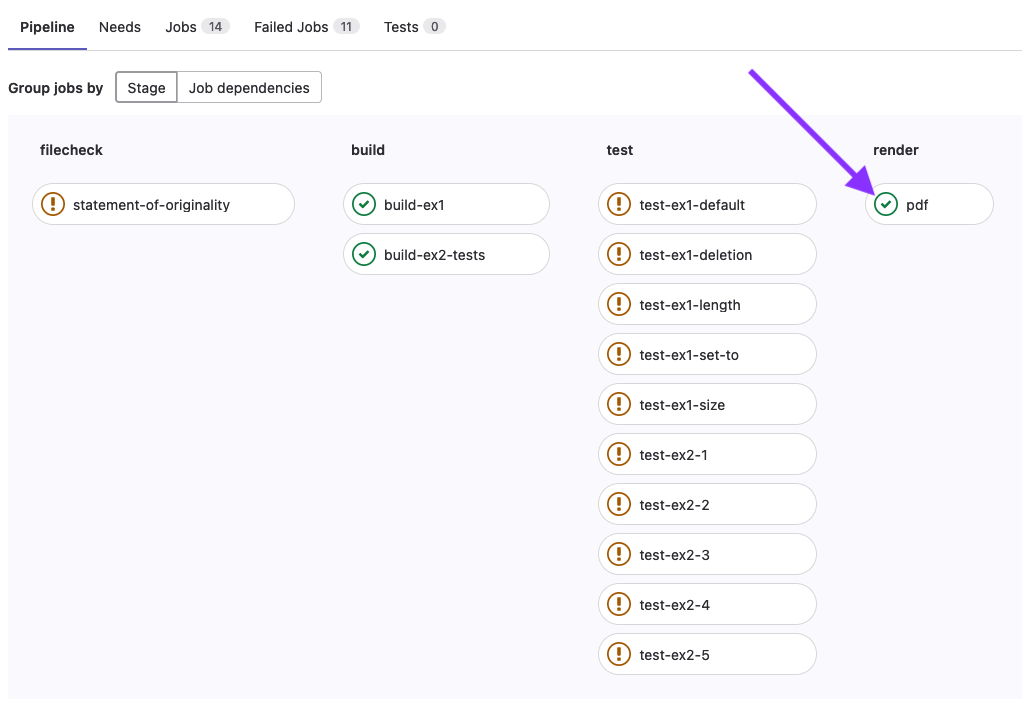
Then, you’ll be taken to the job page, where you should see a “Job Artifacts” section, click on the Download button.
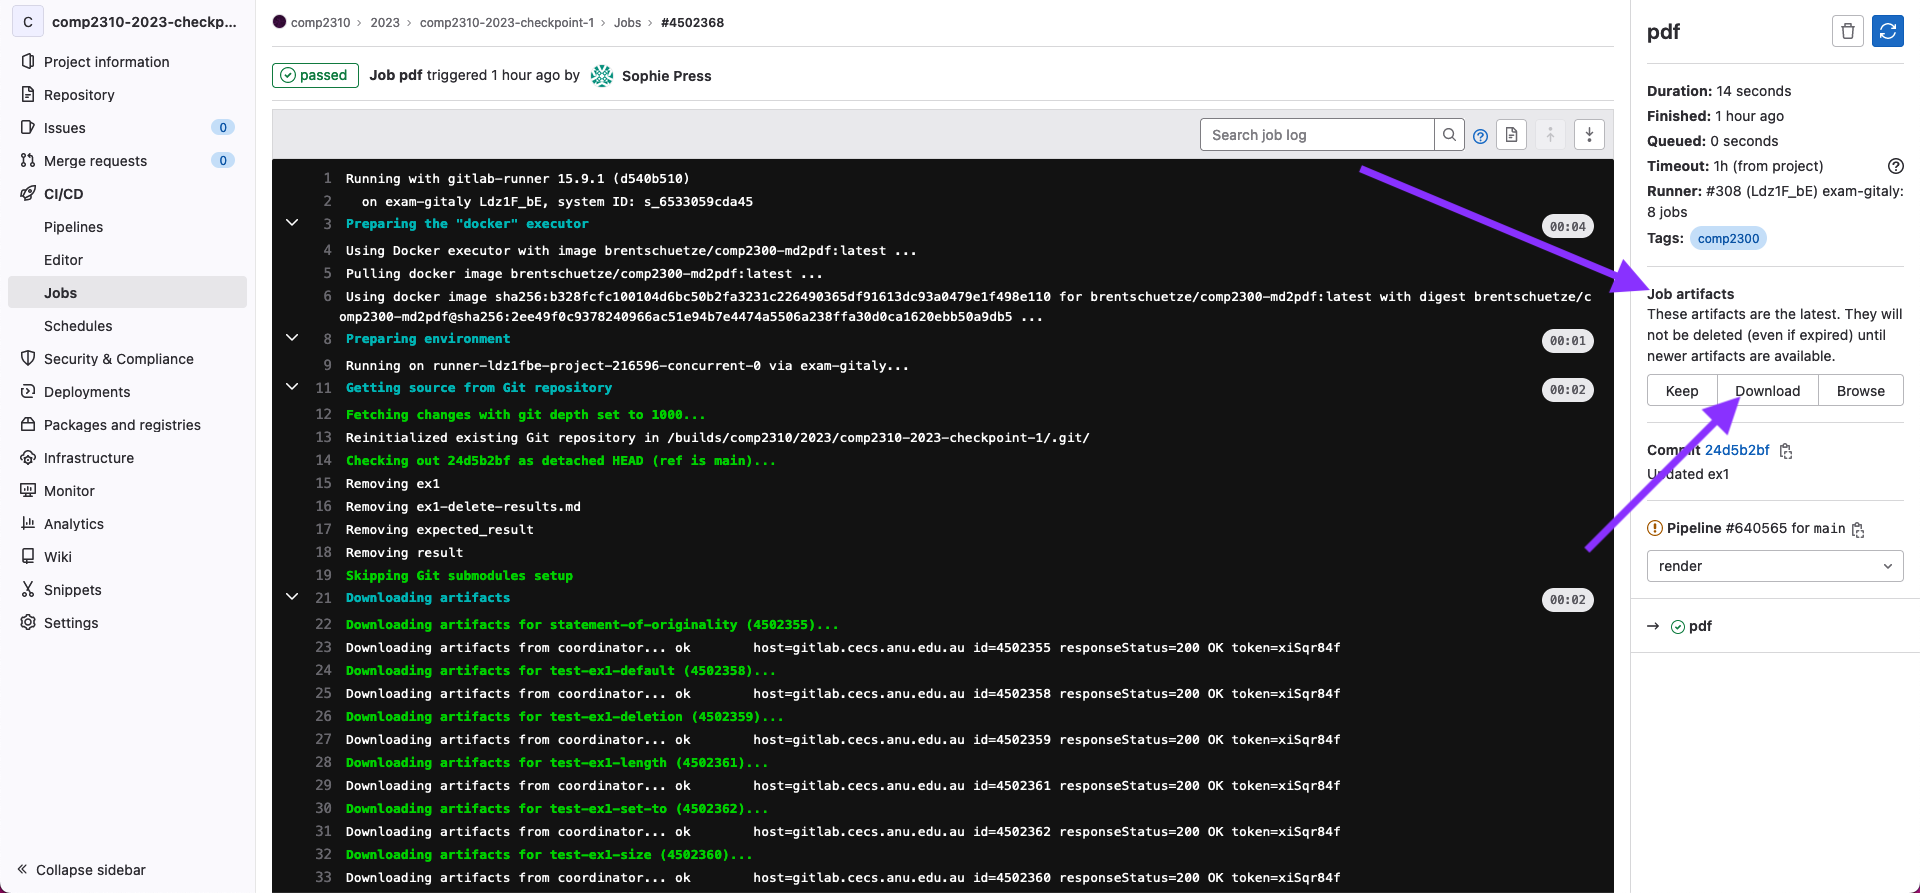
This will download a zip file containing your pdf. Which should look something like this.
FAQ#
My code don’t work, can I email you for help?#
Sorry, you won’t get help over email or Teams. We provide a course forum which is the only way we are able to help outside of labs.
Forum posts related to your assessment submission must be “private” if they contain code or other sensitive information (as for any individual assessment task).
It’s [5 minutes, 60 minutes, 12 hours] before the deadline and my CI Jobs aren’t finishing!#
Unfortunately on the day that an assessment is due, when many students are pushing updates at once, the CI servers can’t keep up. You may not see your CI jobs finish before the deadline. You will just have to manually check that your files have been submitted correctly and that you are passing tests locally.
The best way to avoid this issue is to start early and finish early 😇
If there’s any issues with your git repository after the deadline. Please let us know (after the deadline) through a private forum post and there may be something we can do.
How do I know my assessment has been submitted?#
If:
- the files in your fork of the assessment are correct (i.e., the files you intend to submit) when checking on the gitlab website
- the time is before the deadline
then your assessment has been submitted (well done!).
Please don’t ask us to “check”, we would be just doing exactly the same thing as the above steps which you can do yourself.